Hey friends,
To build your first Agentforce agent, open Agentforce Studio from the App Launcher, click New Agent, describe the job in plain language, then add a subagent, give it actions, write reasoning instructions that say when to use each action, preview the conversation, and finally commit and activate a version. That's the whole loop. The rest of this post walks through it with a real example.
I'm following the flow Salesforce uses in its own hands-on project, Quick Start: Assemble a Service Agent with Agentforce Builder, where you build a booking agent for a fictional resort called Coral Cloud. I'll explain why each step matters, which is the part the click-by-click instructions skip.
Before you start: get an org
You need an org with Agentforce turned on. The easiest route is the Trailhead project itself: it asks for a special Agentforce Builder Playground. Trailhead warns that these playgrounds are time-limited and that you lose access if you don't finish before the org expires, so plan to do the build in one or two sittings.
A quick note on names: Copilot, the legacy builder and the new builder
Einstein Copilot is now Agentforce. Starting January 2025, Salesforce renamed the Einstein Copilot for Salesforce agent type to Agentforce, with no change in functionality (release note). In Setup you'll see Agentforce or Agentforce (Default) for the agent name and type, and permissions, UI labels and Help were updated to match. If a tutorial or exam question says "Copilot", read it as the employee-facing Agentforce agent.
There's also been a builder change. Salesforce rebuilt the experience as the new Agentforce Builder, and calls the earlier one the legacy builder (Trailhead). The new one lives in Agentforce Studio, uses Agent Script under the hood, and lets you switch between a document-style Canvas view and a Script view. Older tutorials show the legacy screens and talk about "topics". In the new builder the same building block is called a subagent.
Step 1: Create the agent
- Open the App Launcher, search for Agentforce Studio and open it.
- Click New Agent. Agentforce Builder opens in a new tab.
- Describe what the agent should do. In the Coral Cloud example: a customer service rep who helps guests make reservations, update bookings and find their way around the resort.
- Give it a name, and assign the user record the agent runs as. That user controls what the agent can access.
- Answer any follow-up questions, or click Skip Ahead to fill in the details yourself.
Why the description matters: Agentforce uses it to draft the agent's details and subagents for you. A vague description gets you a vague starter agent. Write it like a job description: role, company, the tasks it handles.
Why the user matters: an agent can only see and do what its assigned user can. If an action fails in testing, check that user's permissions first.
Step 2: Learn the layout
The builder has three areas: the Explorer on the left, the editor in the middle (Canvas or Script view), and the Agentforce Assistant panel, which edits the agent for you when you ask in plain language. It always shows proposed changes and asks you to accept them.
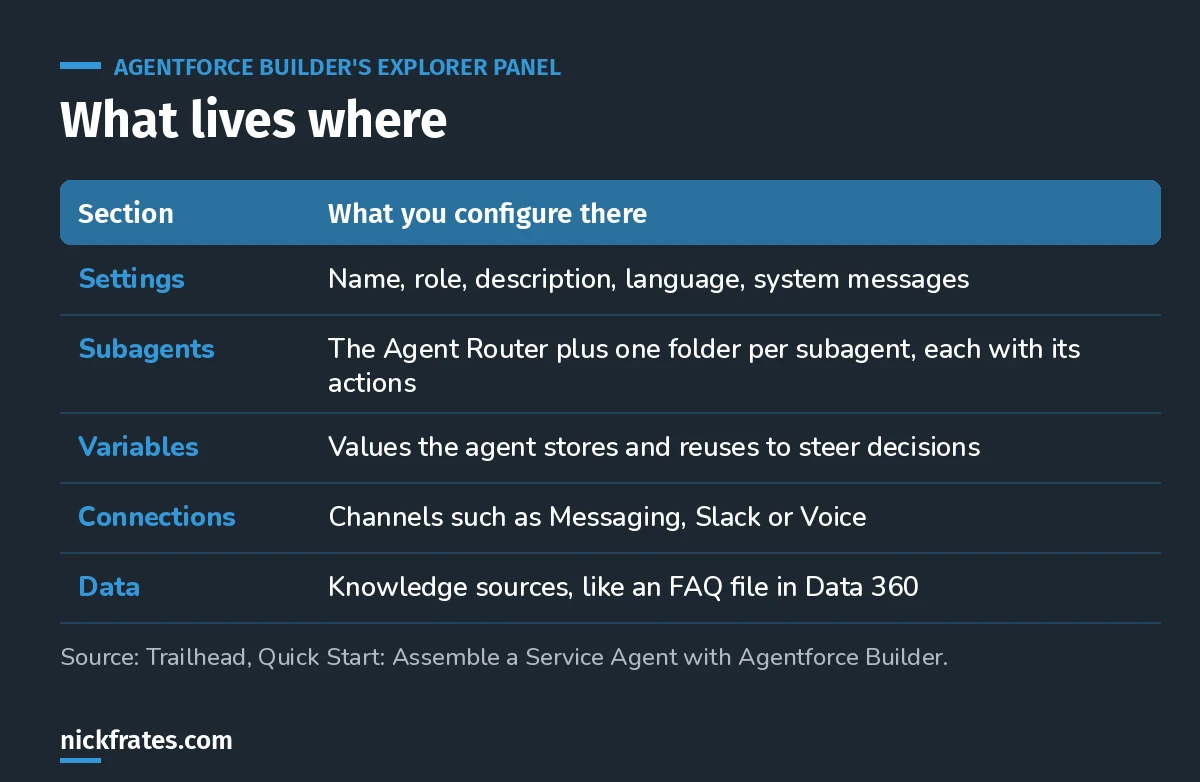
Subagents is where you'll spend most of your time.
The Agent Router inside Subagents is the piece that decides which subagent handles a message, based on what the user said and the conversation so far.
Step 3: Add a subagent
A subagent is a job area. Coral Cloud needs one for booking resort activities, which they call experiences. In the Explorer, click the plus icon next to Subagents, choose New Subagent, name it Experience Management and give it a description.
The description isn't decoration. The router reads it to decide whether a message belongs to this subagent. Say what the subagent covers and, if it helps, what it doesn't.
Step 4: Give it actions
Actions are the tools a subagent can use to do the work. In the project, the Experience Management subagent gets four:
- Get Experience Details: a custom action that points at a flow. Its experience name input is marked Require input to execute action, and its output is marked Show in conversation.
- Get Customer Details: another flow-based action that checks email and membership number against a contact. Both inputs are required.
- Get Sessions and Create Experience Session Booking: existing actions added from the Asset Library, so you don't rebuild what already exists.
Each action has a reference action type (flow, Apex, prompt template and others) and a reference to the thing it runs. For the full menu of action types, see my post on Agentforce topics, subagents and actions.
Cert Lab by Nick Frates
Learn the agent building blocks for AI-201
The Agentforce Specialist Cert Lab covers subagents, actions, instructions, variables and testing, with practice questions that explain every option.
Start the AI-201 Cert Lab, $9.99 →Step 5: Write reasoning instructions
Actions on their own don't tell the agent when to use them. That's what reasoning instructions are for. A simplified version of the Coral Cloud instructions:
If the customer is not known, ask for their email address and
membership number and run {!@actions.Get_Customer_Details}
before running any other action.

If the customer asks about an experience, run
{!@actions.Get_Experience_Details} and summarize the result.

If asked for sessions, run {!@actions.Get_Sessions}.
Ask for the date if it wasn't given. Use the Experience Id,
never the experience name.
Three habits make instructions work:
- Reference actions directly. Type
@in Canvas view to open the resource picker and insert the action, rather than writing "the appropriate action". - Put guardrails first. "Verify the customer before anything else" is the rule that protects your data, so it comes first.
- Say what to pass. The project insists on the Experience Id, not the name. Ambiguous inputs are where agents go wrong.
You can make the same edits in Script view. Canvas and Script stay in sync, because Canvas is writing Agent Script for you in the background.
Step 6: Preview and test
Click Preview. There are two modes:
- Simulate: a safe space. It checks your configuration without checking permissions, running actions or touching data.
- Live Test: runs the actions for real and changes data in your org, so you see how the active agent would behave.
For each message you get interaction details and a trace of the steps the agent took, plus variable values and the time each step took. When an answer looks wrong, the trace tells you whether the router picked the wrong subagent, the agent skipped an action, or the action returned something unexpected. Those are three different fixes.
Once the basics work, move to repeatable tests in the Agentforce Testing Center instead of retyping the same utterances.
Step 7: Commit and activate
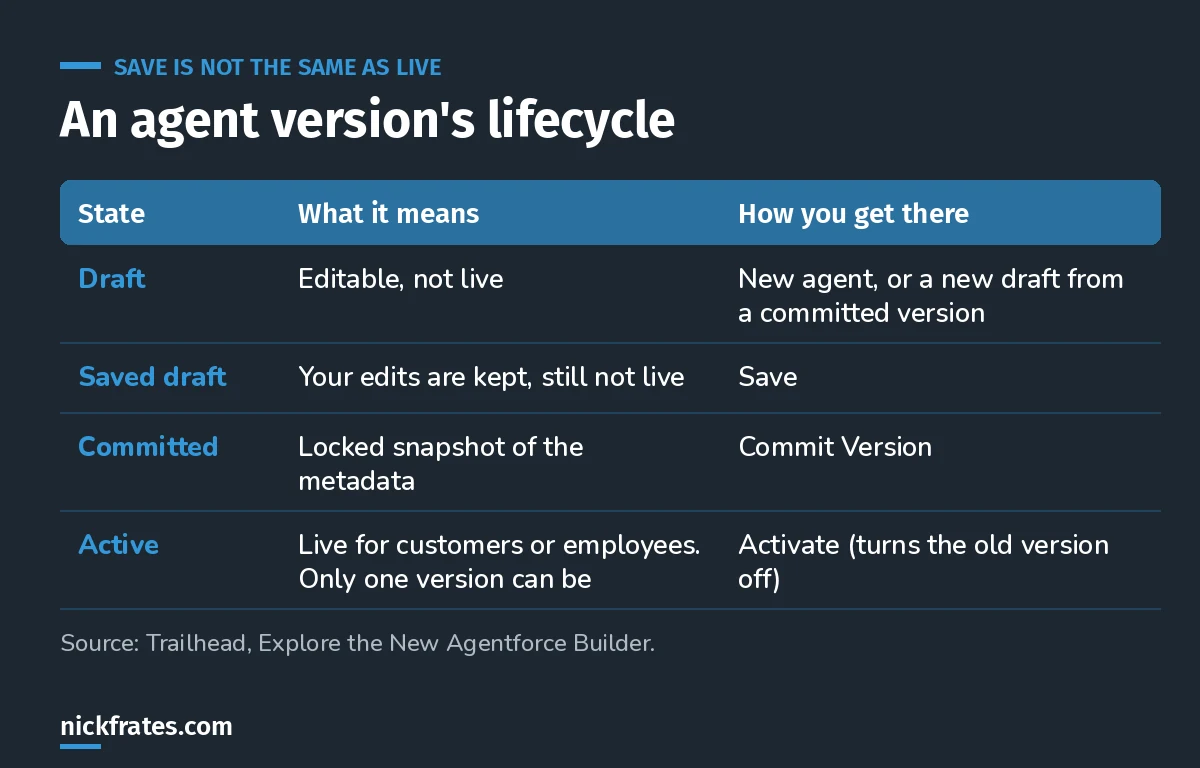
Saving keeps your work. Activating makes it live.
If you can't commit, the project suggests asking the Agentforce Assistant panel to "scan and fix" and reviewing what it proposes. Then click Activate. The last step in the project adds the agent to the Coral Cloud site through a connection.
Where beginners get stuck
- Vague subagent descriptions. The router can't route what it can't tell apart.
- Too many actions in one subagent. Split by job area.
- Testing only in Simulate. It never runs your actions, so permission and data problems hide until Live Test.
- Forgetting the agent user. The agent can't do what that user can't do.
Keep going
- Agentforce topics, subagents and actions: the building blocks in depth.
- Prompt Builder: build the prompt template actions your agent calls.
- Agentforce pricing: what running an agent costs.
- Data 360 for Agentforce: ground answers in your own knowledge.
- Agentforce Specialist study guide: if you want the AI-201 cert.
Cert Lab by Nick Frates
Get the Agentforce Specialist Cert Lab
Lessons, practice questions and flashcards for all 6 AI-201 exam sections, built from Salesforce Help.
Start the AI-201 Cert Lab, $9.99 →Hope this helps!
Best,
Nick