Hey there,
The first time you open Agentforce Builder, there’s a lot on the screen. Here’s how to get from a blank page to a live agent without getting lost.
Agentforce Builder is the tool in Agentforce Studio where you create, test and activate agents. You describe the agent, give it subagents and actions, test it in Preview, then Commit a version and Activate it.
I’m going off Salesforce’s own Trailhead units here (Explore the new builder and Quick Start: service agent), so the click paths match what Salesforce teaches.
Where do I find Agentforce Builder?
Open the App Launcher, then search for and select Agentforce Studio. Then go to Agents.
Agentforce Studio is the hub. Builder itself opens when you create or edit an agent.
What happens when I click New Agent?
Builder opens in a new tab and asks What do you want your agent to do? Describe the agent’s role, your company and the tasks it should handle.
It may ask follow-up questions. Answer them, or click Skip Ahead to fill in the details yourself.
Then give it a Name (the Developer Name fills in on its own). Under the user record section, click Select User.
Don’t rush that last one. The user you pick is who the agent runs as, so it controls what the agent can see and do. (The exam guide asks about this security context too.)
Click Let’s Go, and Agentforce creates the agent with some starter subagents.
What am I looking at?
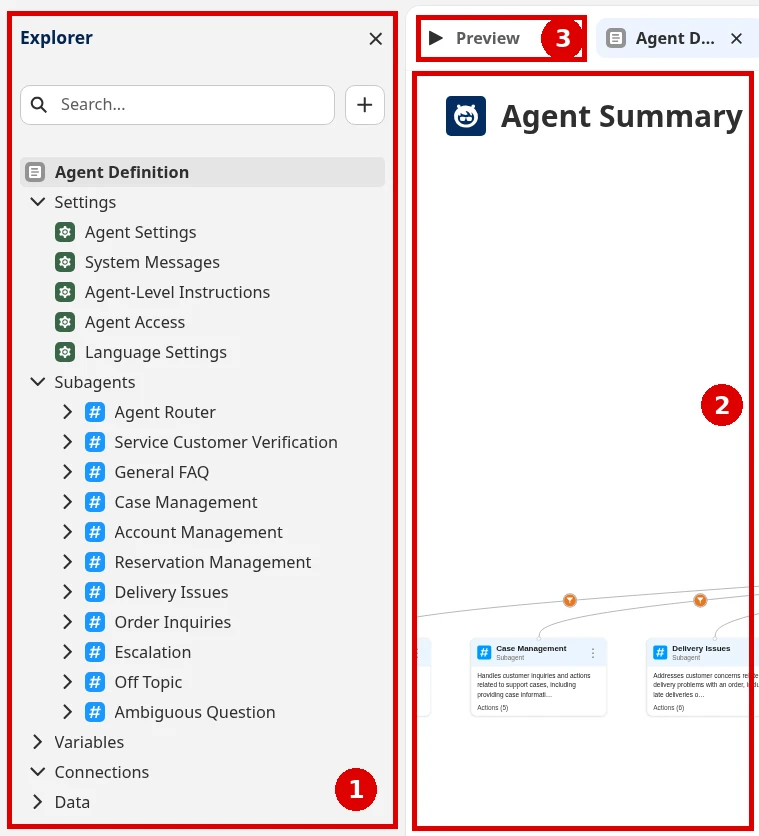
Three areas matter most at first:
- Explorer on the left. It holds Settings, Subagents, Variables, Connections and Data.
- Canvas in the middle. It shows your agent in plain language.
- Preview, where you chat with the agent and see its reasoning for each message.
There’s also a Script view. It shows the same agent as Agent Script, Salesforce’s language for defining agents, with syntax highlighting and validation.
Canvas and Script stay in sync, so edit in whichever you like. And the Agentforce Assistant lets you build in plain language. It shows proposed changes and asks you to confirm before applying them.
How do I give the agent something to do?
Think of it as a chain: the agent has subagents, each subagent has actions, and instructions tell it when to use them.
Subagents are the jobs your agent handles (the exam guide and older docs call them topics). To add one, click the plus icon next to Subagents in Explorer, choose New Subagent, give it a Name and a clear Description, then click Create and Open and Save.
The Description matters. The Agent Router (the part that picks which subagent handles a message) decides based on what the user says and the conversation so far.
Actions are the tools a subagent uses. In the subagent’s Actions Available For Reasoning, click Add action, then Create a custom action. Name and describe it, pick a Reference Action Type such as Flow, and choose the Reference Action.
Set inputs to Require Input to execute action and outputs to Show in conversation where you need them. If the action already exists, use Add from Asset Library instead.
Reasoning Instructions tell the subagent when to use each action and how to reply. Here’s an example from Trailhead, as it looks in Script view:
One trap: to reference an action, type @ to open the Resource Picker (the menu that links an action into your instruction). Pasting a reference doesn’t trigger it.
To refine an instruction with AI, hover over it and click the sparkles icon, or type /.
Agentforce Specialist Cert Lab
The exam tests this builder
AI Agents is the biggest section of the Agentforce Specialist exam. Practice it with exam-style questions and explained answers.
Start the Agentforce Specialist Cert Lab for $9.99 →How do I test without breaking anything?
Use Preview, and check which mode you’re in first.
| Mode | What it does |
|---|---|
| Simulate Mode | Checks your setup without checking permissions, running actions or touching data |
| Live Test Mode | Runs actions and makes real changes in your org |
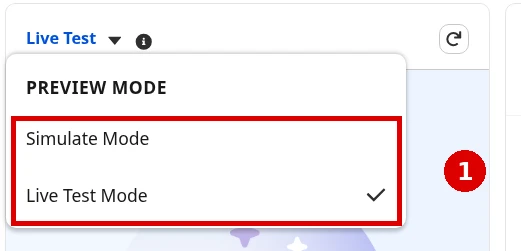
Start in Simulate. Switch to Live Test only with test records you don’t mind changing.
Preview also shows a trace of each step, variable values, and how long each sub-process took. That trace is the fastest way to see why the agent picked the wrong subagent.
Why isn’t my agent live yet?
Because saving isn’t activating. The order is Save, then Commit Version, then Activate.
Save updates the draft, which you can edit as often as you like. Commit Version locks a snapshot. Activate makes that snapshot live.
Only one version can be live. Activating a new one switches the old one off. To change a committed version, save it as a new draft.
If Commit throws an error, Trailhead suggests typing “scan and fix” in the Agentforce Assistant and accepting its fixes.
Can I build agents in code instead?
Yes. Agents are metadata. Agentforce DX adds CLI commands and a VS Code extension to create, preview and test agents, and to move them between your project and your orgs.
If you build in the UI, retrieve those changes back into your project. Salesforce’s guidance is to keep version control as the source of truth.
Studying for the exam? Builder skills land in AI Agents, which is 35% of the Agentforce Specialist exam. My study guide and practice questions cover it, and the Agentforce guide and certification study guides have the bigger picture.
Agentforce Specialist Cert Lab
Get exam-ready
Practice every Agentforce Specialist section with explained answers before you book.
Start the Agentforce Specialist Cert Lab for $9.99 →What’s the first agent you’re going to build? Let me know!
Hope this helps!
Best,
Nick