Category: Flows

  • Salesforce Flow Formulas: 5 Useful Examples (Text, Date, IF)

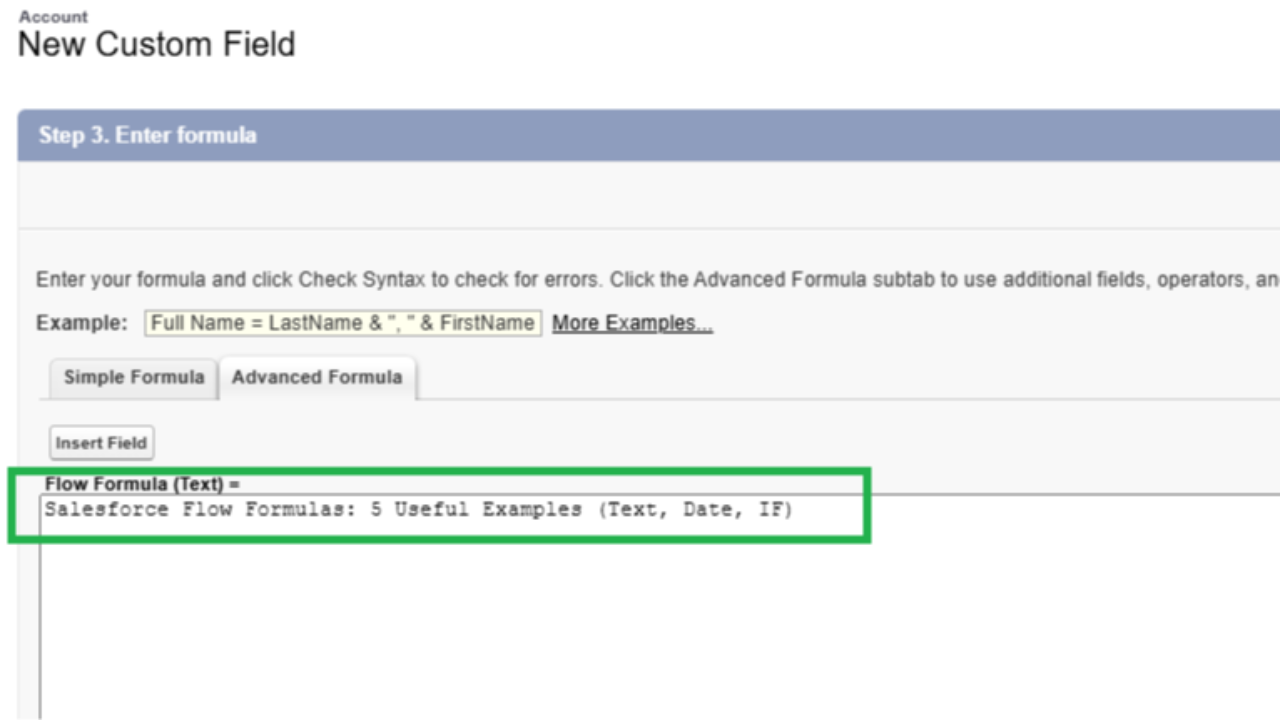
    Salesforce Flow Formulas: 5 Useful Examples (Text, Date, IF)

    Are you a Salesforce admin looking for quick solutions to common Salesforce Flow formulas problems? You’re in the right place. In this help guide, we’ll walk through 5 useful Salesforce Flow formula examples that you can plug into your flows right away. We focus on text manipulation, date calculations, and IF logic – the areas where beginner and intermediate Salesforce professionals often need help. There are countless formula functions available (text, logical, date, etc.)​, but here we’ve distilled some of the most practical ones for everyday use. Each example comes with a ready-to-use formula, a brief explanation, and step-by-step instructions. Let’s dive in and make Flow formulas simple!

    1. Combine Text Fields into a Full Name

    Use case: You have separate First Name and Last Name values and want to combine them into one string (e.g. for a greeting or a single-line display). This is a basic text manipulation formula that concatenates two text fields with a space in between.

    How to do it:

    1. Create a Text Formula Resource: In Flow Builder, add a new Formula resource (Text type) to hold the full name.
    2. Build the Formula: Use the concatenation operator & (or +) to join first name, a space, and last name. For example:

      {!Contact.FirstName} & " " & {!Contact.LastName}
       
       
      This formula simply connects the FirstName and LastName with a space​. (In Salesforce formulas, & and + both concatenate strings​.)
    3. Use the Result: The formula will output something like "John Doe". You can use this FullName formula resource later in your flow – for instance, in an Assignment to set a field, or in a Screen component to display a full name.

    Why it’s useful: Instead of manually joining text in each flow, one formula handles it. This saves time and ensures consistency. You can concatenate any text fields or even literal strings. For example, to include a salutation you might do: "Hello, " & {!Contact.FirstName} & "!" as a quick greeting.

    2. Default a Text Value If a Field is Blank

    Use case: Sometimes a field might be empty, and you want to use a default value in that case. For example, if a contact’s Title is blank, you might want to display "N/A" or some placeholder. We can do this using an IF check or the BLANKVALUE() function in a flow formula.

    How to do it:

    1. Create a Text Formula Resource: Add a new Formula resource of type Text for your default logic (or you can directly use such a formula in a Decision element as the condition).
    2. Write the Formula: Use BLANKVALUE(field, default) which returns the field’s value if it’s not blank, or the default if it is blank​. For example:
       
       
      BLANKVALUE({!Contact.Title}, "N/A")
       
       
      This formula checks the Contact Title. If Title is blank or null, it will yield "N/A". Otherwise, it will return the actual Title value​. (Behind the scenes, BLANKVALUE(X, Y) is equivalent to IF(ISBLANK(X), Y, X).)
    3. Use the Result: Now you can use this formula in your flow wherever needed. For instance, on a Screen element to show a user’s title or "N/A" if no title is set, or in an Assignment to populate a field with a default value.

    Why it’s useful: This formula prevents blank values from causing issues or ugly displays. Beginner admins often struggle with handling empty fields – this provides an easy solution. You can adapt the default text as needed (e.g., "Unknown" or "Not Provided"). It’s immediately usable in any scenario where you need a fallback for blank inputs.

    3. Check If Text Contains a Value (Using IF + CONTAINS)

    Use case: You want to make a decision in your flow based on whether a text field contains a certain substring. For example, suppose on Opportunity you want to set a Priority flag if the Type field contains the word "Existing". The CONTAINS function with an IF statement is perfect for this.

    How to do it:

    1. Prepare the Field Value: Ensure you have the text you want to check. If it’s a picklist in Salesforce, convert it to text using the TEXT() function inside your formula. (Flow formulas require converting picklist values to text before using text functions.)
    2. Create a Formula Resource (Text or Boolean): If you want a text output like "High" or "Medium", make a Text formula resource. If you just need a true/false condition, you could make it Boolean. In our example, we’ll output a text Priority.
    3. Write the Formula: Use the IF function combined with CONTAINS(). For example:
       
       
      IF( CONTAINS( TEXT({!Opportunity.Type}), "Existing"), "High", "Medium" )
       
       
      This checks if the Opportunity Type (picklist) text includes "Existing". If yes, it returns "High", otherwise "Medium"​. (In a real scenario, you might set "High Priority" for existing customers.)
    4. Use the Result: You can use this formula’s output to set a Priority field, display a message, or drive a Decision element. For instance, a Decision could check if the formula result equals "High" and then branch the flow accordingly.

    Why it’s useful: This pattern—IF CONTAINS—is handy for many scenarios: checking if an email address contains "gmail.com", if a description field mentions "urgent", etc. It demonstrates combining text functions and logic. Keep in mind that CONTAINS() is case sensitive and does not work on multi-select picklists (for multi-select, use INCLUDES() instead)​. By using TEXT() on picklists, as shown above, you ensure the function works properly on picklist values.

    4. Calculate the Number of Days Between Two Dates

    Use case: You need to perform a date calculation in your flow, such as finding the duration (in days) between two dates. For example, you might want to know how many days are left between Today and a target Due Date, or the length of time between a Start Date and End Date on a project.

    How to do it:

    1. Determine Your Date Fields: Identify the two date values you want to compare (e.g., Start_Date__c and End_Date__c, or $Flow.CurrentDate for today’s date in a flow).
    2. Create a Number Formula Resource: Add a Formula resource of type Number (with zero decimal places) to calculate the difference.
    3. Write the Formula: Simply subtract one date from the other. In Salesforce formulas, subtracting two Date values gives the difference in days​. For example:
       
       
      {!End_Date__c} - {!Start_Date__c}

      If End Date is 2025-12-31 and Start Date is 2025-12-25, the result will be 6 (days). If you use Today’s date, e.g. Due_Date__c - TODAY(), you’ll get the number of days from today until the due date. (A negative result means the date is in the past.)
    4. Use the Result: The output is a number. You can use it in a Decision (e.g., if result > 0, still open; if < 0, overdue) or display it in a screen. For instance, you might show “Project duration is X days” or use it to trigger an alert if the number of days remaining is below a threshold.

    Why it’s useful: Calculating date differences is a common requirement (e.g., how many days until an opportunity closes, or the age of a case). Instead of writing Apex or doing this math offline, a simple Flow formula does it instantly. This example shows that Flow formulas can handle date arithmetic directly – a big win for automation. For more date tricks, remember functions like ADDMONTHS(date, n) to add months accurately​, or extracting parts of a date with YEAR(), MONTH(), DAY() if needed.

    5. Flag Overdue Tasks with an IF Date Comparison

    Use case: You want to set a text or boolean flag if a date has passed relative to today. A classic example: mark a Task or Case as "Overdue" if its Due_Date__c is earlier than today. This uses an IF statement with the TODAY() function in a formula.

    How to do it:

    1. Create a Formula (Text or Checkbox): If you want a text output like "Overdue"/"On Track", use a Text formula resource. If you prefer a checkbox (true/false), use a Boolean formula.
    2. Write the Formula: Use IF to compare the date to today. For example:
       
      IF( TODAY() > {!Task.Due_Date__c}, "Overdue", "On Track" )
       
       
      This formula checks if today’s date is greater than the Task’s Due_Date. If yes (meaning the due date is in the past), the formula returns "Overdue"; otherwise it returns "On Track"​.
    3. Use the Result: This formula can drive a Decision in a flow (e.g., proceed down an “Overdue” path), or simply write the result to a field. If you created a Boolean formula instead, it would return true/false – that could directly feed a Decision element or update a checkbox field “Is Overdue”. For example, you might update a Task record’s Status to “Expired” if this formula outputs "Overdue".

    Why it’s useful: This showcases IF logic with dates – a very common need. Rather than manually calculating or writing script, the formula instantly evaluates the status. You can adjust the outputs as needed (e.g., "Yes"/"No" or a different wording). This pattern can be reused for any deadline or expiry checks in your org. It’s immediately usable for things like highlighting overdue opportunities, contracts past end date, etc. (Tip: You could even extend it with additional conditions using AND or OR if needed, such as checking a status field along with the date.)

    Additional Tips for Flow Formulas

    • Formula Data Types: Remember to set the formula resource’s data type appropriately (Text, Number, Date, Boolean, etc.) based on what you want to return. A mismatched type can cause errors in Flow. For instance, an IF formula that returns "Overdue"/"On Track" must be Text type.
    • Testing: Use the Flow debugger or a Screen to output your formula result when building, to ensure it behaves as expected. A small typo can break a formula, so testing is key (the Flow debug will show formula outcomes).
    • Use Global Constants: In Flow, you also have global constants like $Flow.CurrentDate and $Flow.CurrentDateTime which are equivalent to TODAY() and NOW()​. You can use them in formulas if you prefer that style.
    • Complex Logic: If you find yourself writing very complex formulas, consider whether you should break the problem into multiple formula resources or use a Decision element. Sometimes a formula isn’t the only solution – but for many simple calculations, text formatting, or IF/OR conditions, formulas keep your flow streamlined.

    For more on building efficient flows, check out our guide on Salesforce Flow Best Practices for Efficient and Scalable Automation. And if you’re new to Flow Builder, you might find Salesforce Flow Types Explained helpful to understand the different types of flows and when to use them.

    Conclusion & Next Steps

    By now, you’ve got five ready-to-use Salesforce Flow formulas under your belt – covering text concatenation, default values for blanks, conditional logic with CONTAINS, date arithmetic, and IF statements with dates. These are some of the most common needs for Salesforce admins automating with Flow. Feel free to tweak these examples to fit your org’s requirements. The key is knowing that with a bit of formula magic, you can point-and-click your way to powerful logic in Flow (no Apex needed!).

    Ready to become a Flow formula pro? Keep practicing these techniques and explore more scenarios. And if you want to master Salesforce Flows end-to-end, including advanced formulas and best practices, consider enrolling in our comprehensive Salesforce Flow course. In the course, we dive deeper into real-world Flow challenges and teach you how to design automations like a pro. Enroll in the 2025 Salesforce Flows course today and take your skills to the next level! Good luck, and happy Flow-building!

  • Salesforce Flow Types Explained

    Salesforce Flow Types Explained

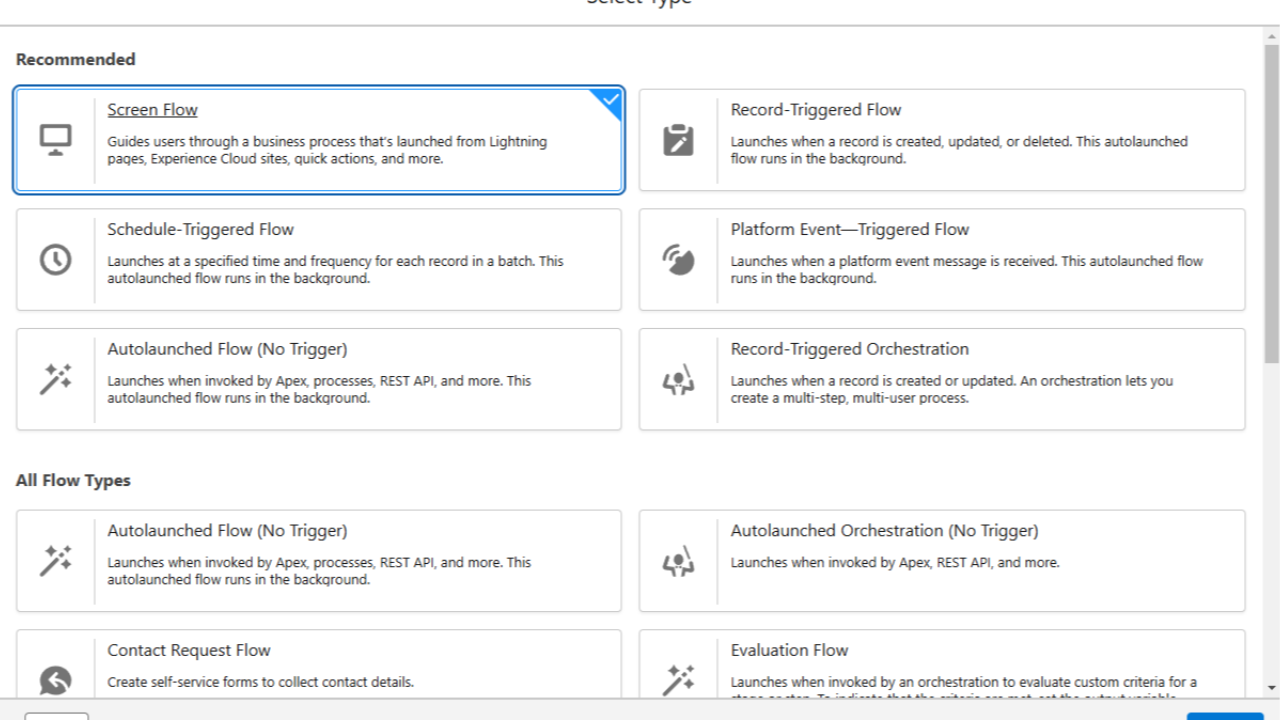
    Salesforce Flow is a powerful automation tool that empowers admins and developers to create custom business processes with clicks, not code​. In other words, it lets you automate tasks and guide users through workflows without writing Apex code. Flows can update records, send emails, collect user input, integrate with external systems, and much more. Salesforce provides several types of Flow, each suited for different use cases. In this article, we’ll break down the main flow types – Screen Flows, Record-Triggered Flows, Scheduled Flows, Autolaunched Flows, and Platform Event–Triggered Flows – and explain when and why to use each. We’ll also compare Screen Flow vs Record-Triggered Flow to help you understand their pros and cons.

    What is a Salesforce Flow?

    For those new to the concept, a Salesforce Flow (also known as Lightning Flow) is an application within Salesforce that automates business logic by flowing through a series of steps. Each flow can take inputs (like user data or record data), perform logic (decisions, calculations), and execute actions (create/update records, send emails, call Apex, etc.) in a defined sequence. Think of it as a way to create mini-applications or custom trigger logic using a drag-and-drop interface in the Flow Builder.

    At a high level, all flows run in Salesforce to save time, reduce manual effort, and enforce consistency in your business processes. However, not all flows are the same. Some run with user interaction on the screen, while others run in the background automatically. Below, we’ll dive into each flow type and discuss when to use them.

    Screen Flow

    A Screen Flow is a type of flow that requires user interaction – it can display screens (steps) to the user and prompt for input​. Unlike other flows that run unseen in the background, Screen Flows run in the foreground as part of the user interface, meaning the user will see and interact with them on screen​. You typically use a Screen Flow to guide users through a step-by-step process or wizard. For example, you might build a Screen Flow to help a service agent create a case with guided prompts, or to walk a customer through an online form.

    Screen Flows can be launched from various entry points in Salesforce. Common ways to invoke a Screen Flow include placing it on a Lightning page (e.g., as a component on a Home page or record page), launching it via a quick action or button, or even calling it from another flow or Flow Orchestration. When the flow is launched, the user will see a series of screens you designed in Flow Builder, with fields, picklists, or instructions to follow. The flow can branch based on the user’s inputs (using Decision elements) and perform actions like saving records at the end.
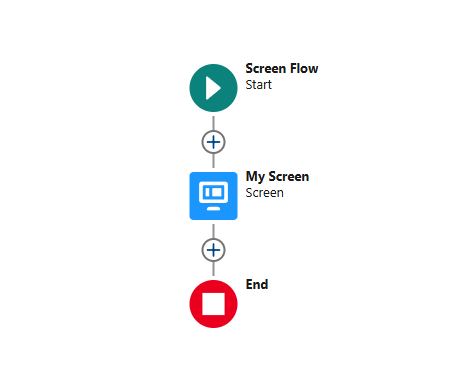
    When and Why to use Screen Flows: Use a Screen Flow whenever you need to collect information from a user or guide them through a complex process. They are ideal for scenarios where manual input or confirmation is required as part of the business process. Some real-world examples include:

    • Guided data entry: e.g. a multi-step wizard for onboarding a new account or lead, ensuring the user provides all necessary information in the correct order (maybe first entering account info, then contact info, etc.). The Screen Flow can validate inputs and reduce errors by guiding the user.​

    • Self-service forms: e.g. an online form for customers to submit a support case or feedback, possibly on a community page. The flow can dynamically show or hide fields based on previous answers (using conditional visibility) to simplify the experience​.

    • Internal process scripts: e.g. a call center script that sales or support reps follow while talking to a customer. The Screen Flow can present prompts and fields in sequence, so the rep knows exactly what to ask and input at each step.

    In summary, Screen Flows shine when you need a user-friendly, guided experience. They improve data quality and user experience by walking users through what could otherwise be complicated tasks. The trade-off is that they require someone to initiate and complete the flow – they do not run automatically in the background.

    Record-Triggered Flow

    A Record-Triggered Flow is an autolaunched flow that runs automatically when a record is created, updated, or (in some cases) deleted​. In other words, this flow “listens” for changes in Salesforce records and fires without any user needing to click anything. Record-Triggered Flows operate behind the scenes (no screens or user input), making them perfect for enforcing business rules and automating system processes whenever data changes in the database​.

    Record-Triggered Flows are often compared to Apex triggers or the older Process Builder rules – they are the declarative (clicks not code) way to react to DML events. For example, you can configure a Record-Triggered Flow to run every time an Opportunity is marked Closed Won, or whenever a new Contact is created. In the flow, you define what actions should happen as a result (such as updating a field, creating a related record, or sending an email). You can also set entry conditions so that the flow only runs for certain records or changes (similar to filter criteria in workflows), which helps control when the automation kicks in​.

    Importantly, Salesforce lets you choose whether a Record-Triggered Flow runs before-save or after-save on the record event. A before-save flow runs prior to the record being saved to the database (like a before trigger), and is typically used to update fields on the triggering record very efficiently (no extra DML statement)​. An after-save flow runs after the record is saved (like an after trigger), and is used for actions that require the record’s ID or to perform actions on related records – for example, logging a task, sending a notification, or updating related objects​. This flexibility means you can often replace small Apex triggers with Record-Triggered Flows, achieving the same outcome with declarative logic.
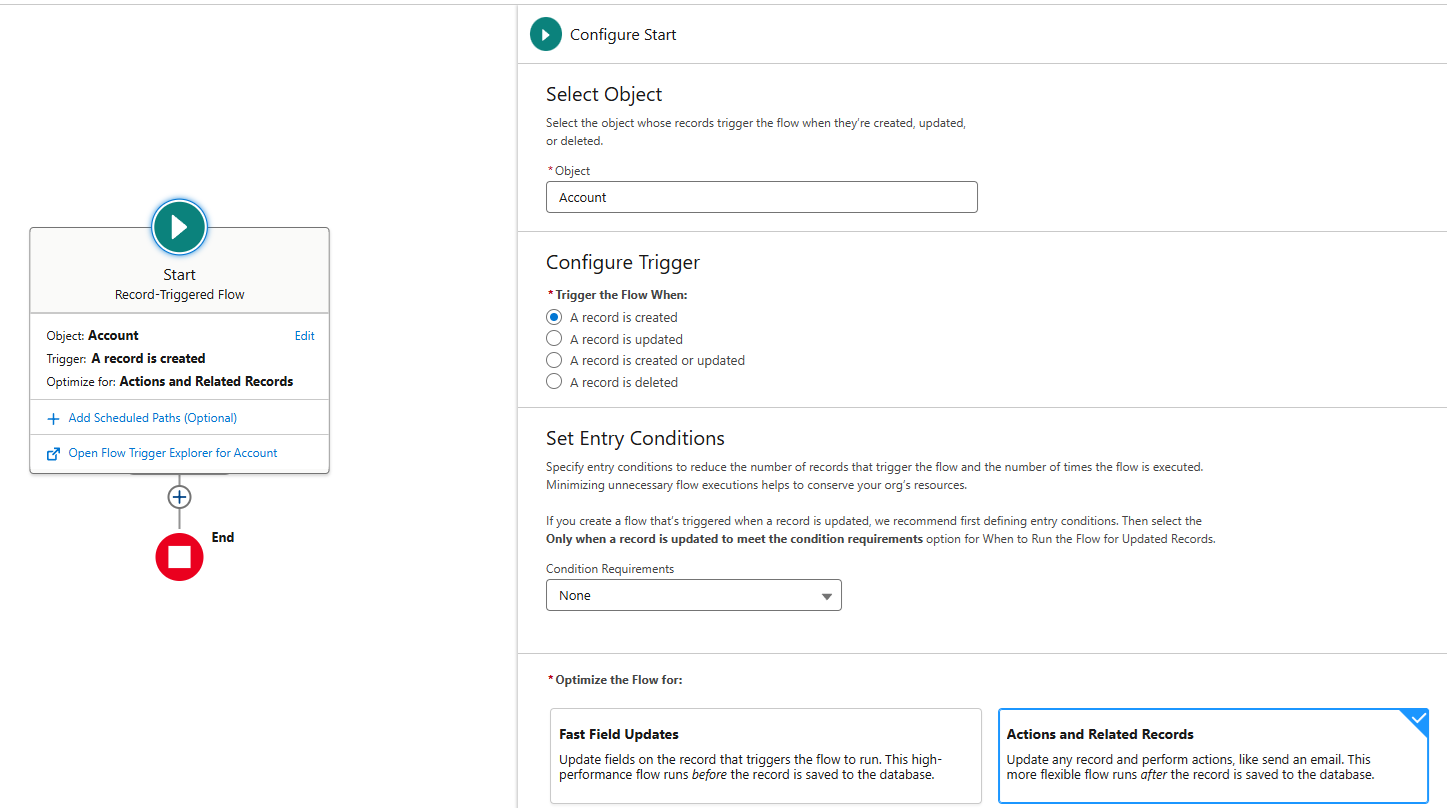
    When and Why to use Record-Triggered Flows: Use a Record-Triggered Flow when you need automation to happen immediately after a data change in Salesforce, without manual intervention. These flows ensure that whenever a user (or an integration) creates or updates a record that meets your criteria, Salesforce will automatically perform the specified actions. Common use cases include:

    • Automating field updates: e.g. whenever an Opportunity’s Stage changes to "Closed Won", automatically update a “Closed Date” field or roll up information to a parent record (instead of requiring the user to do it).

    • Assignment and routing: e.g. when a new Case is created with High priority, automatically assign it to a specific queue or notify a supervisor, ensuring urgent issues get immediate attention​.

    • Related record management: e.g. if a Contact is marked “Inactive”, a record-triggered flow could automatically find all open cases for that contact and close them or reassign them. Or when a new User is created, the flow could auto-assign permission sets and send a welcome email​.

    • Validation and data consistency: while validation rules handle data quality on a single record, a record-triggered flow can enforce complex business logic across objects. For instance, if an Account is updated to a certain industry, the flow can automatically create placeholder records in a related custom object for onboarding steps.

    The big advantage of Record-Triggered Flows is that they run in the background, consistently, for every qualifying record change. This ensures nothing slips through the cracks (users don’t have to remember to run anything). On the downside, because they run automatically, you must carefully design them to avoid unintended consequences (like updates that trigger other automations in a loop). Always test record-triggered flows thoroughly, and use entry conditions or decision elements to prevent them from running when not needed.

    Scheduled Flow

    A Scheduled Flow (also known as a Schedule-Triggered Flow) is an autolaunched flow that runs at a specific time and frequency that you define – for example, every night at 2 AM or every Monday morning. Unlike record-triggered flows, scheduled flows are not tied to a particular record change. Instead, you set them up to execute as a batch job on a schedule, and they will process a batch of records meeting certain criteria. Salesforce essentially checks your conditions at the scheduled time, gathers all records that match, and then runs the flow’s logic for each record (up to a limit) in the background.

    Because Scheduled Flows run in the background at a set time, they are great for routine, batch operations such as daily maintenance tasks or data syncs. For example, you could use a scheduled flow to find all accounts with an expired contract and send renewal reminder emails each week. You could also do nightly data quality updates or backups (within Salesforce), like setting a field to a default value if it was left blank during the day.

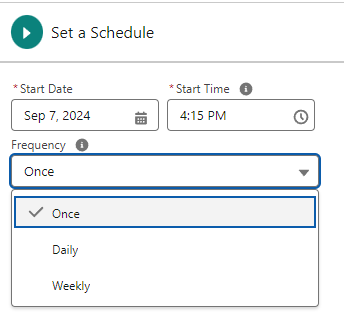
    When you configure a Scheduled Flow in Flow Builder, you’ll specify the object and criteria of records to run on (similar to a report filter), and the schedule (run once on a specific date, or repeat daily/weekly). The flow will then run in bulk mode – Salesforce will create an “interview” for each record found, up to certain limits, and execute the flow actions on those records​. You can monitor and manage these scheduled flows in Setup -> Scheduled Jobs, where you can see upcoming runs or abort a scheduled flow if needed.
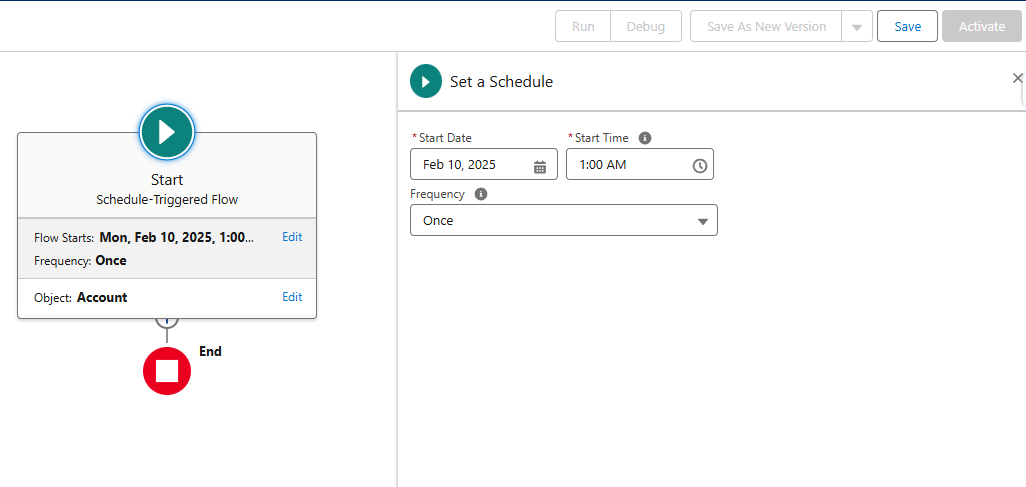
    When and Why to use Scheduled Flows: Use a Scheduled Flow when you need to automate tasks on a regular timetable or perform bulk operations that aren’t triggered by single record changes. They are useful for maintenance and housekeeping tasks that need to happen for multiple records at once. Examples of when you’d use a scheduled flow:

    • Regular data cleanup or updates: e.g. deactivate users who haven’t logged in for 90 days, running every weekend​. Or update a set of records nightly – for instance, reset a flag on all Opportunity records every day at midnight.

    • Scheduled notifications or summaries: e.g. send a daily summary email to sales managers every morning with a list of opportunities closing that week. The flow could run daily, query opps meeting criteria, and send one email per manager.

    • Recurring tasks: e.g. update renewal opportunities and create follow-up tasks monthly for contracts that expire in the next 30 days. The flow can run weekly to catch any that fall into the window and automate the prep work for the sales team.

    • One-time bulk jobs: You can set a scheduled flow to run once on a specific date. For example, if you introduced a new field and want to backfill data on all existing records next Friday at 8 PM, you could use a one-time scheduled flow to do that instead of writing a script.

    One thing to keep in mind is that Scheduled Flows currently support only daily or weekly recurrences out-of-the-box (no direct "monthly" or "yearly" option in the UI). If you have a requirement to run something annually or on a custom timetable, you'll need a workaround. (For instance, you can schedule a flow to run daily and use a formula condition to mimic a yearly run – see our blog post How to Schedule a Salesforce Flow Annually for a clever solution to this.)

    Scheduled flows are great for off-peak processing. You can schedule them during non-business hours to avoid performance impact during the day​. Just be mindful of how many records your flow might process – if you need to handle extremely large volumes or complex processing, you might need Apex (Batch Apex can handle more records and flexible schedules than a flow)​. For most admin needs though, Scheduled Flows strike a nice balance by offering batch automation with clicks not code.

    Autolaunched Flow (No Trigger)

    An Autolaunched Flow (with no trigger) is a flow that runs in the background and does not require any user interaction to start. Unlike Screen Flows, it has no screens, and unlike the triggered flows above, it doesn’t start on its own from a record change or schedule. Instead, an autolaunched flow must be explicitly invoked by another process – for example, called from Apex code, triggered from a Process Builder (legacy), started by another flow (subflow), or via the REST API​. Essentially, it’s a set of automation steps that sits dormant until something tells it to run.

    Because Autolaunched Flows have no UI, they are meant to perform background logic. In fact, Salesforce groups things like record-triggered, schedule-triggered, and platform event–triggered flows under the umbrella of “autolaunched flows” (since they run without user input)​. Here, however, we’re focusing on the generic autolaunched flow type you select as "Autolaunched Flow (No Trigger)" in the New Flow wizard. This type of flow is like a utility or subroutine – you define what it does, and then you run it from somewhere else when needed. It doesn’t run by itself until called.

    Common patterns for Autolaunched Flows include using them as subflows (one flow calls another flow to perform a sub-task). For instance, you might have several record-triggered flows that all need to send a similar email. Rather than writing the email send logic in each flow separately, you could create one autolaunched flow that takes in certain input (like record Id, email template, etc.) and sends the email. Then each record-triggered flow simply calls this autolaunched flow as a subflow. This promotes reuse and easier maintenance.

    Another use: you can put complex logic in an autolaunched flow and then invoke it from an Apex class or API call. If a developer or an external system needs to execute some business process in Salesforce, they could call an autolaunched flow (via the REST API or from Apex using Flow.Interview.start methods) instead of duplicating that logic in code. This way, admins can maintain the flow logic, and it can be triggered from multiple contexts.
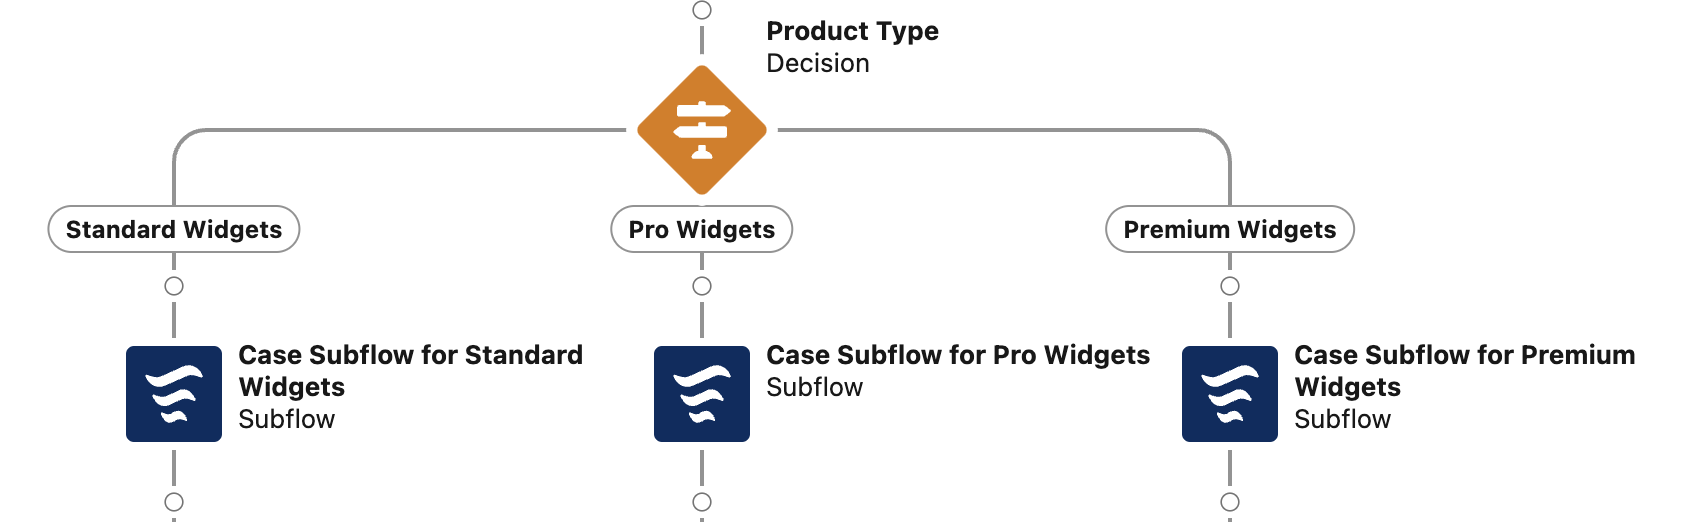
    When and Why to use Autolaunched Flows: Use an autolaunched flow when you want to create a reusable piece of automation that can be triggered by other processes or code. Key scenarios include:

    • Subflow for common logic: e.g. an autolaunched flow that calculates a discount given certain inputs. Multiple other flows (screen or triggered) could invoke this subflow to get the calculation done consistently. If the logic needs to change, you update the one autolaunched flow rather than every flow that uses it.

    • On-demand automation via button: e.g. you add a custom Lightning button or action on a record page that, when clicked, calls an autolaunched flow (possibly via a Lightning Web Component or a Quick Action that launches the flow). The flow then performs a series of background operations (like mass updating related records) and then perhaps navigates the user back or shows a success message. In this case, the autolaunched flow is running from a user’s click, but without any screens – it just does its job in the background and finishes.

    • Invoking flows from code or external systems: If you have developers in your org, they might write an Apex trigger that, instead of containing all logic in code, invokes an autolaunched flow to do the heavy lifting. This can sometimes simplify development and allow admins to modify the flow later without altering the code. Similarly, an external integration could call into a Salesforce Flow via the REST API to, say, process an inbound message, by kicking off an autolaunched flow.

    In summary, Autolaunched Flows (no trigger) are like the utility players of Salesforce automation. They run behind the scenes and give you a lot of flexibility in how they’re invoked. They won’t do anything until called, but when they are called, they can execute powerful automation steps just like any other flow (create/update records, loops, decisions, etc.). Use them to keep your automation modular and maintainable.

    Platform Event-Triggered Flow

    A Platform Event-Triggered Flow is a flow that fires in response to a Platform Event message being received in Salesforce. Platform Events are a mechanism in Salesforce’s enterprise messaging platform that allow apps to publish and subscribe to events (think of them as custom system notifications or messages that can come from external systems or other parts of Salesforce). When a specific platform event is published, any flow that is subscribed to that event type will automatically trigger and execute in real time​.

    In essence, Platform Event-Triggered Flows let you build event-driven automation. Instead of being triggered by a record change, these flows wait for an event notification. This is incredibly useful for integrating with external systems or handling asynchronous processes. For example, imagine an external system sends a "Payment Received" event into Salesforce – you could have a platform event flow subscribe to that event and then update an Invoice record and send a receipt email, all automatically when the event arrives. Another example: an IoT device (like a smart appliance) could publish an event when it detects an issue (e.g., a printer low on toner). Salesforce receives that event and a platform event flow could handle it by creating a Case or reordering toner​.

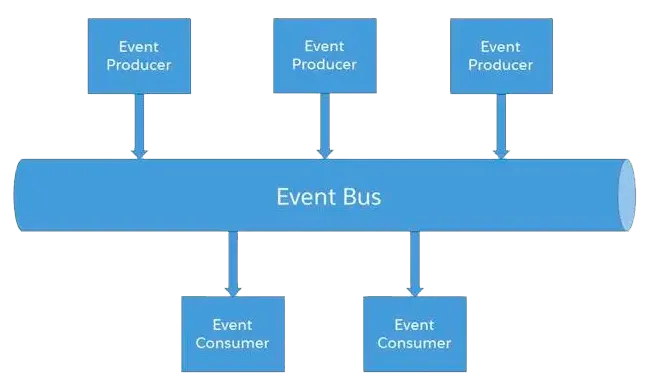
    To use a Platform Event-Triggered Flow, you first define a Platform Event (in Setup) with the fields that will be carried in the event message (similar to defining a custom object). Then, in Flow Builder, you create a new Platform Event-Triggered Flow and select that event as the trigger. From that point, you can use the event’s fields in your flow just like record data. The flow runs whenever an event message of that type is received, and it runs in the background without user interaction (like record-triggered flows, it’s autolaunched). This all happens as part of Salesforce’s Event-Driven Architecture – publishers send event messages to the Event Bus, and subscribers (like our flow) listen for those messages and react​.

    When and Why to use Platform Event Flows: Use a Platform Event-Triggered Flow when you need Salesforce to respond to events from outside the normal record save process, especially for integrating Salesforce with external systems or decoupling complex processes. Scenarios include:

    • External system integration: e.g. an inventory system publishes an event "Inventory Low" when stock drops below threshold. Salesforce receives this and a Platform Event Flow creates a Replenishment Order record and notifies a buyer. This is a more loosely coupled approach than directly calling an API on record save – the external system and Salesforce communicate via events.

    • IoT and monitoring: e.g. a healthcare device publishes a High Blood Pressure Alert event. Salesforce’s platform event flow creates a Case for a nurse to follow up with the patient​. Or a connected machine publishes a maintenance-needed event that triggers Salesforce to log a service task.

    • Cross-org or cross-app workflows: You might have multiple Salesforce orgs or apps where one publishes an event and another subscribes. Platform event flows can handle the subscriber side in a receiving org. Even within one org, you can use platform events to avoid hitting limits like Mixed DML – for instance, have a record-triggered flow publish a platform event instead of directly updating a certain object, and then a platform event flow handles that update in a separate transaction​.

    • Error logging or asynchronous handling: e.g. if a Screen Flow or Apex process encounters an error, you could publish a platform event with error details, and have a platform event flow log it to a custom object for tracking. This way, the error handling is separated out and doesn’t interrupt the user’s transaction.

    Platform Event-Triggered Flows are a bit more advanced, but they are extremely powerful for real-time integrations and orchestrations. They allow Salesforce to react in real time to things that happen outside of Salesforce (or in a decoupled part of Salesforce), which opens up possibilities beyond the traditional record-triggered logic.

    Screen Flow vs Record-Triggered Flow (Pros & Cons)

    New Salesforce professionals often ask when to use a Screen Flow versus a Record-Triggered Flow, since both can automate processes but in very different ways. Let’s compare these two flow types:

    • Trigger Mechanism: A Screen Flow must be launched explicitly by a user (for example, by clicking a button or accessing a Lightning page where the flow is embedded). It runs when someone starts it and typically runs under that user’s context. In contrast, a Record-Triggered Flow runs automatically whenever a record meets the specified trigger condition (record created/updated, etc.), with no user action required​. This means record-triggered flows can fire in response to any data change (even from imports or integrations), ensuring consistent automation.

    • User Interaction: Screen Flows are the only flows that present a UI to the user during execution​. They can show forms, ask questions, and guide the user step by step. Record-Triggered Flows have no user interface – the user is often unaware they even ran, except for the results (like fields updated or emails sent). Screen Flows pause for user input; Record-Triggered Flows execute start to finish in milliseconds once triggered.

    • Use Case Fit: Because of the above differences, the use cases for each differ. Screen Flows are best for guided processes, data entry, and wizard-style tasks where you need to ensure users follow a procedure or provide information. They excel at things like multi-step forms, interactive wizard flows, or on-demand tasks initiated by a user. Record-Triggered Flows are ideal for background automation and enforcement of business rules – situations where, whenever data changes, you need Salesforce to automatically respond. They shine in replacing what used to be workflow rules, process builder flows, and many simple triggers: updating related records, validating data across records, sending notifications, etc., all without user intervention.

    • Pros of Screen Flows: They offer a tailored user experience. You can guide users, show them contextual information, and get immediate input. This leads to better data quality and user satisfaction for complex processes (users don’t have to know what to do next – the flow tells them). Also, because a person is running it, you have the opportunity to let them review or confirm data before finalizing, which can prevent mistakes.

    • Cons of Screen Flows: They are manual to start – if a user forgets or doesn’t know to run the flow, the process might not happen. They also require more design effort to make the UI intuitive, and they tie up the user’s time while the flow is in progress. You wouldn’t use a Screen Flow for something that needs to happen for every single record change (that would be impossible for users to trigger every time). In short, they’re not suitable for behind-the-scenes enforcement or high-frequency triggers.

    • Pros of Record-Triggered Flows: They work behind the scenes consistently and can react to any record change, even ones from data loads or integrations. This ensures business rules are always applied. They don’t interrupt the user – Salesforce just does the work in the background. They are also highly scalable; once you set it up, it runs for every relevant record change automatically. With before-save flows, they can be extremely efficient for certain tasks (fast field updates).

    • Cons of Record-Triggered Flows: Because they run automatically, you have to be careful with conditions to avoid running unnecessary logic (which could impact performance or hit governor limits). Debugging can be trickier, since they might fire in complex data scenarios. Also, they cannot interact with a user mid-process – if there's a scenario where you need user approval or input, a record-triggered flow alone can’t handle that (you’d need to combine it with another mechanism, like send an email and wait for a response, or better, use a Screen Flow or approval process for that part). In summary, they’re powerful but must be designed with care to avoid unintended side effects.

    Bottom line: Screen Flows vs Record-Triggered Flows isn’t an “either/or” choice – they serve different needs. Often, a Salesforce implementation will use both: Screen Flows to guide users through optional or complex tasks, and Record-Triggered Flows to handle mandatory behind-the-scenes automation. Understanding the strengths of each will help you apply the right tool to each business requirement.

    Conclusion and Next Steps

    By now, you should have a solid understanding of the different types of Salesforce Flows and when to use each one. To recap: Screen Flows are for guided, interactive user experiences; Record-Triggered Flows handle automatic behind-the-scenes responses to data changes; Scheduled Flows run batch jobs on a timetable for routine tasks; Autolaunched Flows (no trigger) are reusable logic that other processes call on-demand; and Platform Event-Triggered Flows respond to real-time event messages, enabling event-driven architecture in Salesforce.

    Mastering these flow types will significantly boost your power as a Salesforce Admin or Developer. With flows, you can automate complex processes, improve data quality, and build dynamic applications — all with clicks instead of writing code. As you start building, remember to plan your flows carefully, test in Sandbox, and follow best practices (for example, avoid SOQL/DML in loops, use subflows for reuse, etc.). (For a full list of tips, check out our article on Salesforce Flow Best Practices for Efficient and Scalable Automation.)

    Ready to take your Salesforce Flow skills to the next level? If you want to deepen your expertise with hands-on guidance, consider enrolling in our Salesforce Flow Course. This comprehensive course walks you through building all types of flows with real-world examples and pro tips. Enroll in the Salesforce Flow course here and unlock the full potential of Salesforce automation! 🚀
  • Salesforce Flow Best Practices for Efficient and Scalable Automation

    Salesforce Flow Best Practices for Efficient and Scalable Automation

    Introduction:
    Salesforce Flow is a powerful tool for automating business processes with clicks, not code. However, with great power comes great responsibility – especially after Salesforce announced the deprecation of Process Builder in 2023, making Flow the go-to automation tool​.

    Beginners and intermediate Salesforce professionals often face Flow-related challenges like hitting governor limits or encountering confusing errors. Following best practices is essential to build efficient, scalable Salesforce Flows that work reliably and are easy to maintain. In this guide, we’ve compiled a numbered list of Salesforce Flow best practices to help you avoid common pitfalls and get immediate solutions to your Flow challenges. Each best practice is explained in clear, step-by-step terms with practical examples, so you can apply them right away. Let’s dive in!

    1. Plan Your Flow Before You Build

    Jumping straight into Flow Builder without a plan can lead to confusion and rework. Always start by planning out your flow’s logic on paper or a flowchart. Define the business requirements, the records and fields involved, and the desired outcomes before you even click “New Flow.” Careful upfront planning helps you avoid errors and dead-ends in your design​. For example, if you're automating a case escalation process, map out the steps: what triggers the flow (e.g. case status change), what criteria must be checked (case priority, customer SLA), and what actions to take (notify a manager, update a field, etc.). By sketching this out, you might realize you need an additional decision branch or a lookup early on – before you build the flow. This saves time and ensures your final Flow design is logical and efficient. In short, measure twice, cut once – a solid plan will make your Flow development smoother.

    2. Build and Test in a Sandbox First

    One golden rule for Salesforce development (Flows included) is never build directly in Production. Always use a Sandbox or Developer environment to create and refine your flows. Building a flow in production can introduce unnecessary risk – mistakes might update or delete real data, and there’s no easy “undo”​. In a sandbox, you’re free to experiment and you can test different scenarios without impacting business operations.

    After building the flow, test it thoroughly in the sandbox. Salesforce Flow provides a debug mode and even a new testing feature to run flows with sample data​. Use these tools to step through your flow and verify it works as expected. For example, if your flow is supposed to create an Opportunity when a new Account is created, test cases like: a normal Account, an Account missing some data (to see how errors are handled), etc. Run the Flow’s debug for each scenario and confirm the outcomes. It’s always better to catch and fix issues in sandbox than to have a flow fail in Production. Only after you’ve vetted the Flow in sandbox should you deploy it to Production. This best practice ensures you avoid deploying untested flows in production​, protecting your org’s data and users.

    3. Avoid DML Operations Inside Loops

    Never perform DML statements inside a loop – this is a critical Salesforce Flow (and Apex) best practice. DML operations are actions like Create, Update, or Delete records. If you put a DML inside a Flow loop, you risk hitting Salesforce governor limits by executing too many operations in one go​. Salesforce has a limit (e.g. 150 DML statements per transaction), and a flow that updates records inside a loop can quickly exceed that. For instance, imagine a loop that iterates over 200 Opportunity records and updates each one; that would be 200 separate “Update record” actions, far above the limit – your flow will throw an error or fail partway.

    Best practice: bulkify your flow by using collection variables. In the example above, instead of updating each Opportunity inside the loop, add each record to a collection (an “Records” variable). After the loop finishes, use a single Update Records element to update the whole collection at once. This way, whether you had 5 records or 500, it counts as just one DML operation. This bulk update technique prevents governor limit errors​ and makes your flows more efficient. Always remember: pink Data elements (DML) should be outside of any Loop. The same goes for Get Records inside loops (use one initial query or accumulate IDs and query outside the loop if needed). By avoiding DML in loops, you ensure your flow can handle larger volumes of data and run without hitting limits​.

    Example scenario: You have a Record-Triggered Flow on Contact that, for each new Contact, loops through related Cases and closes them. If you use a Close Case action inside the loop, the flow might fail when a Contact has many Cases. The solution is to collect those Cases in the loop and then close them all at once with one update – avoiding multiple DML calls in a row. This way, your flow runs successfully even for Contacts with dozens of Cases.

    4. Use Subflows for Reusable Logic

    As your org grows, you’ll find that different flows may need to perform similar tasks. Subflows are a best practice to make your automation modular and avoid reinventing the wheel​. A Subflow is essentially an autolaunched flow that you can call (invoke) from another flow​. It can take input variables and return output values, allowing data to pass in and out.

    Use subflows whenever you have a sequence of actions or calculations that might be needed in multiple places or that logically represents a standalone piece of work. For example, suppose you have several processes that send a “Welcome Email” to new customers (one process for web sign-ups, one for manual Account creation, etc.). Instead of building the email-sending steps in each flow, create one Send Welcome Email subflow. The parent flows can simply call this subflow and pass in the Customer’s details. This reusable flow approach reduces redundancy and improves efficiency​ – if the welcome email template changes, you update one subflow instead of many flows.

    Subflows also help simplify complex flows. If a single flow is doing too much, consider breaking out a logical chunk into a subflow. For instance, a flow that calculates discount percentages might be useful in both a Sales process and a Renewal process – build it once as a subflow and call it from both. This makes your flows easier to maintain and test, since each subflow can be debugged on its own. Overall, leveraging subflows leads to cleaner, more modular automation design, which is especially beneficial as a beginner because it’s easier to build and reason about one piece at a time. Salesforce encourages creating reusable subflows to reduce redundancy in your automations​.

    5. Never Hard-Code IDs in Your Flow

    Hard-coding an ID means typing a literal record Id (a 15- or 18-character Salesforce record identifier) directly into your flow logic. Avoid hard-coded IDs at all costs – it’s a fragile practice that will break as you move your flow between orgs or change configuration. The reason is that record IDs (like those for record types, queues, or specific records) often differ between a Sandbox and Production. If you hard-code an Id, say for a Record Type or a User, that Id is usually unique to the sandbox. When you deploy the flow to Production, that Id might not exist, or refer to a completely different record, causing the flow to fail or behave unpredictably​.

    Best practices to avoid hardcoding: Use a Get Records element to dynamically query for the record you need (for example, query for the Record Type by name, rather than using its Id). Alternatively, store such values in Custom Metadata or Custom Settings/Labels and reference those in your flow​. For example, if you need an “HR Department” queue Id in a flow, create a Custom Label for it. Then your flow can use that label – when moving to another org, just update the label value for that org’s queue Id, and the flow works without changes. Salesforce flows have the ability to easily get IDs for things like record owners, record types, etc., so take advantage of that instead of hardcoding​.

    Example scenario: A beginner admin created a flow to auto-assign a case to the “Support” queue by hard-coding the Salesforce Id of that queue. It worked in UAT sandbox, but upon deployment, new cases weren’t getting assigned. Why? The queue’s Id in Production was different from the sandbox. The fix was to use a Get Records to find the queue by Name = "Support". This way, regardless of environment, the flow always finds the correct queue Id at runtime. Bottom line: Never embed literal IDs in your flow resources – always fetch or reference them dynamically for flexibility​.

    6. Implement Fault Paths for Error Handling

    Even well-built flows can encounter errors – perhaps a record doesn’t meet a validation rule, or a query returns no results when one is needed. Instead of letting the flow fail abruptly, use Fault Paths to handle exceptions gracefully. A fault path in Flow is what you configure to run when an element encounters an error (the little red connector that appears on Record elements, for example). By planning for faults, you can guide the flow to do something helpful when things go wrong​.

    Why implement fault paths? It improves user experience and maintainability. For users, you can show a friendly error screen or message rather than the generic “unhandled error” message​. For admins, you can set up an email alert or post to Chatter when a flow error occurs, so you get notified immediately with details. For example, if a Flow fails to create a record because a required field was blank, a fault path can catch that error and display, “Oops, we couldn’t create the record because a required field was missing. Please contact support.” Meanwhile, it could also send an email to the admin with the error details for troubleshooting.

    In practice, add fault connectors on critical elements like record Creates/Updates, especially if subsequent steps depend on them. You might route faults to a Screen element (for screen flows), or to a Subflow that logs errors, or to an Action that sends an email. Salesforce best practices suggest handling errors by creating fault paths – for example, logging errors or notifying the team when a flow fails​. This way, you don’t leave your users or support team in the dark about what went wrong. Implementing fault handling makes your flows more robust and enterprise-ready.

    7. Document Your Flows and Include Descriptions

    When you or someone else looks at a flow months later, good documentation can be a lifesaver. Always take time to document what your Flow does and why. At a minimum, fill in the Description field of the Flow itself with a summary of its purpose and any important details. Also use the description field on individual elements (like Assignment, Decision, etc.) to note their role if it's not obvious​. This practice helps the next person (or your forgetful future self) to quickly understand the flow’s objective​.

    For example, if you have a Decision element checking if an Opportunity is high value, write a description like “Checks if Amount > $50,000 to apply high-value process.” Such inline documentation is extremely valuable when troubleshooting or enhancing the flow later. Additionally, maintain external documentation: a simple document or spreadsheet listing each flow, its purpose, trigger criteria, and owner. This is especially useful in orgs with many flows. Salesforce’s own guidance emphasizes that documenting your flow’s business case and design is critical for long-term maintenance​.

    By documenting thoroughly, you ensure knowledge isn't lost when team members change. It makes onboarding new Salesforce admins easier and reduces the bus-factor (the risk of only one person understanding the automation). In summary, well-documented flows are easier to debug and less likely to be mistakenly altered, because everyone can understand their intent​. Don’t skip this step – it’s a best practice that truly benefits you in the long run.

    8. Use Clear Naming Conventions for Flow Elements

    Clarity in naming is a simple but impactful best practice. Establish and follow a naming convention for your flow resources (flows, variables, elements, etc.) to make them self-explanatory. Instead of accepting default names like “Screen Flow 3” or “Variable1”, use names that describe function, e.g. “New Hire Onboarding Flow”, “varContactList”, “Decision_IsHighValue”, etc. A good naming convention improves readability – anyone can glance at the flow and understand what each part is for​. Consistency is key here. For instance, you might decide that collection variables are plural (Accounts, ContactsList) while single record variables are singular (Account, Contact). You could use prefixes like “var” for variables, “scr” for screen, “dec” for decision, etc., or a CamelCase style – choose a standard and stick to it​.

    Example: Suppose your flow creates a task and sends an email. You might name the Create Records element “Create Follow-Up Task” and the Action “Send Email to Owner”. These names are far more informative than “CreateRecords1” and “Action1”. Similarly, name your flow formulas clearly, like “calc_DiscountPercent”, so their purpose is evident. Including brief info in the variable descriptions (e.g. “Stores list of contacts to update”) is another part of good naming practice. While it might take a few extra seconds when building the flow, this discipline pays off immensely when you or others revisit the flow later. Following clear naming conventions is even highlighted in Salesforce’s Flow standards​ because it makes maintenance and collaboration much easier.


    9. Only Use Flows When Appropriate (Consider Alternatives)

    Just because you can build something in Flow doesn’t always mean you should. A savvy Salesforce professional knows when to use Flow and when another tool might serve better​. Flows are excellent for many use cases, but there are scenarios where a formula field, validation rule, or Apex code might be more suitable. Always ask yourself: “Is Flow the best solution for this requirement?” This is especially important for beginners to understand – sometimes a simpler solution exists.

    Consider the complexity and performance: If a flow is becoming extremely complex with many loops, queries, and branches, it might be reaching the limits of what declarative tools can do gracefully​. For instance, a flow that needs to handle heavy calculations on thousands of records might run into limits or be hard to debug – an Apex trigger or batch job could handle it more efficiently​. On the other hand, if you need a simple field update or calculation, a Formula Field might achieve it without any flow at all, and with no maintenance. Likewise, Salesforce has specialized tools for certain tasks (example: Data Load for one-time updates, or Territory Management for assignment logic) that might reduce the need for a custom flow.

    Another angle is maintenance: Flows are point-and-click, but if your team has developers, sometimes writing an Apex class (with proper tests) could be more maintainable for very advanced logic. As a best practice, evaluate alternatives like Apex triggers, formulas, or reports when appropriate​. Don’t use a Flow to do something that a standard feature already does well (for example, use Approval Processes for complex approvals rather than a massive flow trying to mimic that). In summary, use the right tool for the right job – Flows are powerful, but they are one part of the Salesforce toolkit. Knowing their limits and when to leverage other solutions is key to building scalable and maintainable systems.

    Conclusion:
    By following these Salesforce Flow best practices, you’ll create flows that are efficient, robust, and easy to maintain as your org grows. From avoiding governor limit errors by bulkifying your loops to handling exceptions gracefully with fault paths, these guidelines help you steer clear of common pitfalls and deliver smooth automation for your users. Remember, the goal is to build flows that scale with your business and remain reliable over time​. Adopting a proactive approach – planning ahead, testing in sandbox, documenting, and continuously learning – will pay off with fewer headaches down the road.

    Now that you’ve learned the best practices, it’s time to put them into action. Go ahead and review your existing flows for improvements or start designing your next automation with these tips in mind. Ready to take your Salesforce Flow skills to the next level? For a deeper dive into building flows with confidence, we invite you to enroll in our Salesforce Flow course – check out the Salesforce Flow 2025 Course for expert guidance, hands-on exercises, and more tips to become a Flow pro. Good luck, and happy Flow building!

  • How to Automatically Update Child Records with Salesforce Flow

    How to Automatically Update Child Records with Salesforce Flow

    Objective: Solve a common Salesforce Flow problem – automatically updating all child records when a parent record is changed – with a step-by-step, beginner-friendly solution. This tutorial uses a record-triggered Flow (after-save) to update related records.

    Introduction

    Have you ever needed to ensure that when a parent record updates, all its related child records update too – without manual effort? For example, if an Account’s status changes, you might want to update all related Contacts, or when an Opportunity is closed, update all related Opportunity Products. In Salesforce Flow, this can be achieved easily with a Record-Triggered Flow. In this guide, we’ll walk through an example: when an Account’s “Active” field changes to “No,” automatically set all related Contact records to “Inactive.” This solution requires no Apex code and can be done with just clicks using Flow Builder.

    Why this is useful: By following these steps, you’ll solve an immediate automation need and ensure your data stays in sync – a big win for admins looking to work smarter, not harder!

    Step 1: Identify the Trigger and Related Records

    First, clarify the requirements:

    • Trigger Object: The parent object that, when changed, will trigger the flow. (In our example, Account).
    • Trigger Condition: The specific change or criteria on the parent that should cause the update. (E.g., Account “Active” field changed from Yes to No).
    • Target Object: The child records that need updating. (E.g., Contacts related to the Account).

    In our scenario:

    • When an Account is marked not active (Active = "No"),
    • Then all Contacts linked to that Account should be updated (we’ll set a Contact field “Inactive__c” to true, for instance).

    Having this clear will help configure the flow correctly.

    Step 2: Create a Record-Triggered Flow

    1. Navigate to Flow Builder: In Salesforce Setup, type “Flows” in the Quick Find and click Flows. Click New Flow.

    2. Choose Flow Type: Select Record-Triggered Flow and click Create. We use a record-triggered flow because we want the automation to run automatically when a record changes (in this case, an Account).

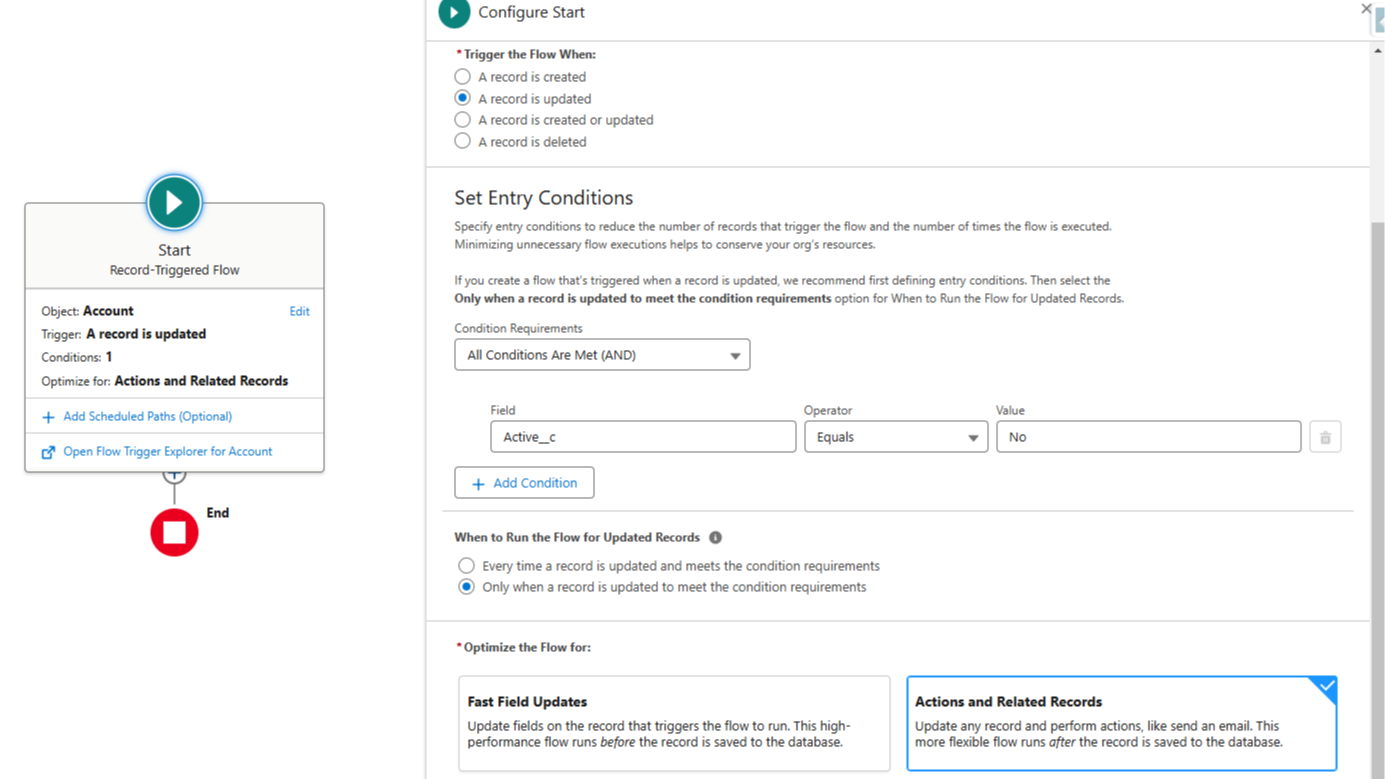
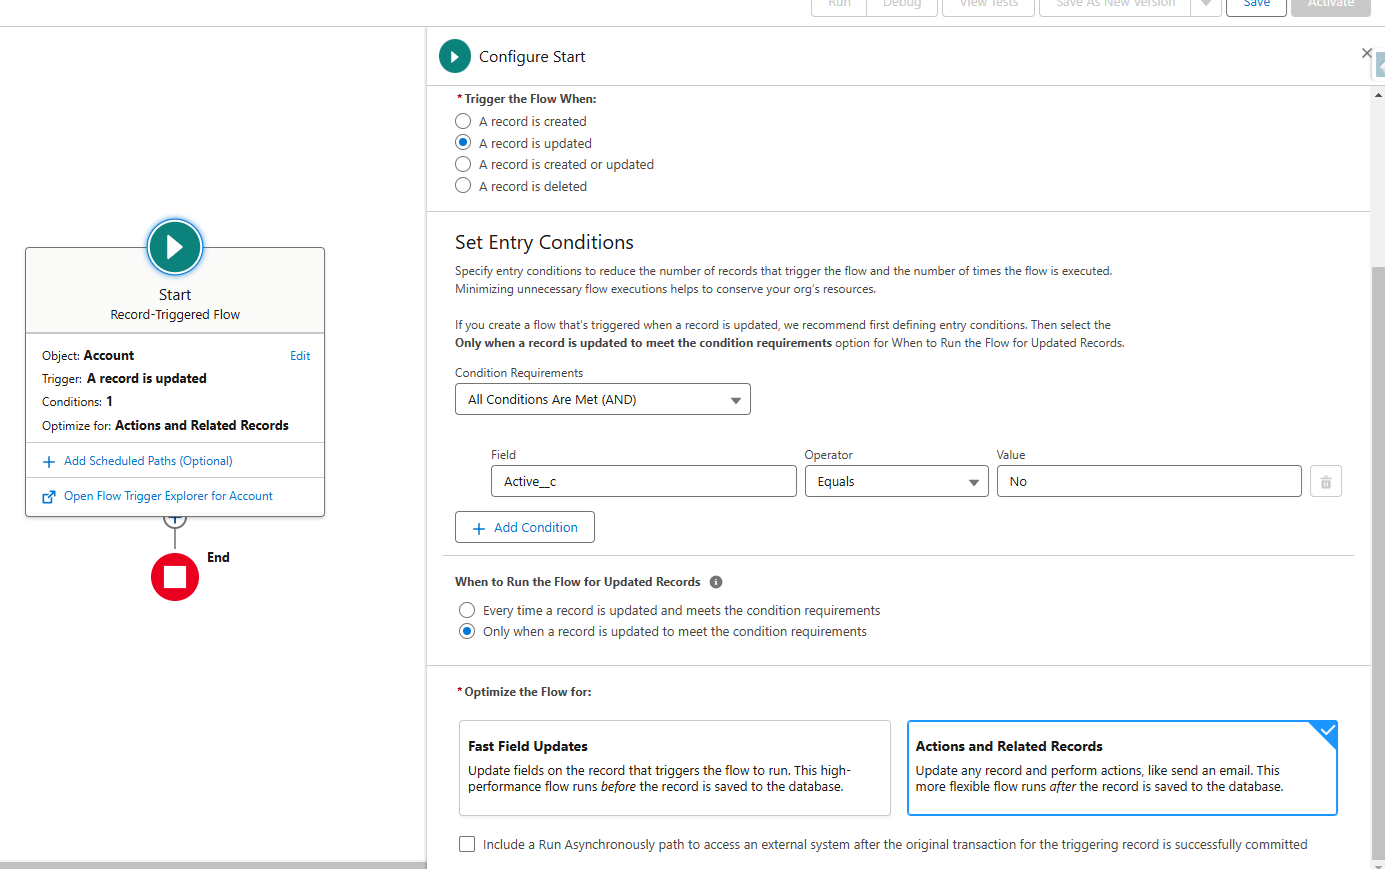
    3. Configure the Trigger: In the Start element that appears:

      • Set Object to Account.

      • For Trigger condition, choose “A record is updated” (since we care about changes to existing accounts).

      • Under Entry Conditions, define Active field Equals “No”. This ensures the flow runs only when an Account is set to not active.

      • Choose When to Run the Flow: Select Only when a record is updated to meet the condition requirements. We choose this so that the flow runs only when the account is updated to meet the condition for the first time.


      • Ensure Optimize the Flow for: is set to Actions and Related Records (this is the default for after-save in newer Salesforce versions; older UI labels called this “after save”). This setting confirms we can interact with related records in this flow.
      • Why after-save? After-save flows run after the Account is saved to the database, which means we can safely perform actions on other records. Salesforce documentation notes that before-save (fast field updates) flows are limited to updating the same record, whereas after-save (actions and related records) flows can perform additional actions like creating or updating related records.

      Now our flow will trigger at the right time: whenever an Account becomes inactive, the flow will fire after that change is saved.

    Step 3: Update Related Child Records

    Now we need the flow to gather all related Contacts of the Account:

    1. On the flow canvas, click + Add Element and select Update Related Records.

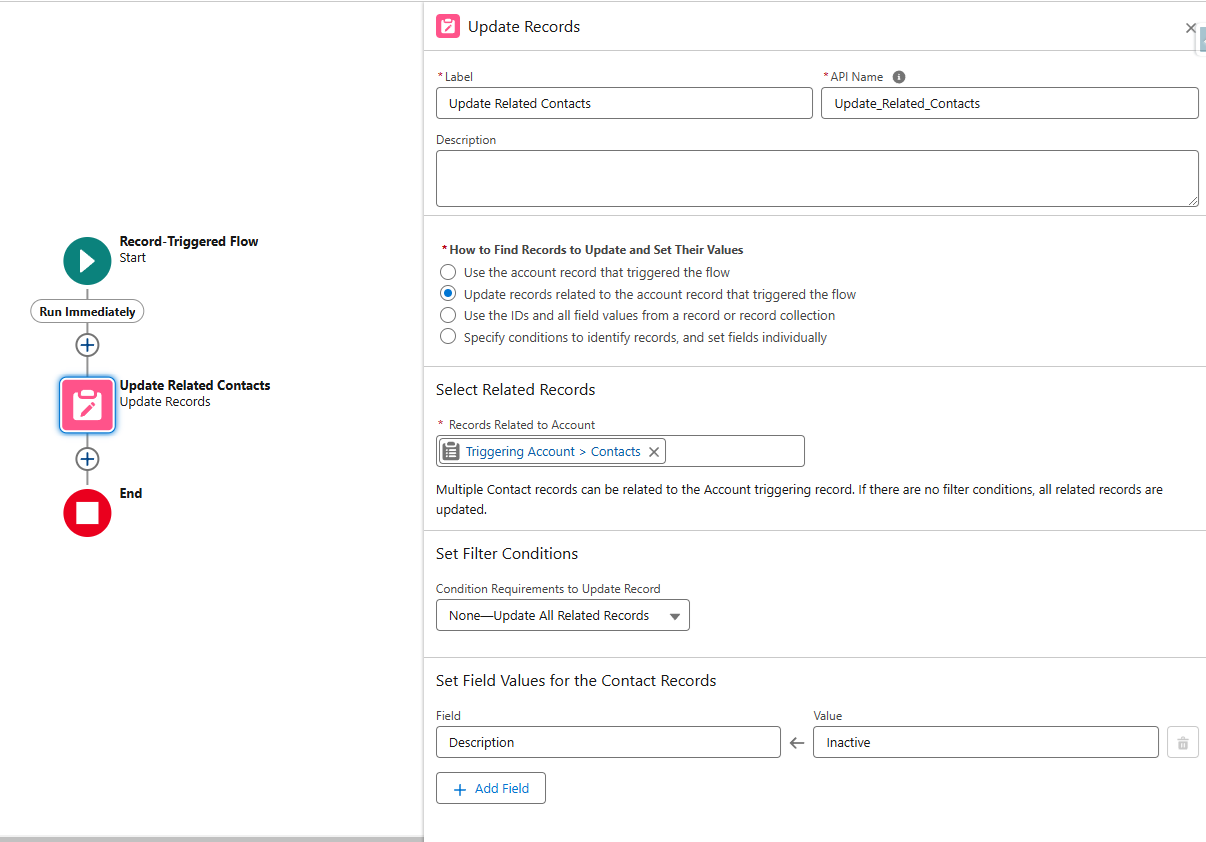
    2. Label it something like “Update Related Contacts” In the Update Records configuration:

      • How to Find Records to Update and Set Their Values: Update records related to the account record that triggered the flow
      • Select Related Records: Triggering Account > Contacts
      • Filter Conditions: None—Update All Related Records
      • Set the Field Values to update:

        • Field: “Inactive__c” (or a similar checkbox/field on Contact that denotes inactive status like Description__c).
        • Value: True. (Or set to the appropriate value/checkbox indicating the contact is inactive or should be closed out. If using a Text or Picklist field, set the value accordingly, e.g., Status = “Inactive”).
    3. Save the Update Records element. This single element will iterate through the Contact collection and update each Contact’s field as specified.

      (Behind the scenes, Flow bulkifies this action – it’s one transaction updating multiple records, which is efficient. As a best practice, avoid updating records one-by-one in a loop if a single bulk update can do the job.)

      If we needed more complex logic per record, we could drag a Loop element to iterate over each Contact, use Assignment elements inside the loop to set values conditionally, then use a second Update Records element to save the changes. But for this straightforward field update, the single update on the collection is the cleanest solution.

    Step 4: Test the Flow

    Before activating, it’s crucial to test the flow to ensure it works as expected (and only updates what it should):

    1. Test in Debug Mode: Click the Debug button in Flow Builder. Provide test input by selecting an Account record (you can choose an Account that has some Contacts). Simulate changing the Account’s Active field to “No” in the debug run. The debug logs will show if the flow retrieved the contacts and updated them. Verify that the “Update Related Contacts” step executed and how many records were updated.

    2. Activate the Flow: If the debug results look good (no errors, and the intended updates showed up), click Activate. The flow will start listening for real record changes.

    3. Live Test: Go to a real Account record in Salesforce (preferably in a Sandbox or test environment). Change the Active field from Yes to No (or whatever the trigger condition is) and save. Then, check the related Contacts for that Account – each Contact’s Inactive field (or whatever you chose) should now be set to True (or updated accordingly). You might need to refresh the record page to see the changes.

    4. Optionally, test a negative case: change an Account that has Active = Yes (or doesn’t meet criteria) and ensure the flow does not fire. This confirms your entry condition is specific enough.

    Step 5: Deploy and Monitor

    Once tested, your flow is effectively automating the child record updates. Keep an eye on it initially:

    • Use the “Paused and Failed Flow Interviews” section in Setup to see if any executions failed (e.g., due to permissions or data issues).
    • Ensure users have permission to the fields being updated. (In our example, if a user triggers the Account change, the flow runs in system context, so it usually can update child records regardless of user’s rights – but if using a screen flow or other scenarios, be mindful of permissions).

    This flow will now save your team time and prevent data inconsistencies. No more manually updating each related record – it’s all handled automatically!

    Tips and Best Practices

    • Bulk Considerations: The approach shown (Update Records) is bulk-safe. If someone mass-updates Accounts (via Data Loader, for instance), the flow will handle batches up to the limit without hitting governor limits. We’re using one SOQL (to get contacts) and one DML (to update them) per flow run, which is efficient.
    • Selective Updates: We updated all child contacts unconditionally. If you need conditional logic (e.g., only update contacts that meet certain criteria), you could add filters in the Update Records (for example, only get Contacts where Status != "Inactive" to avoid redundant updates).
    • Avoid Recursion: The flow updates Contacts but not Accounts, so we won’t retrigger itself. Be careful in flows that update the same object that triggered them (you may need a condition to prevent infinite loops).
    • Documentation: Add a description to your Flow and elements so future admins know what it’s for (e.g., “This flow deactivates contacts when an account is deactivated”).

    Conclusion and Next Steps

    You’ve now built a Salesforce Flow that keeps parent-child data in sync automatically. This “update child records” pattern can be applied to many scenarios (Opportunities → Opportunity Products, Campaigns → Campaign Members, etc.). With each Flow you build, you’re replacing what might have been tedious manual work with effortless automation.

    If you found this tip useful, imagine what else you can do with Salesforce Flow with the right guidance. From complex approval processes to integrating external data – Flow can do it all with clicks.

    Call to Action: Ready to become a Salesforce Flow expert? 🚀 This tutorial is just the beginning. To dive deeper and learn pro-level Flow techniques, best practices, and real-world project examples, check out my Salesforce Flow course. The course, Salesforce Flows: The Complete Guide, has helped thousands of professionals automate business processes like a rockstar. Enroll now and take your Salesforce skills to the next level!

    Your journey from Flow beginner to automation champion starts today – see you in the course! 🙌

  • Sneaky Address Fields

    Sneaky Address Fields

    Quick tip this week!

    The address field data type inside of Salesforce is made up of five constituent parts:

    1. Street
    2. City
    3. State
    4. Postal Code
    5. Country

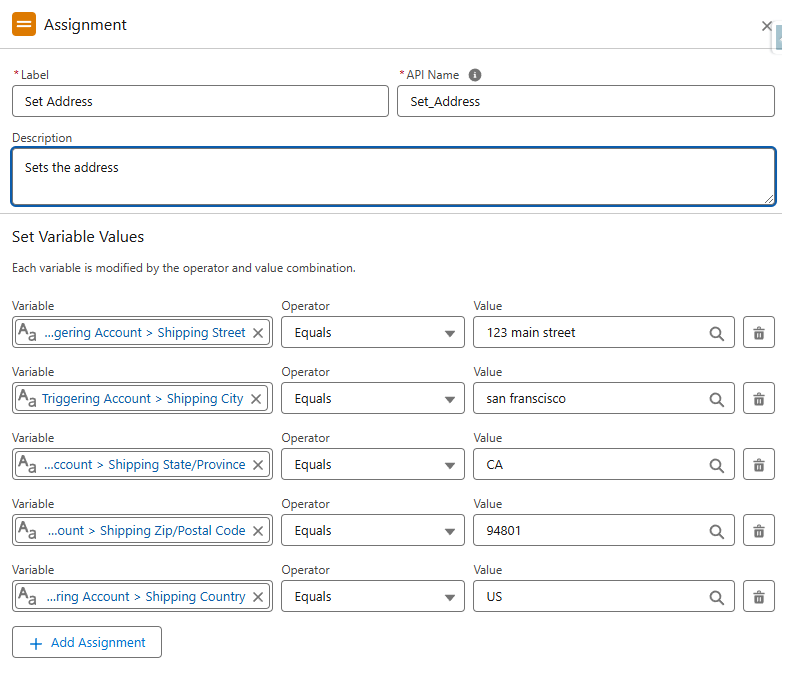
    When setting the values of an address field inside the Flow Builder, you must work with the parts individually.

    For example:


    Set fields one by one

    You can see above that the assignment sets each component part individually.

    This will successfully update the address in the flow.

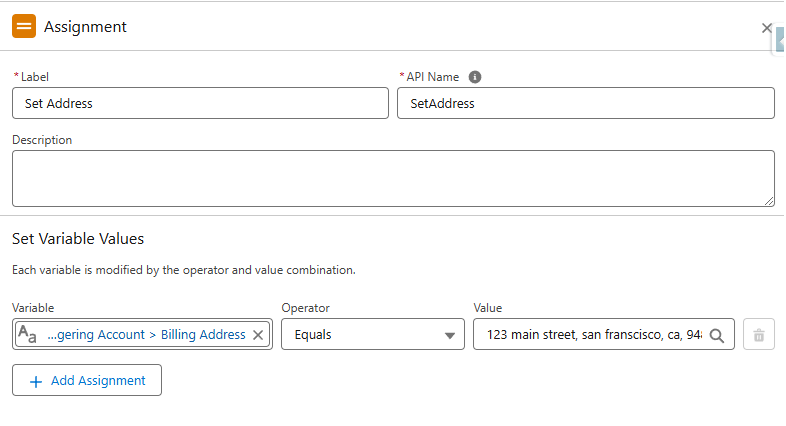
    Below, you can see the incorrect approach:


    Directly setting the full field is a no-go

    Logically, there's nothing wrong with the approach in the screenshot above.

    It seems to make sense that you could set the whole address field at once.

    And the flow builder will even successfully debug!

    But if you activate and test this flow on an actual record it will throw an error at run time.

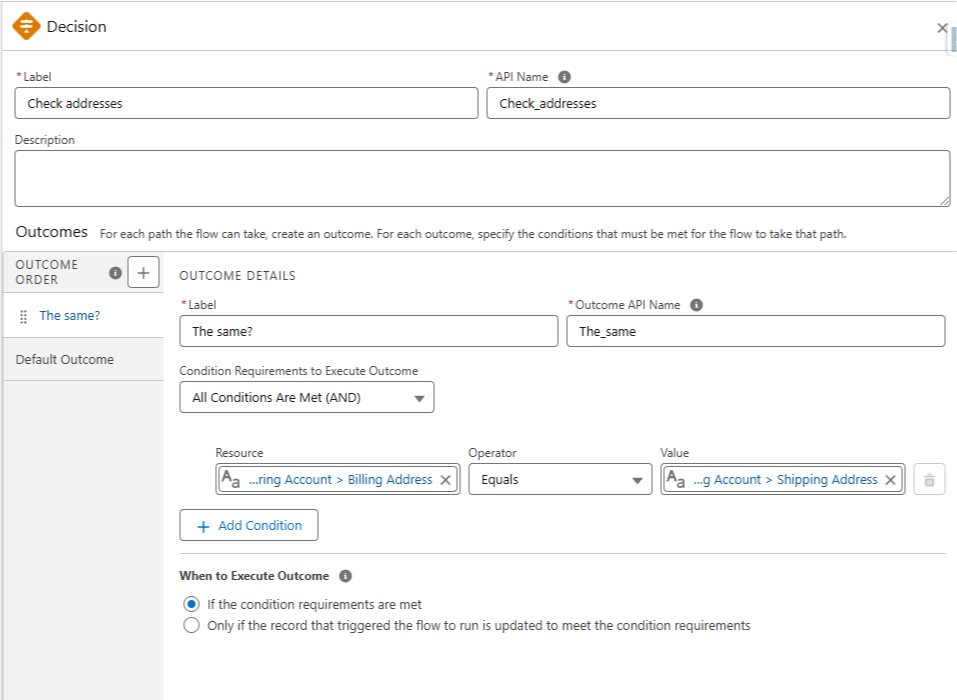
    This is also true when you're comparing addresses (like in a Decision element).

    You have to compare the individual address parts rather than the entire field.

    The below example would not function as expected:


    Direct comparison doesn't work

    Once again, the flow will run, but it would not successfully compare the actual address values.

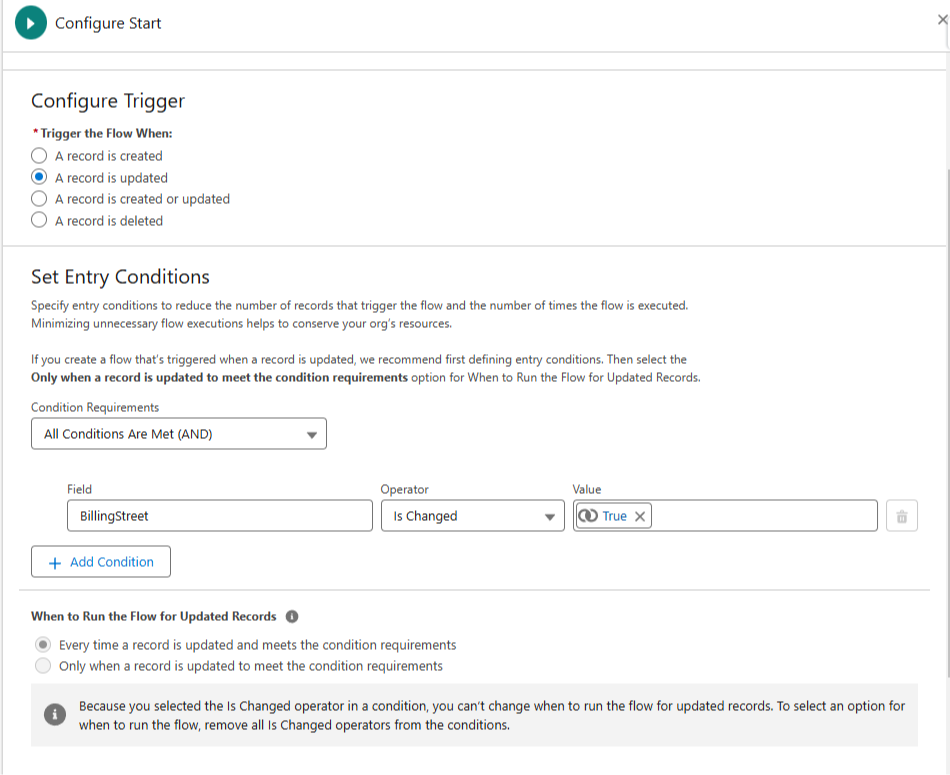
    And one final example.

    If you want to trigger a flow when an address changes — then you must trigger off one of the constituent parts (like BillingStreet).


    Notice this start element looks at BillingStreet

    Triggering on the full "BillingAddress" field would not work as expected i.e. the flow doesn't fire at all.

    Now I can't really explain the underlying why behind all this (yet).

    But I can say it's good to know addresses function like this because its frustrating if you don't know what's going on and are getting bugs.


    Hope it helps!


    Best,

    Nick

  • How to Quickly Document Your Flows

    How to Quickly Document Your Flows

    Happy Saturday!

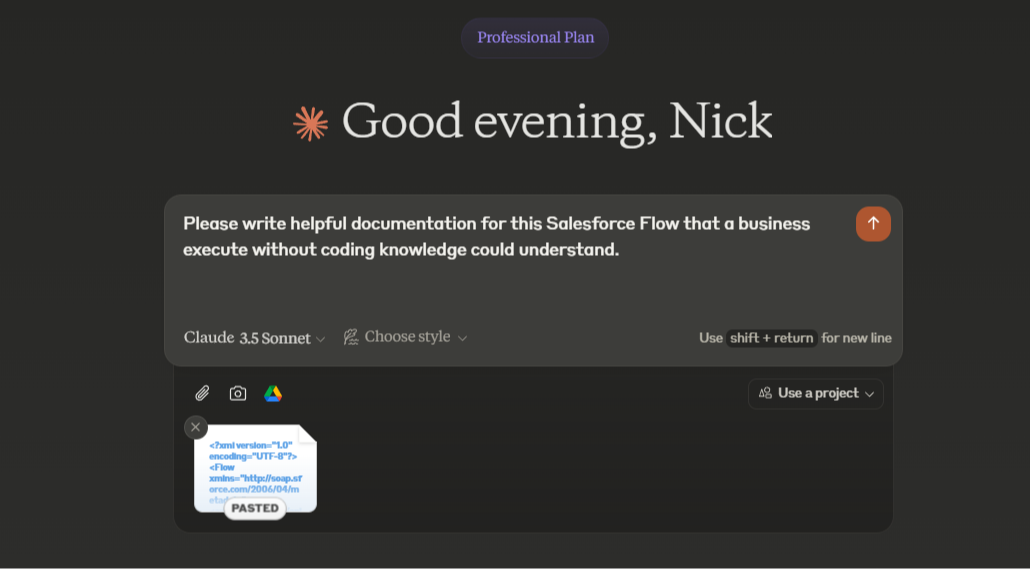
    This week's tip dives into the technical side of Salesforce, but the payoff is worth it: you’ll learn how to create detailed Salesforce Flow documentation quickly and efficiently with tools like ChatGPT or Claude AI.

    This method also allows you to upload flows to these AI tools for insights on improving performance, debugging, or re-architecting them for optimal functionality.

    Why This Matters:

    • Save Time: Skip manually documenting complex flows.
    • Enhance Understanding: Get clear explanations of flows you’re unfamiliar with.
    • Improve Quality: Use AI to identify inefficiencies and suggest improvements.
    • Delight Clients: Generate professional documentation with ease.

    Getting Started:

    Here’s what you need to set up before using AI for flow documentation:

    1. Visual Studio Code: Install and configure it as your development environment.
    2. Salesforce CLI: This tool lets you connect to your Salesforce org and retrieve metadata.
    3. Node.js (optional): A runtime needed for Salesforce CLI and other tools.


    Step-by-Step Workflow:

    Install Tools:

    Create a Project and Authenticate with Your Org:

    • Use the VS Code Command Palette (Ctrl+Shift+P or Cmd+Shift+P)
    • Create a new Project (name it anything you like)
    • Open the Command Palette again (Ctrl+Shift+P or Cmd+Shift+P)
    • Select “Authorize an Org” and log in to the Salesforce environment containing your flows.


    Retrieve Flow Metadata:

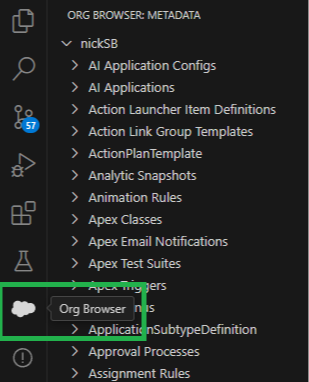
    • In VS Code, click the cloud icon labeled “Org Browser.”
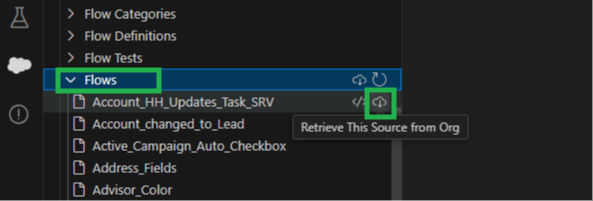
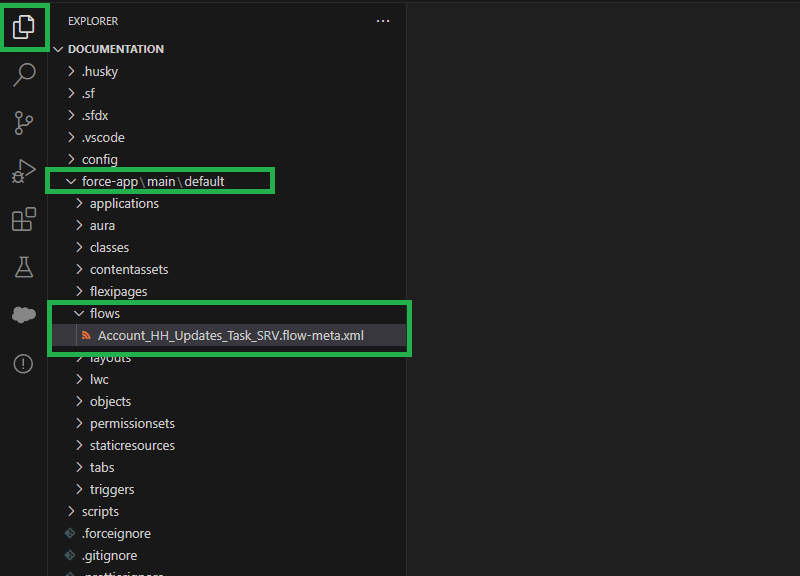
    • Scroll to “Flows” and download the metadata for the flows you want to document.


    Generate Documentation:

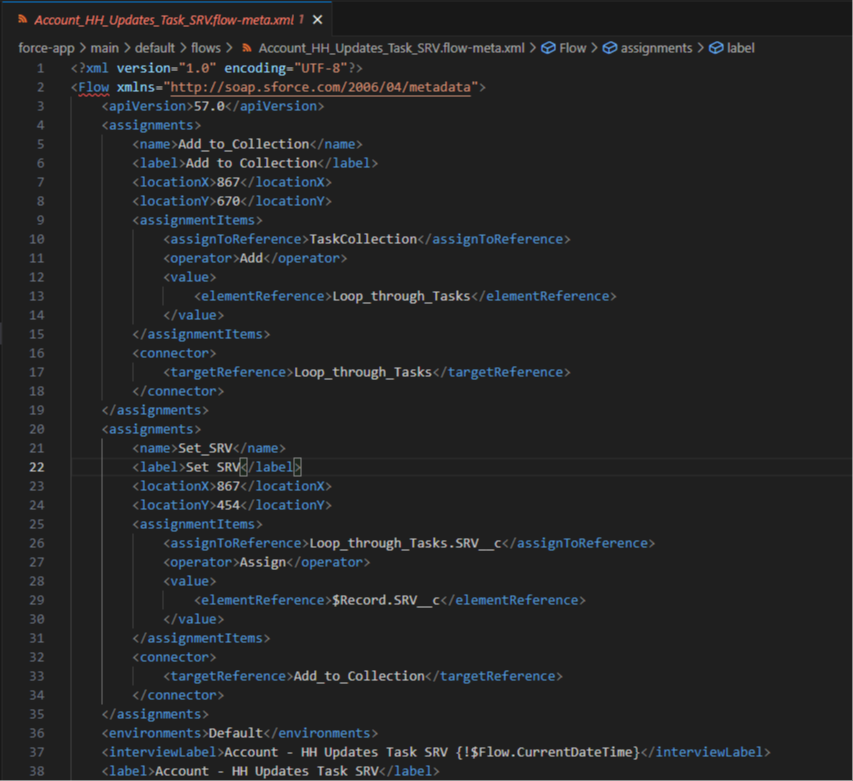
    • Open the retrieved flow’s XML file in VS Code
               
               
    • Copy its contents and paste them into ChatGPT or Claude AI.


    You can ask the AI to:

    • Summarize the flow.
    • Suggest improvements.
    • Diagnose potential bugs.
               

    And that's it! The AI will output new documentation (or answer your other questions) just as requested.

    You can also ask questions like

    • How might you improve this flow?
    • On a scale of 1-10 how well in this flow built?
    • What are the strengths and weaknesses of this flow? 

    In conclusion, this is a powerful time saving approach to creating flow documentation

    And this method can double as an AI mentor for your flow building skills!

    Hope it helps.


    Best,

    Nick 

  • Flow Building Framework

    Flow Building Framework

    "Everything should be made as simple as possible, but not simpler."
    — Albert Einstein


    What is the simplest set of principles for building Salesforce flows?

    I was brain storming this week and wanted to come up with an easy system that a beginner could quickly memorize.

    Here's where I landed: FRAME your flows (if you're a beginner).

    F - first, avoid flows entirely

    R -  reverse engineer what you want the flow to do

    A - add checkpoints

    M - make your flow easy to change

    E - evaluate: who does this help?


    If you're a beginner, FRAME provides a simple structure to help you get started and build effective flows.

    Let's take this letter by letter.

    F - first, avoid flows entirely

    The easiest flow to build is the one that doesn't exist.

    This cue is to prevent bad effects from "man with a hammer" syndrome.

    It's meant to encourage routinely exploring configuration options like quick actions as solutions before diving into automation.

    Now, automation exists for a reason, and if you think flows are the solution you need, then...

    R -  reverse engineer what you want the flow to do

    Begin with the end in mind.

    Define the ideal outcome of the flow.

    This flow creates a new case when an opportunity is closed won.

    This flow guides a user to create a new contact with an email and phone number. It should always be available at the bottom of the screen.

    The process of defining what the flow should do guides you on what kind of flow to build.

    It also gives you a blueprint for what elements you'll need on the canvas.

    Creating a case? Use the create element.

    Need information a related contact? Use a get element.

    Fires when an opportunity is closed won? Add that to the start criteria.

    Once you've thought through the flow backwards, then...

    A - add checkpoints

    You've listed four or five things you want your flow to do.

    Now, pick which one should be first.

    Next, pick which one should be last.

    Then, try to sequence the other steps in between.  

    Each of these items is now a "checkpoint".

    It can be daunting building an entire flow start to finish when you're still learning.

    Breaking the steps down into smaller, more manageable, pieces helps you build momentum.

    Get to the first checkpoint, save your work, and then test how the flow works so far.

    Did you configure your start criteria and save the flow? Nice! First small win.

    Did the flow successfully go from the start criteria to the get element right afterwards? Awesome! Second small win.

    Keep stacking small wins, one at each checkpoint, and soon enough the flow is done.

    Once your flow is built, double check if it's...

    M - make your flow easy to change

    Good software architecture is easy to change (because the business always changes its mind).

    Therefore, well designed flows are easy to change too.

    We follow this philosophy by: 

    • Naming elements well
    • Adding descriptions to elements
    • Keeping flows small 
    • Building each flow with a single responsibility

    This reduces long-term maintenance, and makes your life easier from the get go. With that done, let's...

    E - evaluate: who does this help?

    All flows are built to automate or simplify something.

    By extension, they should make someone's life easier in some way.

    Flows are fun, but we have to remember they're meant to help specific people do specific things.

    We must double check our flow simplifies and helps someone - even if it's only one person.

    If we've built a flow and it doesn't help anyone at all, let's go back to the drawing board and find a way to make sure our flow fulfills its purpose of being useful to someone.


    And that's it! If you're a beginner, remember to FRAME your flows and you'll always be in good shape.


    Best,

    Nick

  • How to Query for a Record Type in Salesforce Flow

    How to Query for a Record Type in Salesforce Flow

    Best Practice: Query for your record types in Salesforce Flows (and Apex)

    What You'll Need:

    • Object Name
    • Record Type Name

    How To Do It:

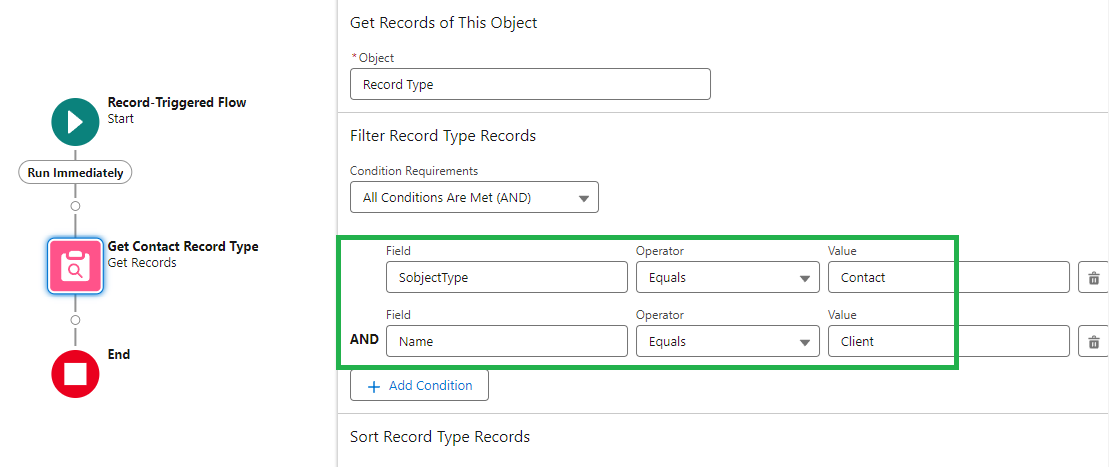
    • Use a Get Records element in your flow on the "Record Type" object.
    • Filter on the SobjectType field
    • Filter on the Name field 

    In the screenshot above you can see we're querying the "Record Type" object.

    We set the SobjectType = Contact, and the Name = Client.

    So this query searches Record Types on the Contact object where the name of the record type is "Client".

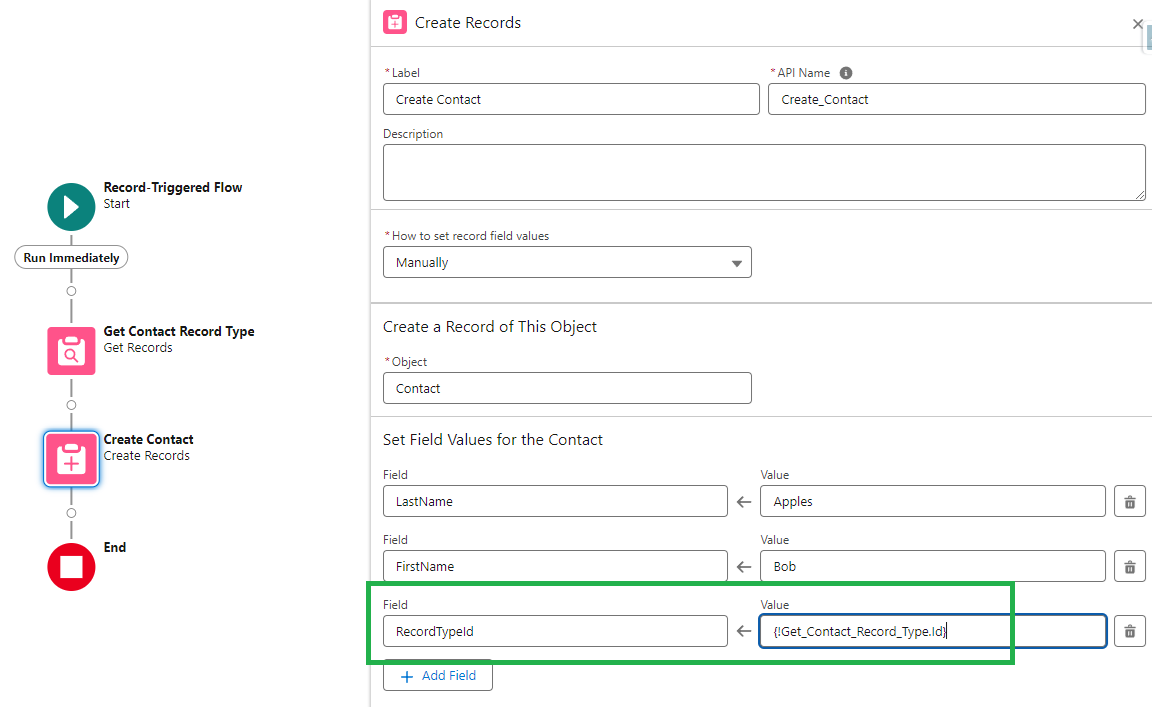
    Then we can use the result of that query to set the RecordTypeId field in a Create or Update record element:

    When It Matters:

    • When creating new record types in lower sandbox environments the RecordTypeId will change as you promote it to higher sandbox environments (and production). This approach helps avoid problems during deployments
    • If a Record Type is used in multiple places in a flow, and then you need to change it later, you'll save yourself time by only having to update one single query rather than reworking multiple create / update elements
    • Knowing this approach is useful in technical interviews when asked about architecture best practices

    And that's a wrap!

  • How to Schedule a Salesforce Flow Annually

    How to Schedule a Salesforce Flow Annually

    A colleague asked this week, "Can flows be scheduled to run annually? Or do I need an Apex Trigger for that?"

    Good question.

    At first glance, it looks like there is no annual option in a Scheduled Flow.

    But there is a workaround!

    Pretend we want our Flow to run once a year on Account records.

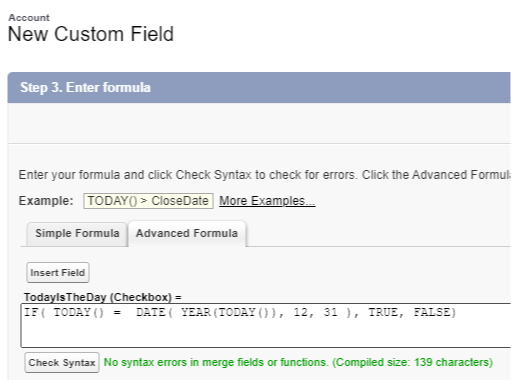
    We can make a formula field on the Account object that returns TRUE when today is the day our Flow should run, and false every other day of the year.

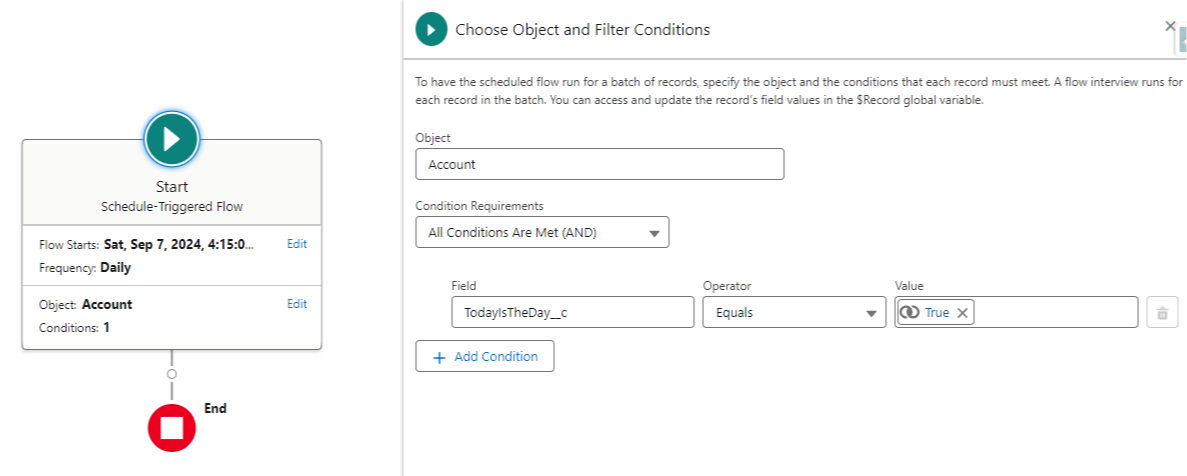
    With this formula created we can use it as a condition in our Scheduled Flow Start element:

    That's it.

    We configure our Flow to run daily and find any records where this formula field is true.

    364 days a year it runs and finds zero records so it does nothing.

    And on the 365th day, it runs and finds all the Accounts we want to perform some logic on, and runs the logic.

    Magic!

    We can of course add in additional entry criteria to better target certain records we're looking to run the Flow on — but the formula field remains the key.

    And that's a wrap for this week.

    Hope this helps you at some point in the future :)


    Best,

    Nick


  • A secret good flow builders know...

    A secret good flow builders know...

    Have you ever used custom meta data?

    Building your Flows to make long term maintenance easy is an excellent design principle (and custom metadata can help).

    Let me tell you a story.

    I have a client in the banking industry.

    And I recently built them a screen flow that helps in their credit risk evaluation process.

    It's big and complicated. There are 23 screens in the flow, one for each unique credit risk scenario.

    Depending on the risk level of the loan, a bank employee using the Screen Flow is shown a list of up to four other bank employees who must review the loan information before it gets approved.

    And with 23 credit scenarios, managing the reviewers for each one is complicated.

    The reviewers change frequently. They swap roles.

    And sometimes new reviewers get added.

    The goal was to avoid having to update the flow (and all 23 screens) every time a reviewer changed.

    Enter custom meta data.

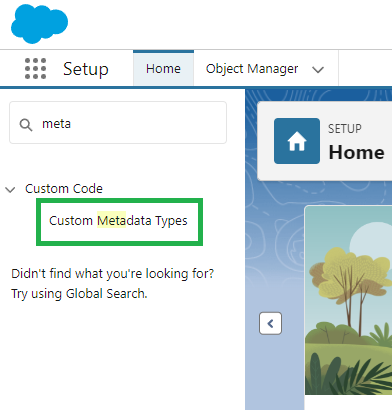
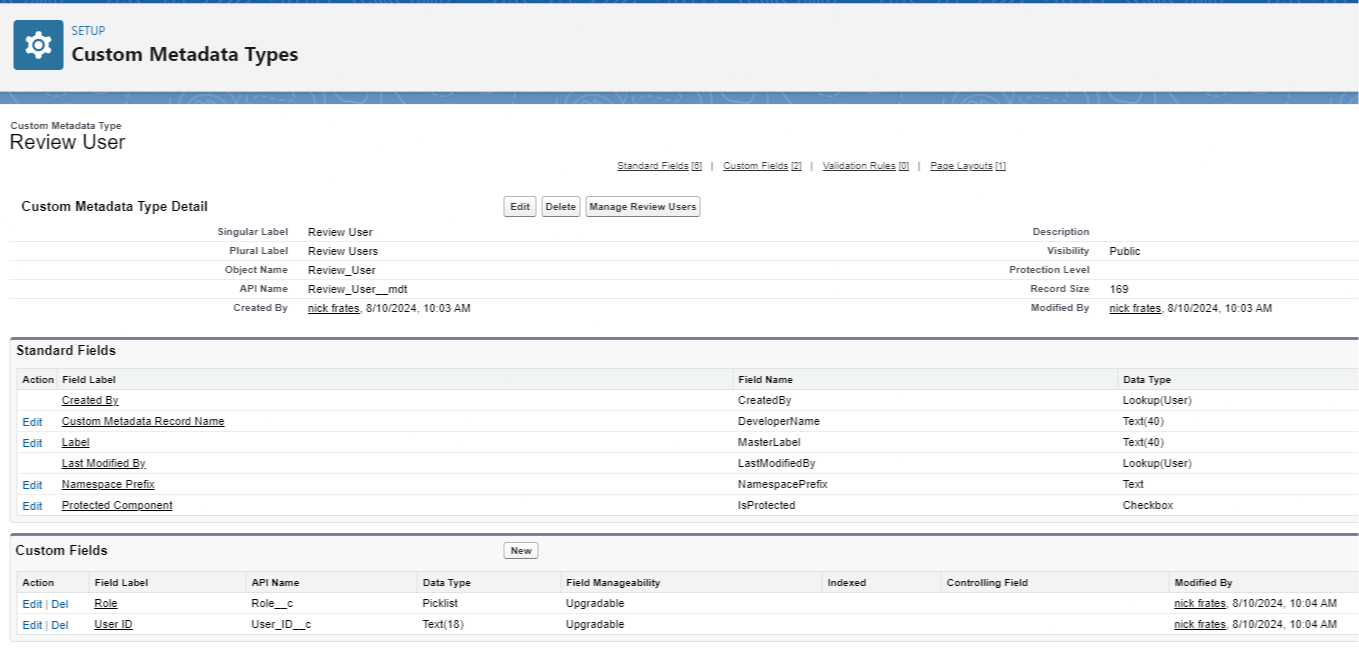
    By creating a custom meta type called "Review User", I was able to store all the review user information outside the flow.

    Custom metadata is like it's own object.

    You can create fields and then create records to store information.

    In my case, I created a User_Id__c and a Role__c field.

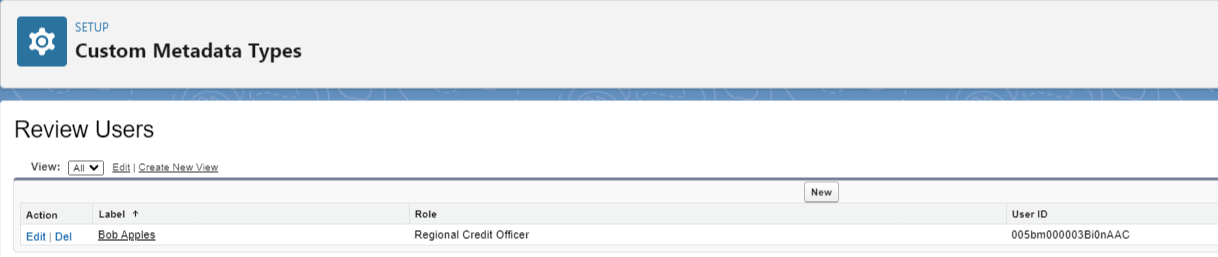
    Then I created a record for each reviewer.

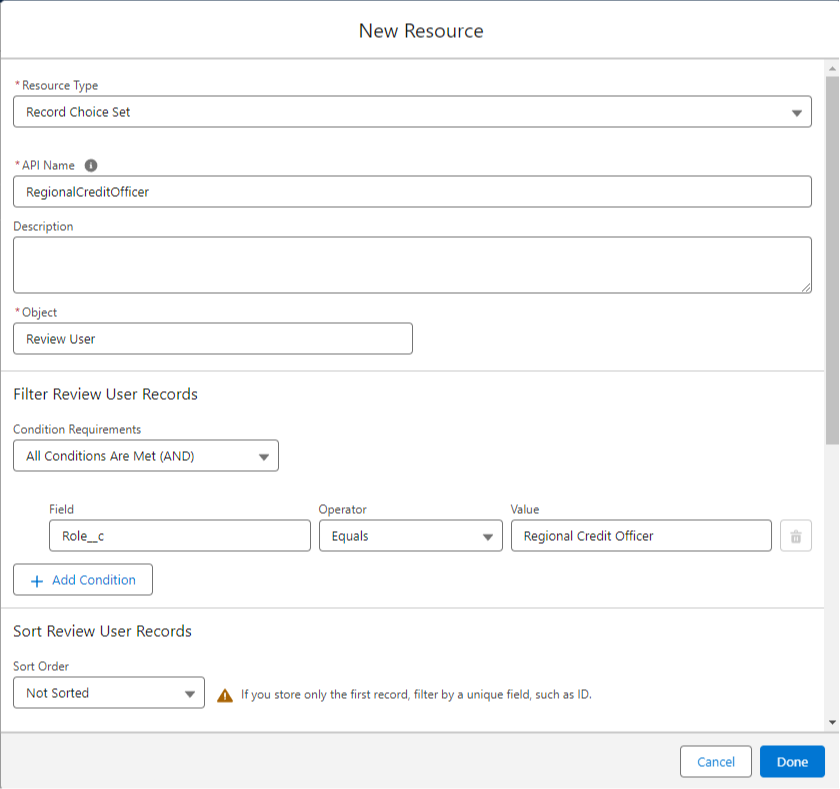
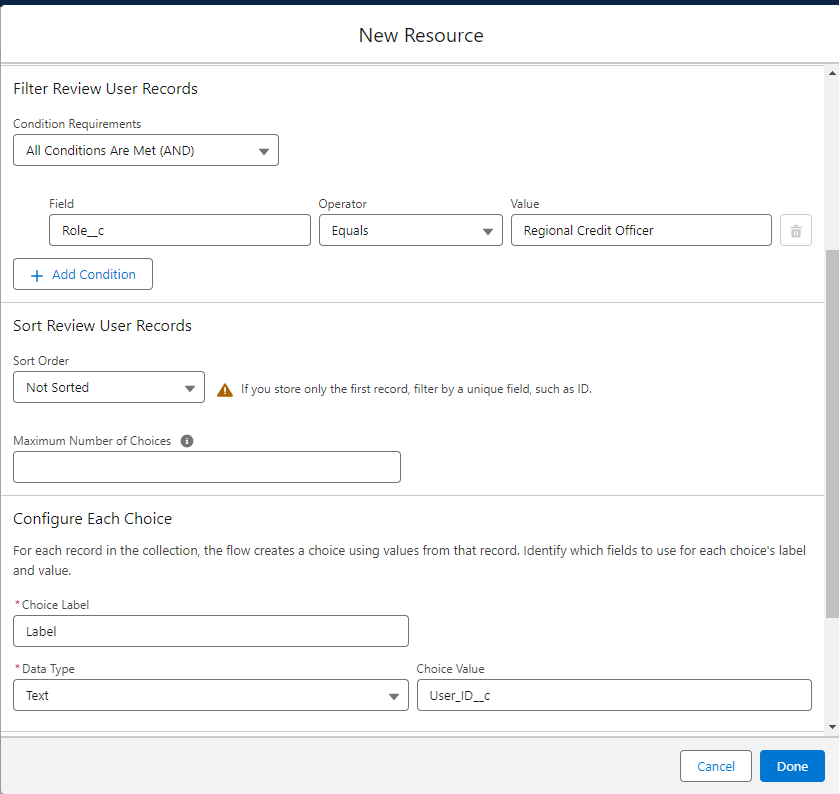
    This is great because now, in my flow, I can use a record collection drop down to query for users in this role (storing the User ID for later use)

    That means I set the flow up once with a Record Choice collection and its ready forever.

    All my Flow dropdowns will use this record choice collection, and they'll be dynamically kept up to date.

    Adding users and changing roles is all done to the meta data records, rather than in the flow.

    My client loved this because it makes future changes simple.

    Other scenarios you could use custom metadata in include:

    • Discount Rules
    • Lead Scoring Criteria
    • Tax Rate Management

    You get the idea.

    We store compicated and changing information in metadata so that our flow doesn't have to be updated all the time.

    The flow queries the metadata. And any changes we need to make are done on the metadata records.

    Hope this helps!


    Best,


    Nick


    P.S. Check out this YouTube video from me with a live example

    https://youtu.be/7NxLsq8SQNM