Category: Flows

  • Stop Copy-Pasting Flow XML: Set Up Claude Code and the Salesforce CLI

    Stop Copy-Pasting Flow XML: Set Up Claude Code and the Salesforce CLI

    Hey friends,

    A while back I wrote How to Quickly Document Your Flows. The trick: pull a flow's XML down into VS Code, copy it, and paste it into ChatGPT or Claude so the AI can explain or document it.

    A reader asked me about it recently, and it made me realize something. That trick still works, but there's a much better way to do it now.

    Set up the Salesforce CLI and Claude Code once, and you can just ask the AI about your flows right inside your project. No copying. No pasting. No 3,000-line XML file stuffed into a chat window.

    Here's exactly how to set it up, step by step.

    Why this is better than copy-pasting XML

    Claude Code is an AI assistant that runs in your terminal (or inside VS Code). When you start it in your Salesforce project folder, it can read the files in that folder. That includes everything you've retrieved from your org:

    • Flows (.flow-meta.xml)
    • Apex classes and triggers
    • Custom objects and fields
    • Pretty much any metadata you pull down

    So instead of copying one file at a time, you ask in plain English:

    • “Explain what this flow does.”
    • “Find bugs or risky logic in this flow.”
    • “Document this flow for an admin who's never seen it.”

    And because it can see the whole project, it can connect the dots. If your flow calls an Apex action, it can open that class too. That's something the copy-paste method just can't do.

    What you'll need

    • Visual Studio Code (free)
    • The Salesforce Extension Pack for VS Code (free)
    • The Salesforce CLI (free)
    • Claude Code (needs a paid Claude plan, like Pro or Max, or a Claude Console account. The free Claude plan doesn't include it.)
    • A Salesforce org you can log into. I'd strongly suggest a sandbox or Developer Edition org.

    Step 1: Install VS Code

    Go to the official site, code.visualstudio.com, and grab the installer for your computer (Windows, Mac, or Linux). Run it and accept the defaults.
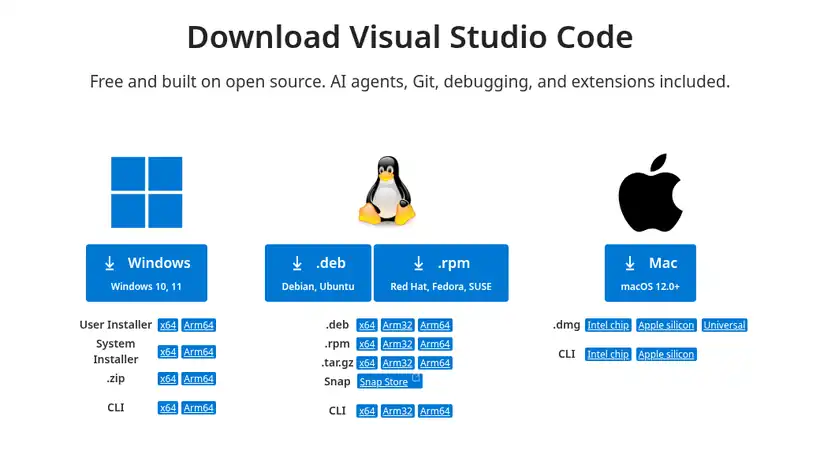
    Official Visual Studio Code download page at code.visualstudio.com with installer buttons for Windows, Linux (.deb and .rpm), and Mac

    The official VS Code download page (code.visualstudio.com/download).

    Step 2: Install the Salesforce CLI

    Head to the Salesforce CLI page on developer.salesforce.com and download the installer for your operating system. There are installers for macOS (Apple Silicon and Intel), Windows (x64 and ARM64), and Linux.
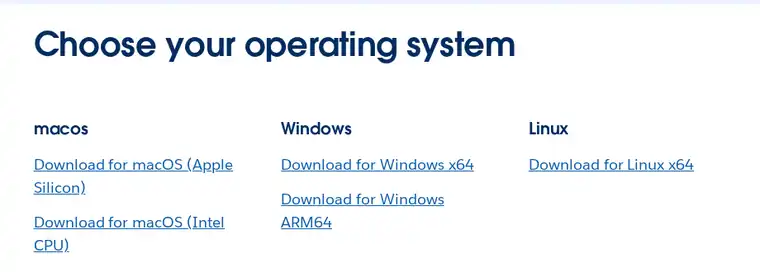
    Salesforce CLI download page on developer.salesforce.com showing installer links for macOS, Windows, and Linux

    Pick the download that matches your computer.

    Once it's installed, open a new terminal window and check that it worked:

    sf --version

    If you see a version number, you're good. If you get “command not found,” close and reopen your terminal (or restart VS Code) and try again. Salesforce's official install guide covers the other options, like installing with npm.

    Step 3: Install the Salesforce Extension Pack

    In VS Code, open the Extensions panel (the four-squares icon on the left), search for Salesforce Extension Pack, and click Install. Make sure the publisher is Salesforce. Here's the official Marketplace listing.

    The extension pack uses the Salesforce CLI under the hood, which is why we installed the CLI first.

    Step 4: Install Claude Code

    Anthropic's official install docs have the current commands. At the time I'm writing this, the recommended “native install” is one line in your terminal.

    macOS, Linux, or WSL:

    curl -fsSL https://claude.ai/install.sh | bash

    Windows PowerShell:

    irm https://claude.ai/install.ps1 | iex

    The docs also list Homebrew (brew install --cask claude-code) and WinGet (winget install Anthropic.ClaudeCode) if you prefer those.
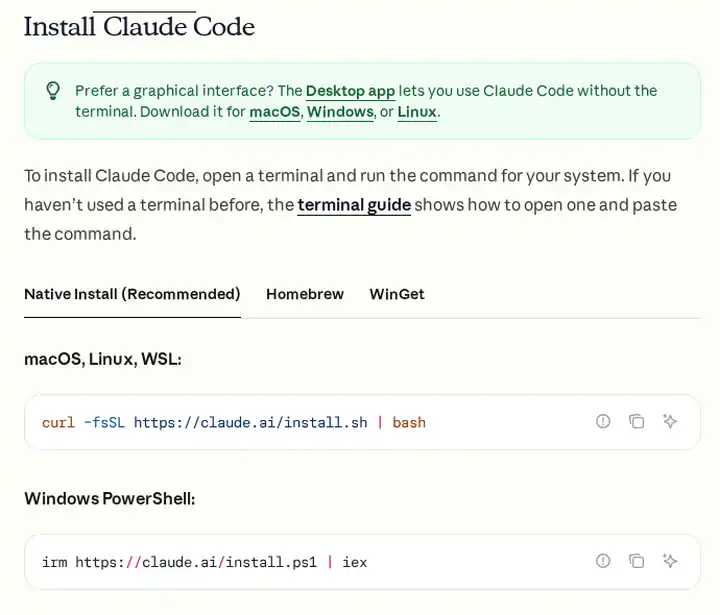
    Install Claude Code section of the official Claude Code docs at code.claude.com showing the native install commands for macOS, Linux, WSL and Windows PowerShell

    The install section of the official Claude Code docs. Always copy the command from there, since it can change.

    Then open a new terminal and confirm it's installed:

    claude --version

    The first time you run claude, it'll open your browser so you can log in to your Claude account.

    Prefer buttons over a terminal? There's also an official Claude Code extension for VS Code that gives you a chat panel right in the editor. Details are in the VS Code section of the docs.

    Step 5: Salesforce CLI basics (create a project, log in, pull your flows)

    Open the terminal in VS Code (Terminal > New Terminal) and run these one at a time.

    1. Create a project (this makes a folder with the standard Salesforce DX structure):

    sf project generate --name my-org-project
    cd my-org-project

    2. Log in to your org. This opens a browser window. Give the org a short alias and make it your default:

    sf org login web --alias my-sandbox --instance-url https://test.salesforce.com --set-default

    Use https://test.salesforce.com for sandboxes. For production or a Developer Edition org, leave off --instance-url (it defaults to login.salesforce.com). If your company uses a My Domain login, use that URL instead.

    3. Retrieve a flow. Use the flow's API name, not its label:

    sf project retrieve start --metadata Flow:My_Flow

    Or grab all of your flows at once:

    sf project retrieve start --metadata Flow

    Your flows land here:

    force-app/main/default/flows/My_Flow.flow-meta.xml

    You can pull other metadata the same way. For example, this pulls every Apex class and custom object so Claude has more context:

    sf project retrieve start --metadata ApexClass CustomObject

    Step 6: Ask Claude Code about your flow

    From inside your project folder, start Claude Code:

    claude

    Now just ask. Here are some prompts I like:

    • “Explain what force-app/main/default/flows/My_Flow.flow-meta.xml does in plain English. What triggers it, what does it check, and what does it update?”
    • “Review this flow for bugs. Look for missing null checks, DML or queries inside loops, hard-coded IDs, and paths that never end.”
    • “Write documentation for this flow for an admin: purpose, trigger, entry criteria, each decision and what happens on each path, and the fields it touches. Save it as docs/My_Flow.md.”
    • “Which of my flows update the Opportunity object? List them with a one-line summary of each.”
    • “This flow calls an Apex action. Find that class and explain how the two work together.”
    • “On a scale of 1 to 10, how well built is this flow? What would you change first?”
    • “Create a Mermaid diagram of this flow's logic.”

    Claude Code will ask for permission before it creates or edits files, so you stay in control. And if you only want answers, just say “don't change any files.”

    Tips and tricks

    • Use a sandbox. Retrieving metadata is read-only, but get in the habit of pointing your tools at a sandbox, not production.
    • Set a default org. If you skipped --set-default, run sf config set target-org my-sandbox from your project folder. Now you don't have to type --target-org on every command.
    • See which orgs you're connected to: sf org list.
    • Use .forceignore. Your project already has a .forceignore file. Add paths there for anything you don't want the CLI to touch. Salesforce has a short guide on how it works.
    • Re-retrieve before you ask. Your local files are a snapshot. If someone changed the flow in the org, pull it again first so Claude is reading the latest version.
    • Use --help. Every command has it, like sf project retrieve start --help. Or run sf commands to see everything.
    • Keep the CLI updated. Run sf update every so often if you used the installer. (If you installed with npm, update with npm instead.)
    • Give Claude some project context. Run /init inside Claude Code to create a CLAUDE.md file. Add notes like “This is a Salesforce DX project. Flows are in force-app/main/default/flows.” Claude reads it every session.
    • Use Git. Commit your retrieved metadata. Then you can see exactly what changed between retrieves, and undo anything you don't like.

    Stuck installing something? Ask the AI.

    This is my biggest tip. When an install fails, don't spend an hour on forums.

    Copy the exact error message and paste it into an AI. If Claude Code is already working, ask it right there in the terminal. If it isn't installed yet, use a chat AI like Claude or ChatGPT. Tell it:

    • Your operating system (Windows, Mac, Linux)
    • What you were trying to install
    • The command you ran
    • The full error text

    Nine times out of ten you'll get a fix in a minute or two. It's usually a PATH issue or an old terminal window that needs to be reopened. Claude Code also has a troubleshooting page, and claude doctor will check your install for you.

    The old XML trick still works

    If you can't install Claude Code at work, or you just want a quick answer on one flow, the copy-paste method from my original post still does the job. Retrieve the flow, open the XML, paste it into your AI of choice, and ask away.

    But if you're going to do this more than once or twice, take 20 minutes and set up the CLI and Claude Code. You'll never go back.

    Hope it helps.

    Nick
  • ⚡How to Make Dynamic Salesforce Record URLs⚡

    ⚡How to Make Dynamic Salesforce Record URLs⚡

    Sometimes, in a Salesforce Flow, we need to email an end user a link to a record in Salesforce.

    One way to do that inside a Flow is by manually creating the link to the Salesforce record in the body of the email.

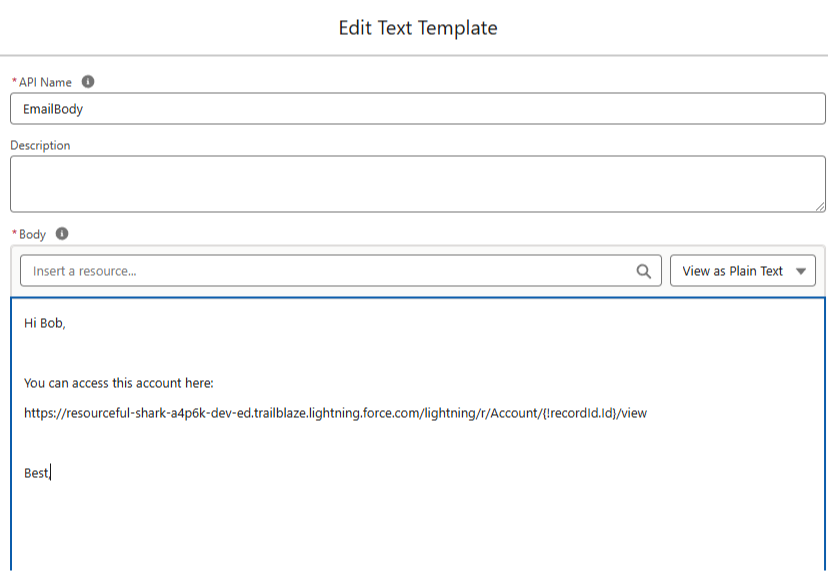
    You can do that by copy and pasting your Salesforce environment's URL directly into the EmailBody resource and inserting the RecordId as a Flow Resource.

    Like this:


    This approach does work, but when you move your Flow from a lower sandbox environment to higher sandbox environments (or to production), it means you need to recreate your URL in each environment.

    And if a production Flow ever goes back down to sandbox (say after a sandbox refresh) the URLs are broken again.

    Can we do this dynamically instead?

    Yes!

    Salesforce has a built in Global Variable that contains a URL to the current environment.

    Its meant to be used with API calls, but we can take the global variable, and apply some formula functions to find the current environment URL.

    Then we can use that URL anywhere we like.

    Let's break it down.

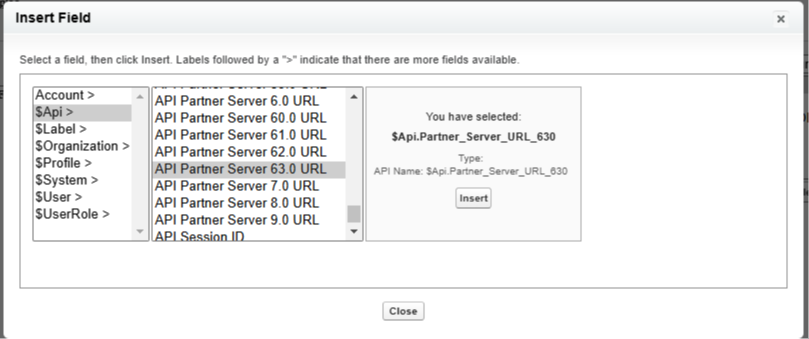
    First, this is the global variable that has your environment URL:


    In the formula field editor (in flows or fields) you can use the $API global variable to find the API Partner Server XX.X URL

    XX.X stands for the current API version which is 63.0 or 630 as of this writing.

    You'll want to choose the highest number which corresponds with the most recent API version.

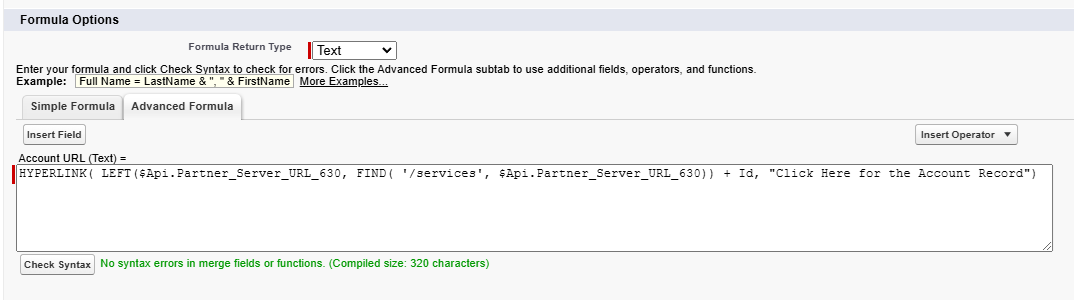
    We insert the API global variable into our formula. It actually returns a longer URL than we need with extra stuff in it (which we don't want).

    To clear the "extra stuff" out, we use the FIND() function to find out where the "extra stuff" begins.

    Then we use a LEFT() function to return everything to the LEFT side of it in the URL.

    Finally we concatenate the Record ID of the record we want to the end of the formula to create a normal Salesforce record URL.


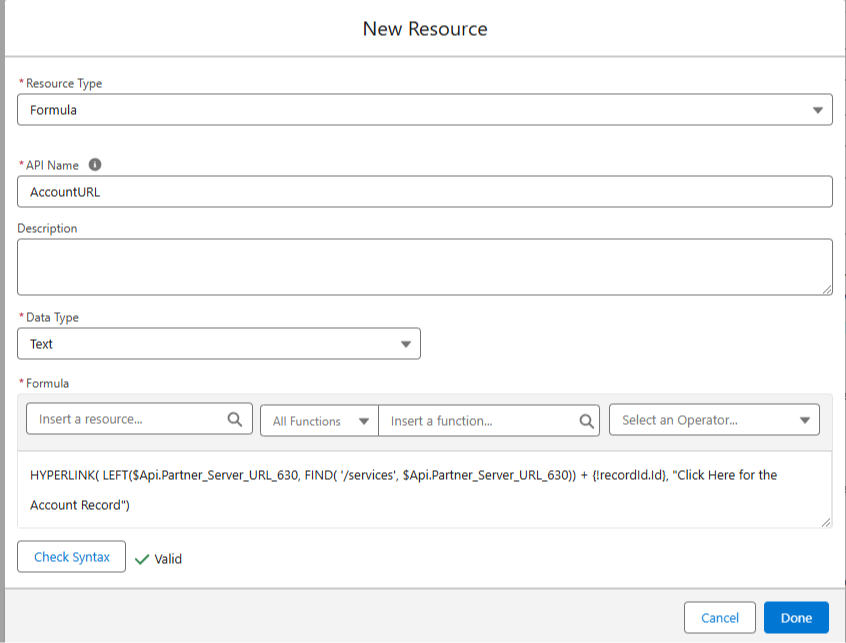
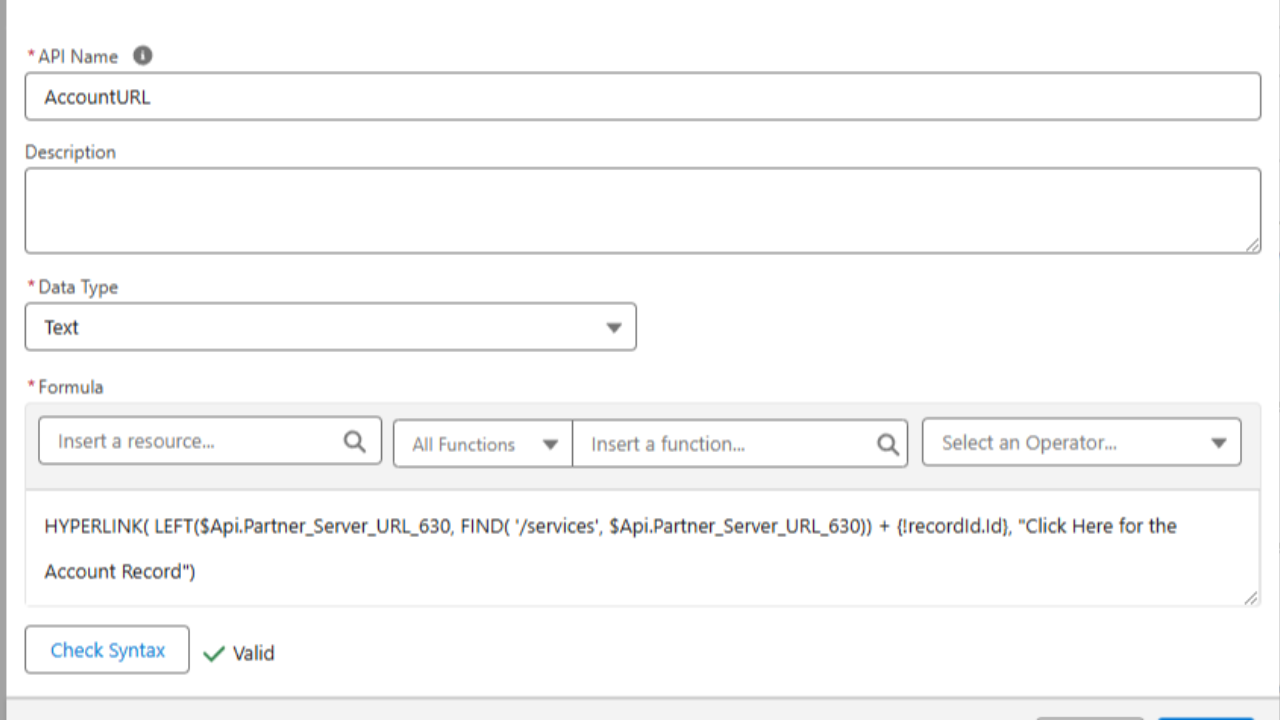
    Note: This exact same formula works in the Flow Builder, you just need to change it to use a flow variable for the Id rather than the formula editor Id shown in the screenshot above.

    Here's the formula from above:

    HYPERLINK( LEFT($Api.Partner_Server_URL_630, FIND( '/services', $Api.Partner_Server_URL_630)) + Id, "Click Here for the Account Record") 

    Below you can see the same thing in the Flow Formula editor:


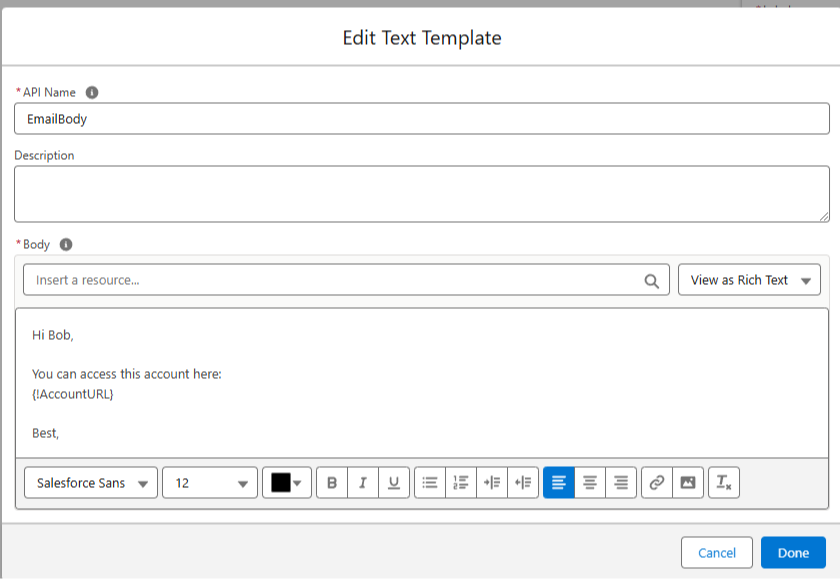
    With our formula built, we can add it to an EmailBody in text template configured for Rich Text:


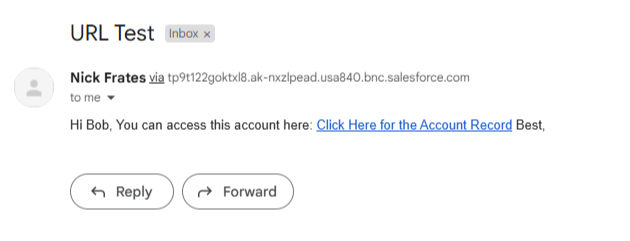
    And when the email goes out, it will include a clickable URL for the current environment to your record!


    No more broken URLs!

    You can set this up once and it's good to go for a long while.

    I was reminded of this solution this week and thought I'd share.

    Hope it helps!

    Best,

    Nick
     
  • How to Get the Current Record Id in a Salesforce Screen Flow (Step-by-Step Guide)

    How to Get the Current Record Id in a Salesforce Screen Flow (Step-by-Step Guide)

    How to Get the Current Record Id in a Salesforce Screen Flow (Step-by-Step Guide)

    Getting a Screen Flow to “know” which record it’s running on is a common challenge for new Salesforce Admins. You might be building a flow on a record page or launching one with a quick action, and you need the flow to pull in information about the current record – starting with its Id. The good news is Salesforce provides a built-in way to capture the record Id (and even the record’s data) in your flow. In this guide, we’ll walk through exactly how to get the current record’s Id in a Screen Flow, how to use it to fetch record details, and some best practices along the way. By the end, you’ll be confidently passing a record into your flows like a pro.

    Why You Need a recordId Variable in Screen Flows

    In Salesforce, Screen Flows often run in a record context – for example, placed on a Lightning record page or launched from a record’s action button​. That means there is a “current record” the user is looking at when they run the flow. To make the flow aware of which record that is, we use a special input variable called recordId. Salesforce will automatically pass the current record’s Id into this variable when the flow starts (as long as everything is set up correctly). This recordId variable captures the Id of the record that initiated the flow, allowing you to use that Id inside your flow logic.

    How does Salesforce know to do this? By convention, if your flow has an input variable named recordId, the platform recognizes it and will populate it with the Id of the relevant record (when the flow is launched from a record page, quick action, etc.). In other words, “recordId” is a special name – it must be spelled exactly recordId (case-sensitive) and marked as available for input​. If those conditions are met, you can get the current record’s Id in your flow without any coding​. This saves you from manually passing parameters or hard-coding Ids.

    Now, let’s dive into the step-by-step process to set this up and use it in a Screen Flow.

    Step-by-Step: Getting the Current Record in a Screen Flow

    Follow these steps to configure your Screen Flow so it can access the current record’s Id and data. We’ll start with creating the recordId variable, then cover two approaches: using it as a text Id or as a full record variable. Don’t worry – we’ll explain which to use and why.

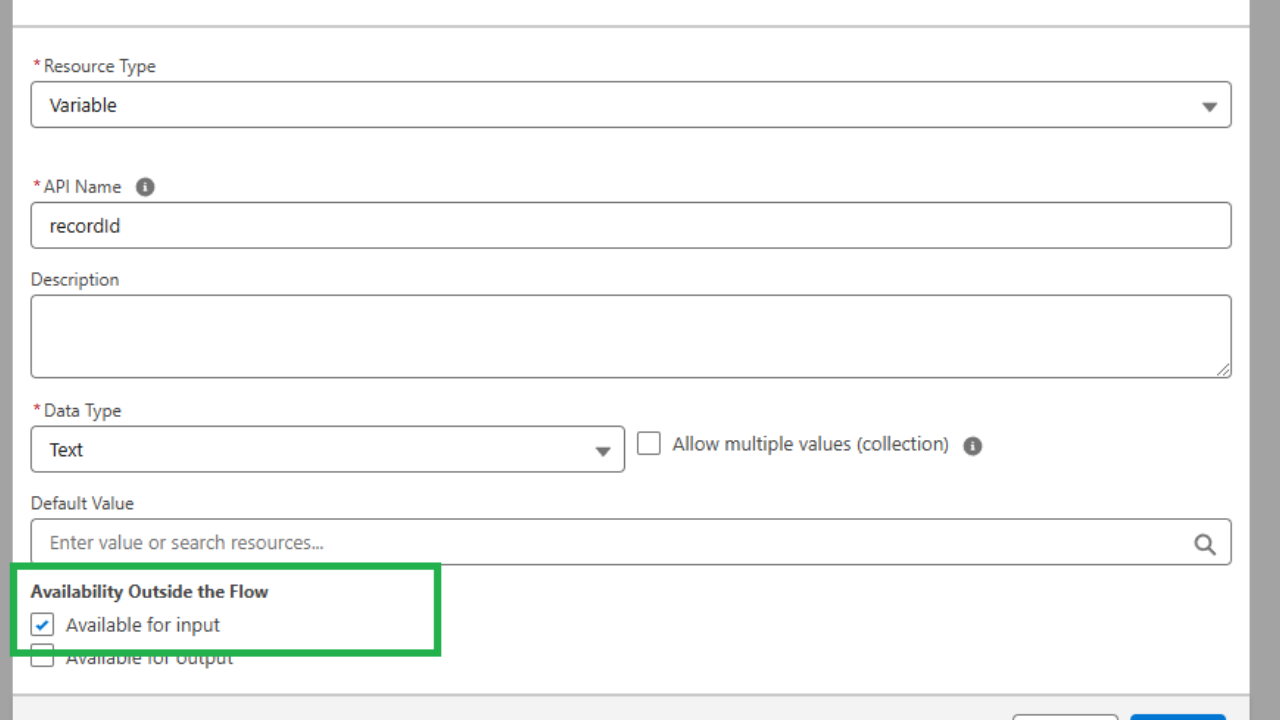
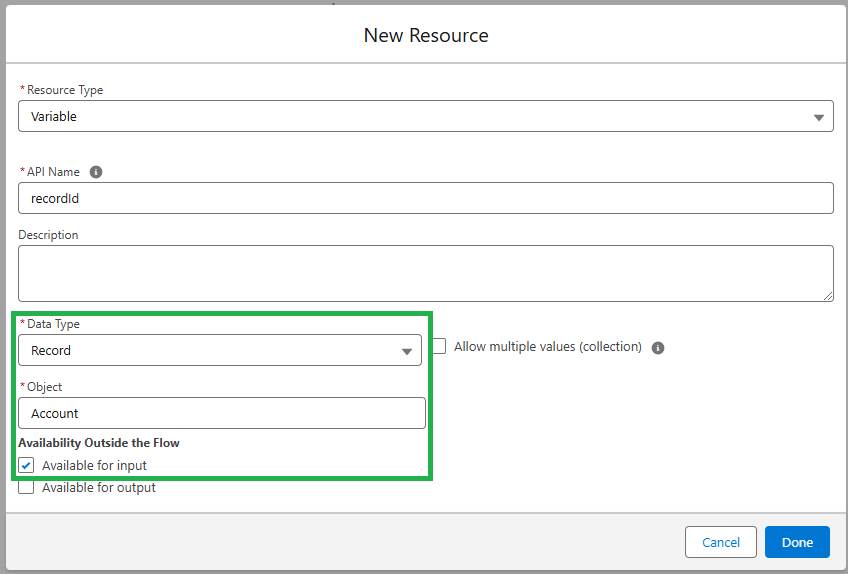
    1. Create a recordId Variable in Your Flow: Open your flow in Flow Builder (make sure it’s a Screen Flow type). Go to the Manager tab and click “New Resource” to create a variable. Configure the variable as follows:

      • API Name: recordId (exactly this name).

      • Data Type: You have two options here – Text or Record. For beginners, choosing Text is simple (it will hold just the Id string). If you choose Record, you’ll need to specify the Object (e.g. Account, Contact) so the variable can hold an entire record of that type. More on this choice in the next step.

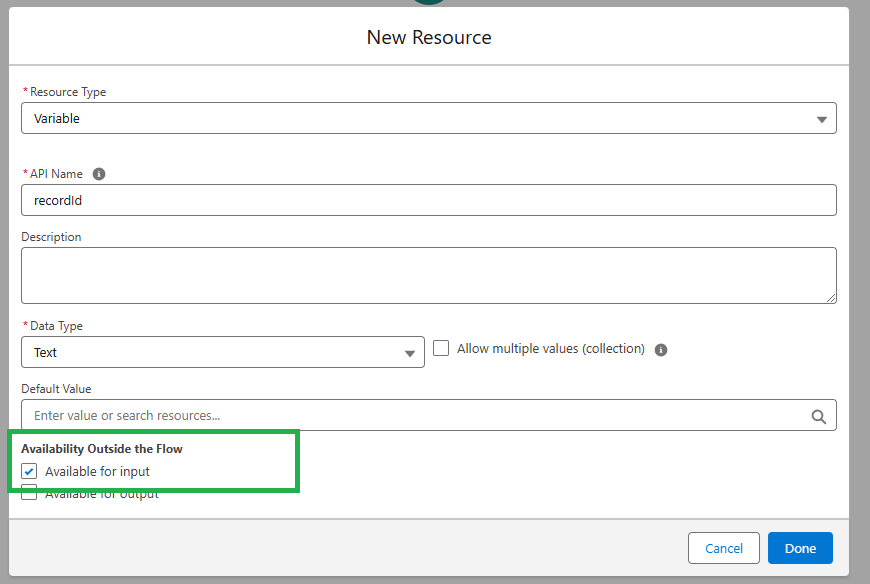
      • Availability: Check Available for input. This is crucial – it tells Salesforce this variable can receive a value from outside (the record page or action)​. If you skip this, the flow won’t actually get the Id passed in!

      Pro Tip: If you only need the record’s Id (and maybe a couple of fields), use a Text variable. If you need many fields from the record, use a Record variable. The Record variable option will automatically retrieve all the record’s fields for you, but it can be slightly less efficient if the object has a lot of fields you don’t actually use​.

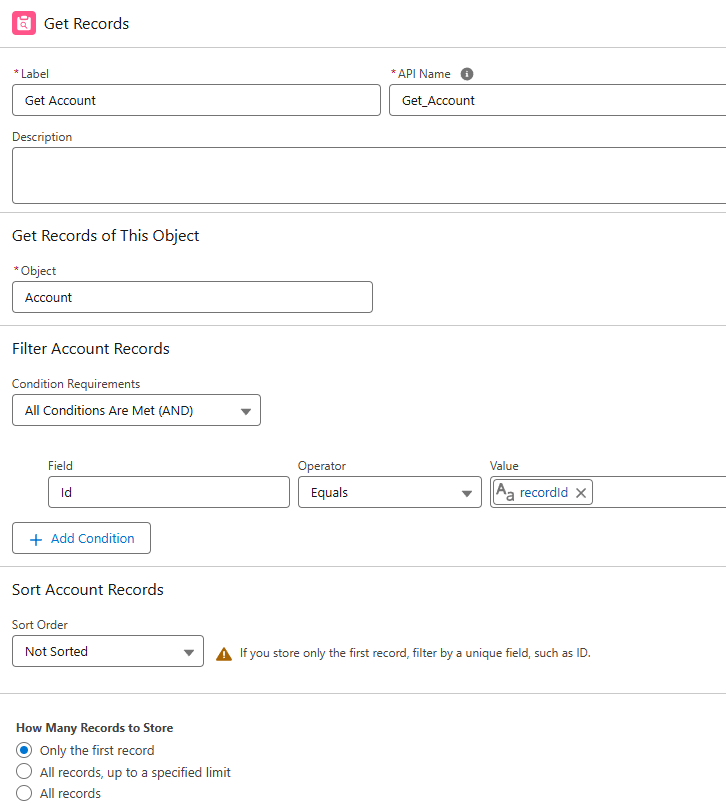
    2. (Option A) Text recordId – Get the Record’s Details: If you went with a Text variable for recordId, your flow now has the Id but not the other fields of the record. To fetch details (like the record’s Name, Status, etc.), add a Get Records element to your flow. Set it up to query the object where Id equals {!recordId} (the variable). For example, if this flow runs on Account records, your Get Records would filter Account Id equals {!recordId}. This will retrieve the matching record from the database so you can use its fields in the flow​. Store the result in a record variable (you can let Salesforce automatically store all fields). Now you have the current record’s data at your fingertips.

      You can use the output from Get Records to reference any field of the record. For instance, if you queried Account, you might use the Account Name in a screen or make decisions based on the Account’s Status. (For a detailed walkthrough on using Get Records, see our step-by-step guide​.)

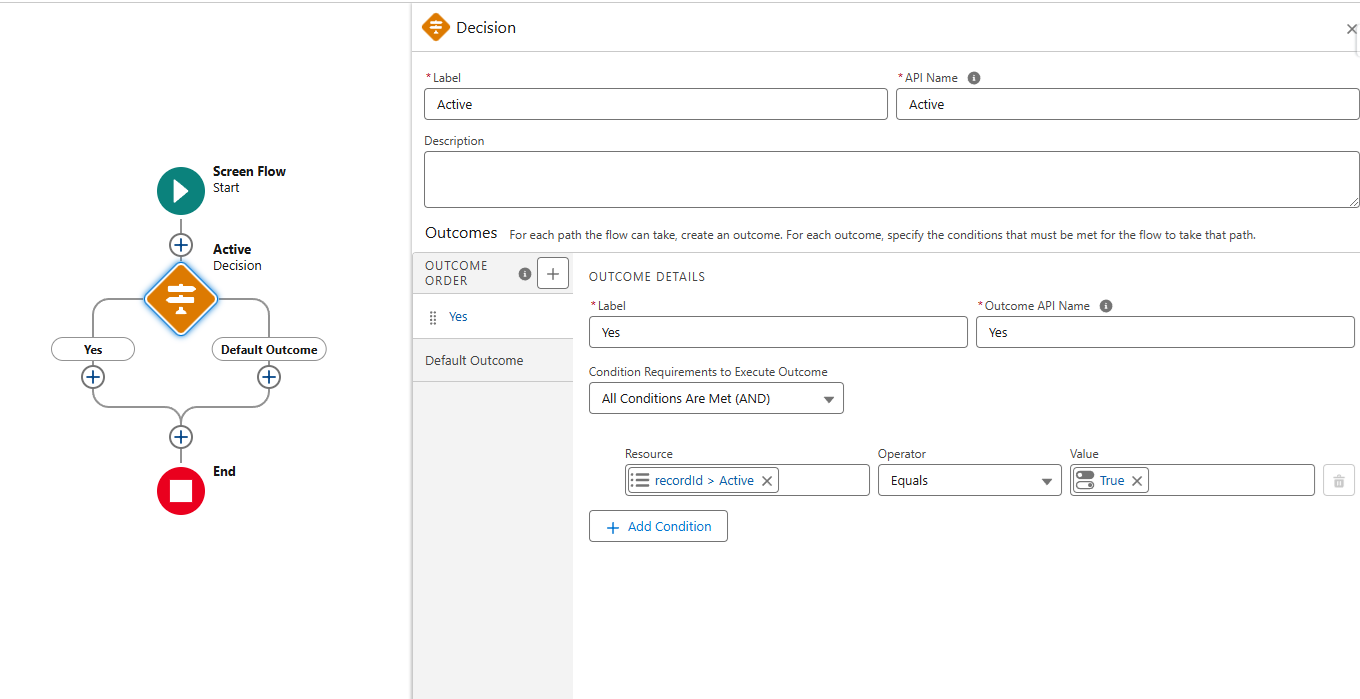
    3. (Option B) Record recordId – Instant Record Access: If you defined recordId as a Record data type (with the object set to, say, Account), you don’t need a separate Get Records element. Salesforce will pass the entire record into that variable automatically​. In our example, recordId would actually contain an Account record (not just an Id) as soon as the flow starts. You can then reference fields directly from recordId in the flow (e.g. {!recordId.Name} for Account Name). This approach saves you an extra query and is very convenient when you need many fields from the current record​. Just be mindful of the performance note above – if your object has dozens of fields but you only needed one or two, you’ve pulled a lot of unnecessary data. Otherwise, this is a super handy shortcut.

    4. Use the recordId in Your Flow: Now that your flow has the current record’s Id (and possibly the full record), you can use it just like any other variable. Here are a few ideas:

      • Display information on a Screen: You can add a Display Text component to your flow screen and include the record’s fields. For example, show a welcome message like “You are updating {!recordId.Name} record” (if using the Record variable) or use the fields from the Get Records result. (Screenshot: Display Text component showing the current record’s Name)
      • Make decisions based on the record: Use a Decision element to branch the flow depending on a field value of the current record. For instance, if {!recordId.Status} is “Closed”, take one path, otherwise another.


      • Update or create related records: You might pass the recordId into another element. A common use case is an Update Records element where you update the record that the flow is running on (using the Id as reference). Or you could create a related record (e.g., create a Case and set its AccountId to the current record’s Id).

      Essentially, recordId opens the door for your flow to interact with the specific record that’s in context. This makes your Screen Flow dynamic and context-aware, rather than a one-size-fits-all mechanism.

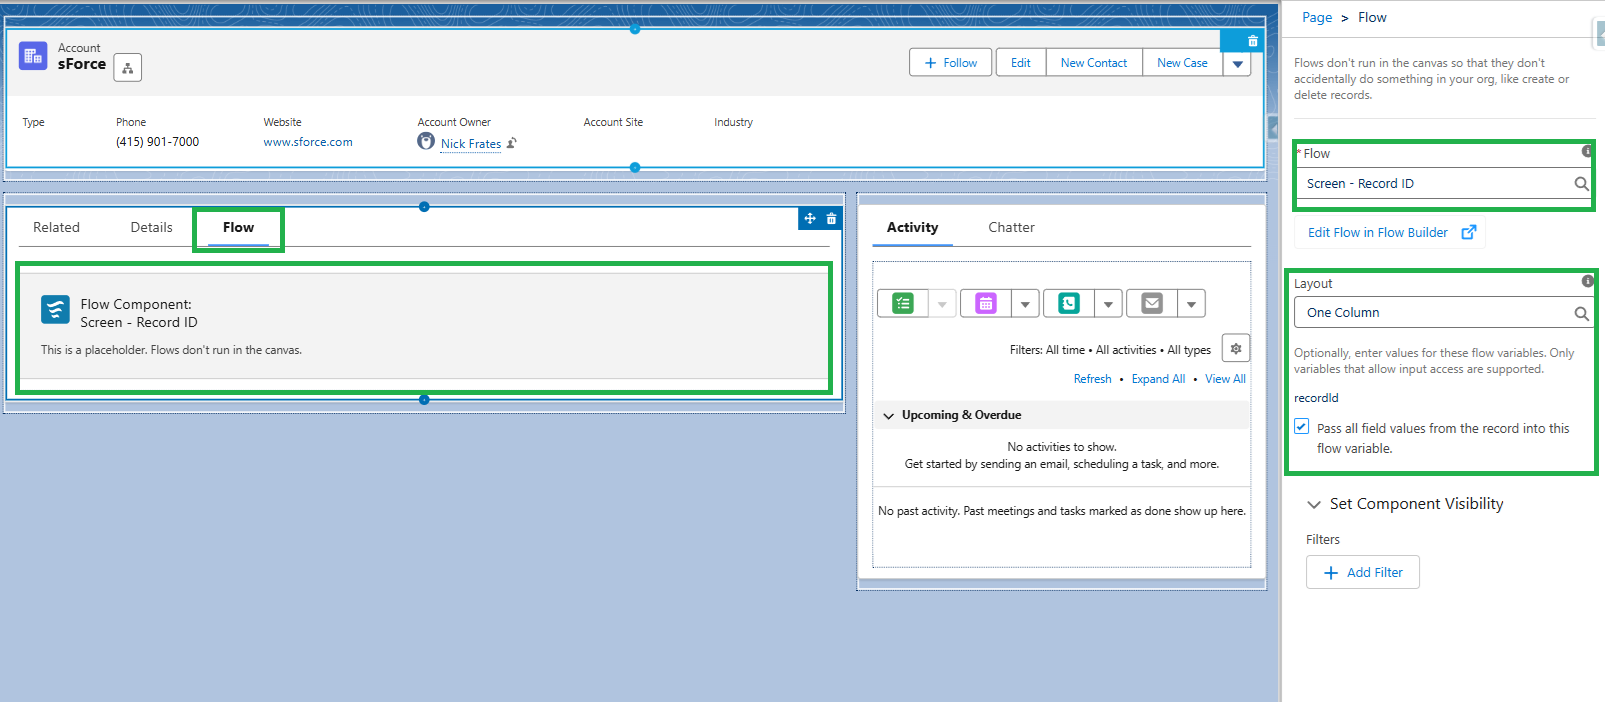
    5. Add the Flow to a Record Page or Launch it in Context: For the recordId magic to work, the flow must be launched from a record context. Typically, this means either embedding the Screen Flow on a Lightning record page or launching it via an object-specific action (button). In both cases, Salesforce will handle passing in the Id as long as you set up things correctly:

      • Lightning Record Page: Add your flow to the page using the Flow component in the Lightning App Builder. In the component’s properties, check the box for “Pass record Id” (this maps the page’s record Id into your flow’s recordId variable). Salesforce will then inject the Id when a user views that page​.
      • Quick Action / Button: If you create a Lightning Action (on the object) that launches your Screen Flow, you don’t get a field to input the Id – Salesforce just does it for you. As long as your flow has the recordId input variable defined, the platform automatically passes the current record’s Id into it when the action is invoked​. No extra configuration needed! Just create the action, assign the flow, and you’re set.

      Troubleshooting: If you find your flow isn’t getting the Id (e.g. recordId is coming in blank when you debug), double-check that you marked the variable as input and that you’re launching the flow in one of the above ways. A Screen Flow run directly from Setup (or via Flow debug) doesn’t automatically have a record context – you’d have to provide an Id in the debug settings to simulate it. Also ensure the variable name is exactly recordId. Typos or wrong casing will break the auto-pass functionality.

    Additional Tips and Best Practices

    • recordId is Contextual: Remember that recordId only has a value when the flow is run from a record context (record page, action, or something like a related list). If you try to run the same Screen Flow from outside a record (for example, from the Flow detail page or utility bar without extra setup), recordId will be empty. Always plan to launch these flows in context or handle the scenario when recordId is null (perhaps by showing a message to the user). Salesforce has even introduced a global variable $Flow.CurrentRecord that represents the context record​, but it only works when the flow is launched from a record page or related list. Using the recordId input variable is the tried-and-true method that won’t let you down.

    • Case Sensitive Name: As mentioned, the variable’s API name must be exactly recordId. For example, RecordID or recordID (capitalizations) will not work​. Salesforce specifically looks for the lowercase "recordId" when passing the Id. Stick to that naming, and you’ll be golden.

    • Mark as Input (Always): This bears repeating because it’s a frequent oversight – make sure to check Available for Input when creating the recordId variable​. Without it, the record page or action cannot feed the Id into your flow. If you forget, your flow will act like there is no current record.

    • Use the Right Data Type: Decide between Text vs Record for recordId based on your needs. If you only need a couple of fields from the record, using a Text Id + Get Records to fetch just those fields is a lean approach. If you need many fields or the whole record anyway, using a Record variable for recordId saves you an extra Get step​. Either way is fine – just balance convenience vs. performance. And remember, in Screen Flows you can always do a Get Records later if you realize you need more data.

    • Test with Debug Mode: When you test your Screen Flow in Flow Builder’s debug mode, you can provide a sample record Id to simulate running on a record. This is a great way to verify that your recordId variable is working. In debug, set “Run flow as if launched from” and paste in an Id (e.g., an Account Id) to test. If configured right, you’ll see that Id populate in your flow and any retrieved fields show up correctly.

    Conclusion (Next Steps)

    By now, you’ve learned how to grab the current record’s Id in a Screen Flow and use it to drive your flow’s behavior. With the recordId variable in your toolkit, you can build flows that adapt to whichever record the user is on, making your applications far more dynamic and user-friendly. No more hardcoding Ids or creating separate flows for each record – one flow can handle them all, contextually.

    Ready to take your Salesforce Flow skills to the next level? As your personal mentor, I highly recommend deepening your expertise with structured learning. Check out my 2025 Salesforce Flows Course – an in-depth, project-based program that will turn you into a Flow expert. Enroll now in the Salesforce Flow course and supercharge your Salesforce automation skills!

    (Happy Flow-building!)

  • Salesforce Scheduled Flow: How to Automate Processes on a Schedule (No Code Guide & Examples)

    Salesforce Scheduled Flow: How to Automate Processes on a Schedule (No Code Guide & Examples)

    Salesforce Scheduled Flow: How to Automate Processes on a Schedule (No Code Guide & Examples)

    Salesforce Scheduled Flows (also known as Schedule-Triggered Flows) let you automate tasks on a timetable – no Apex code required. Imagine scheduling a job to run nightly data syncs or weekly email reminders without ever writing a script. Sounds great, right? In this guide, we’ll show you exactly how to set up a Salesforce Scheduled Flow step by step, with practical examples you can use today. We’ll keep it casual and straightforward, so you can start automating those routine processes ASAP. Let’s dive in and get your flows working on your schedule!

    What is a Salesforce Scheduled Flow?

    A Salesforce Scheduled Flow is an autolaunched flow that runs in the background at a specific date/time and frequency you define (daily, weekly, or once)​. Unlike record-triggered flows (which fire when a record is created/edited) or screen flows (which require user interaction), scheduled flows are time-based – they run independently of any single record change. You set the criteria, schedule the run, and Salesforce executes the flow for all records that meet your criteria at the scheduled time.

    In other words, a scheduled flow is like a cron job for admins: you configure it with clicks, not code, to perform repetitive tasks on a regular cadence​. Salesforce will batch-process records that match your conditions. For example, you could use a scheduled flow to find all accounts with an expired contract and send out renewal reminder emails every week, or do a nightly data cleanup on records that need updates​. All of this happens automatically once you set it up – no manual intervention needed.

    Why use scheduled flows? They’re perfect for routine maintenance, weekly/daily summaries, or any process that needs to run for multiple records on a schedule rather than immediately at record save. Prior to this feature, admins often had to ask developers to write batch Apex jobs for such tasks. Now, you can accomplish many batch jobs with scheduled flows (clicks not code!). Keep in mind, though, that scheduled flows have some limits compared to code – for instance, they can query up to 50,000 records and execute up to 250,000 records per day​. That’s plenty for most admin use cases, but if you ever need to process millions of records or complex logic, a developer might still reach for Apex​.

    Note: Don’t confuse Schedule-Triggered Flows with Scheduled Paths in record-triggered flows. A scheduled path is a delay added to a record-triggered flow (for example, “do X 7 days after a case is created”) – it’s still tied to a specific record event. A Scheduled Flow, on the other hand, runs at a fixed time regardless of any single record change​. Both are useful, but here we’re focusing on true schedule-triggered flows that run on a set timetable.

    How to Create a Salesforce Scheduled Flow (Step-by-Step)

    Ready to set one up? Let’s walk through creating a scheduled flow without writing code. In this example, we’ll build a flow that runs on a schedule and performs actions on a batch of records. You can adapt these steps for your own use case (we’ll also cover two examples in detail next). Follow along in Salesforce Flow Builder:

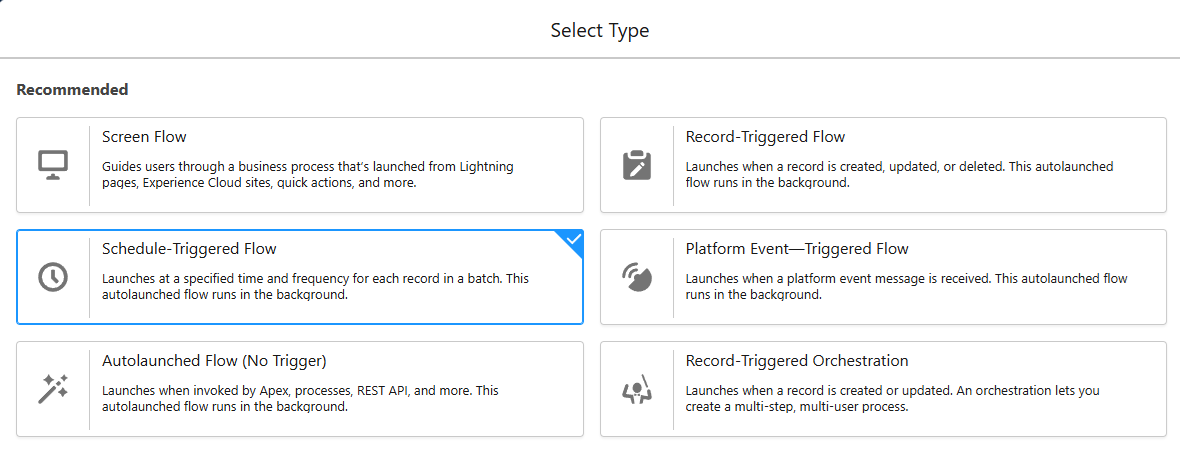
    1. Go to Flow Builder and start a new Flow: In Setup, navigate to Process Automation > Flows, then click New Flow. In the New Flow dialog, select “Schedule-Triggered Flow” (it might also be labeled Scheduled Flow depending on your org). This is the flow type that allows scheduling. *✨ 

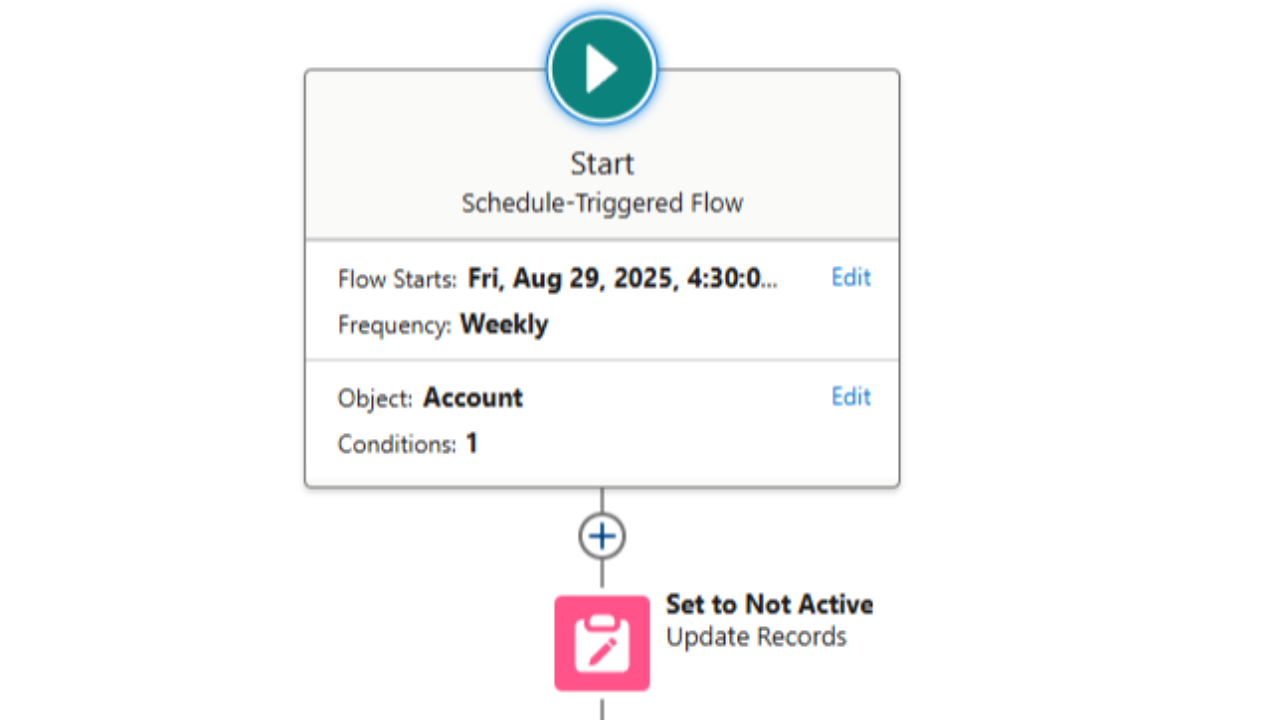
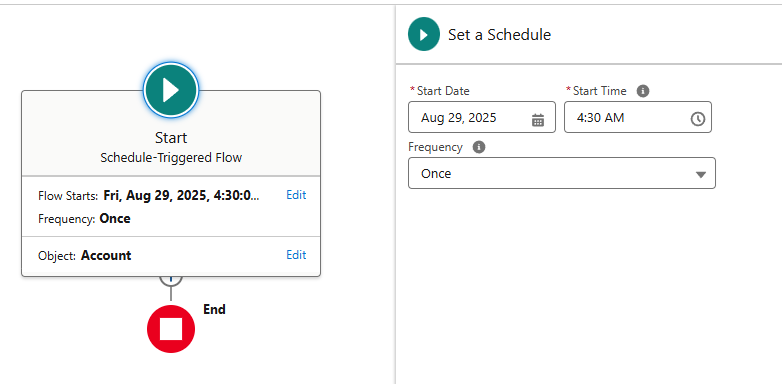
    2. Choose Start Date, Time, and Frequency: After selecting Schedule-Triggered Flow, Salesforce will prompt you to set the schedule. Pick the Start Date and Start Time for when the flow should first run. Then set the Frequency to either daily, weekly, or once. For example, you might choose tomorrow’s date at 2:00 AM, repeating Daily, to run a nightly job. By default, Salesforce only offers Once, Daily, or Weekly recurrences​. (If you need a monthly or annual schedule, don’t worry – we’ll mention a workaround later.) *✨ 

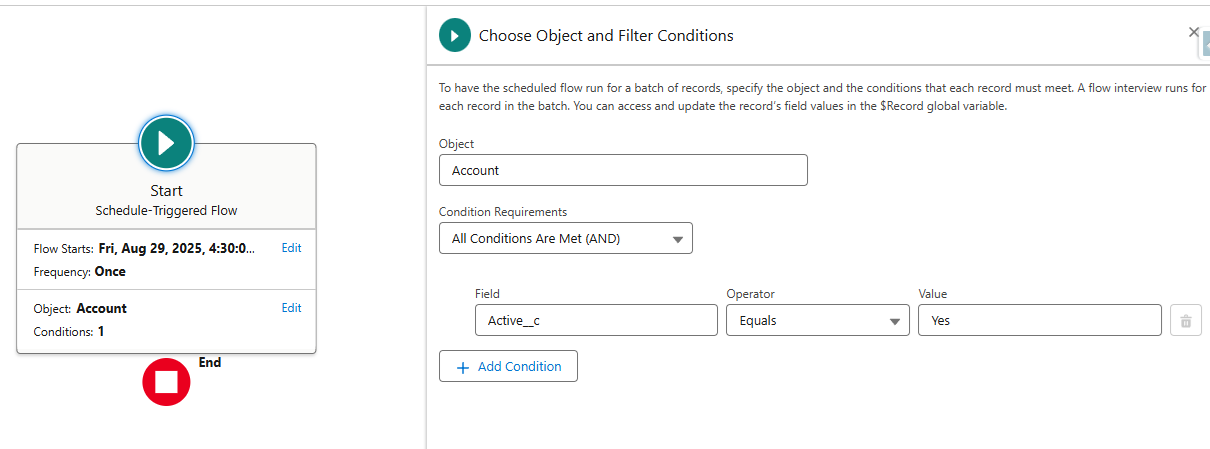
    3. Specify the Object and Filter Conditions (Optional): Next, you can tell Salesforce which records to process when the flow runs. You’ll see options to Select Object and set Filter Conditions. This step is like building a report: you choose an object (e.g., Contact, Account, Opportunity, etc.) and define criteria so that the flow will run once per record that meets those conditions. For example, if you want to process all Contacts with a missing email, you’d select Object: Contact and set a filter like “Email equals Null”. Salesforce will then create an individual flow interview for each record matching the filter at runtime​. (If your automation doesn’t relate to a specific set of records, you can skip specifying an object – the flow will then just run its actions once at the scheduled time.) Pro Tip: Keep your filter specific to avoid hitting limits – Salesforce allows up to 250,000 records (flow interviews) per 24 hours for scheduled flows, so make sure you’re not trying to process more records than that​. *✨ 

    4. Build the Flow Logic: Now design what you want the flow to do for each record (or just once if you didn’t specify an object). This works like a normal Autolaunched Flow. Common elements you might use include:

      • Get Records: to retrieve related data needed for your actions. For example, if your flow is on Contact, you might Get Records for that contact’s Account.
      • Decisions: to branch logic depending on conditions. Maybe only perform an action if certain criteria are met.
      • Assignment: to set or calculate values in variables.
      • Loop: to iterate over a collection of records if needed (for instance, if you used a Get Records to gather a bunch of related records and need to handle each one – see our Looping in Salesforce Flow guide for tips on using loops efficiently).
      • Actions: like Update Records, Create Records, or Send Email to do the actual work. For example, update each record’s fields, or send an email notification. You can also use Subflows (to call another flow) or invocable actions as needed.

      Design your flow as you normally would for an autolaunched flow. Each scheduled run will execute this logic. For example, you might build a flow that, for each Contact (from step 3) with missing email, fetches an alternate email from a related record and sends a notification to the owner. Use the canvas to add your elements and connect them in the right order. *✨ 

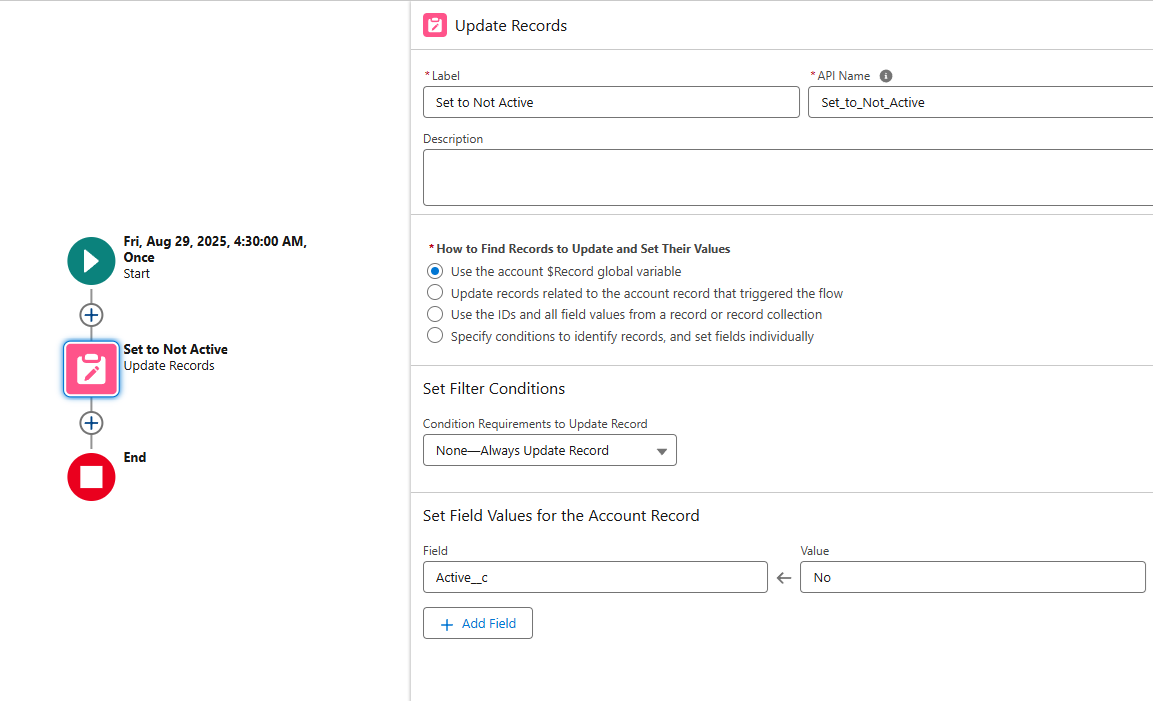
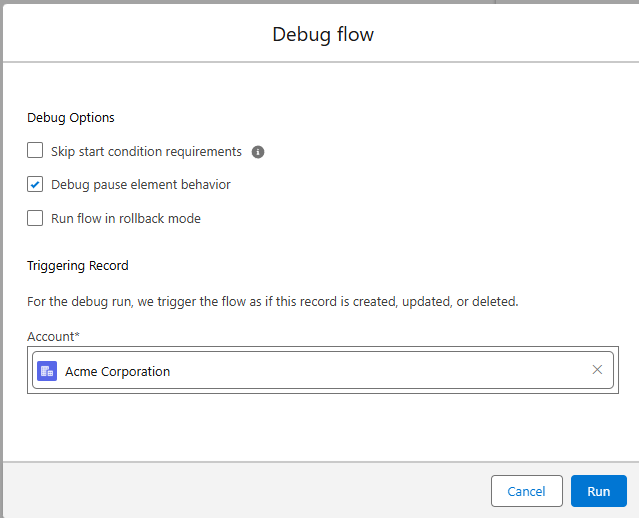
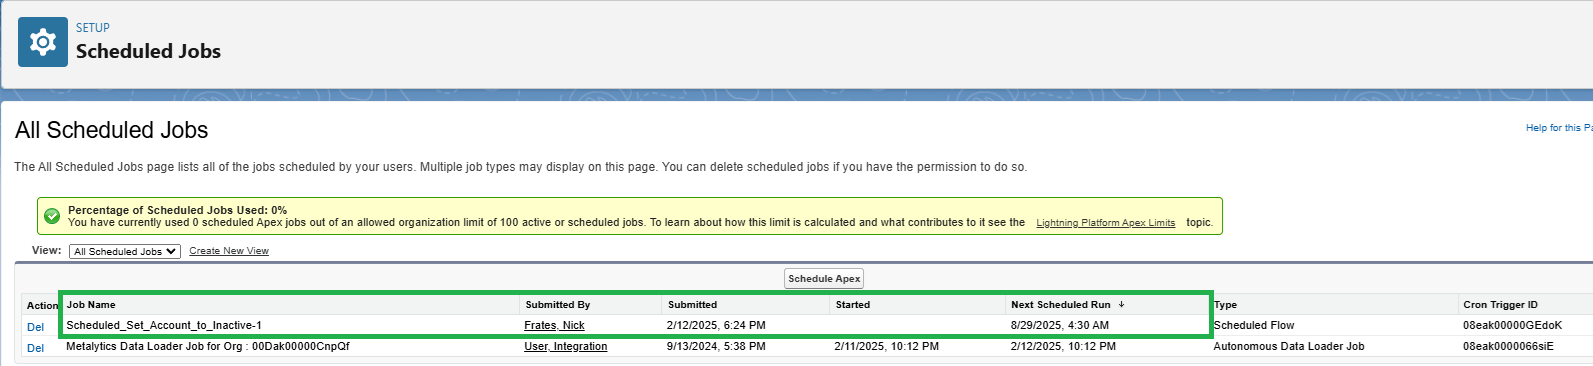
    5. Test (if possible) and Activate the Flow: Before activation, it’s a good idea to test your flow. You'll press Debug and then select a record you want to run your scheduled flow against. You can choose to Skip start condition requirements and run flow in rollback mode if you only want to test the logic, or you can leave them both checked to have the flow really change the record if it meets your flow criteria. Once you’re confident, Save the flow and click Activate. Activation will schedule it according to the start time you set. You can verify it’s scheduled by going to Setup > Scheduled Jobs – your flow should be listed there.


    That’s it! You’ve now set up a scheduled flow. It will run at the next scheduled time and start performing the actions you configured. No cron jobs, no Apex classes – just pure Salesforce automation with clicks. 🎉

    Before we move on to real examples, here are a couple of best practices to remember:

    • Off-Peak Hours: Schedule heavy-duty flows for non-business hours (like late night or early morning) to avoid conflicts with users. This ensures your automation doesn’t slow down record updates while users are actively working.​
    • Avoid Hitting Limits: As mentioned, if you’re processing a lot of records, use filters to keep the batches reasonable. Salesforce will send an error email if you ever hit the 250k records/day limit​. If you need to handle more, consider splitting into multiple flows with different criteria or times, or opt for an Apex solution.
    • No Monthly Option: Currently, Salesforce doesn’t offer a monthly or yearly recurrence in the UI for scheduled flows​. If you need something like an annual job, you can implement a clever workaround by scheduling the flow daily and using a formula condition. (Essentially, the flow runs daily but only does stuff on one day of the year when the formula is true). Check out How to Schedule a Salesforce Flow Annually for a step-by-step solution to that.
    • Follow General Flow Best Practices: Just because it’s on a schedule doesn’t mean normal flow best practices don’t apply. Make sure to bulkify your updates (e.g., avoid SOQL or DML inside tight loops, use collections where possible) and test thoroughly. If you’re new to flow optimization, see our guide on Salesforce Flow Best Practices to build efficient, error-free automations.

    Now, let’s look at a couple of concrete examples of scheduled flows in action, so you can visualize how to use this in real life.

    Example 1: Nightly Data Sync (Scheduled Flow for Daily Updates)

    Let’s say you want to perform a nightly data sync to keep your Salesforce data tidy and up-to-date. For instance, imagine you need to ensure that every Contact’s phone number is in sync with its Account’s phone number. Maybe during the day, Account phone numbers change, and you want all related Contacts to get the updated number as well. You decide to run a fix every night to copy Account phone values to Contacts that are missing a phone. Here’s how you could do that with a scheduled flow:

    • Use Case: Sync contact data nightly. Every night at 2:00 AM, find all Contact records that have a blank Phone field, and update them with the Phone number from their related Account (if available). This ensures no contact is missing a phone number if the account has one on file.

    • Flow Setup: Create a scheduled flow on the Contact object:

      • Schedule: Daily at 2:00 AM (off-hours).
      • Object & Criteria: Object = Contact. Filter: Phone EQUALS null. This filter will target contacts lacking a phone.
      • Flow Logic: For each Contact record the flow runs on, use a Get Records element to retrieve that contact’s Account (you can use the $Record.AccountId to fetch the Account). Then use a Decision: if the Account’s Phone is not blank, proceed. Next, use an Update Records element to set the Contact’s Phone to the Account Phone. Because the scheduled flow treats each record separately in this configuration, you don’t even need a loop here – Salesforce will handle each Contact as a separate interview​. Make sure to mark the update to run only on that Contact record (you can use the IDs stored in the $Record global or the Get Records result).
      • Activate: Once tested, activate the flow. Now each night Salesforce will find all contacts without a phone and populate them.
    • Outcome: At 2:00 AM every day, Salesforce will automatically fill in missing contact phone numbers from the account. By morning, your sales reps find their contacts updated. No more manual data patching or worrying about out-of-sync records!

    Why it’s great: This scheduled flow example shows how you can perform data maintenance on a schedule. We did a simple field sync, but you could extend this idea to all sorts of nightly jobs – recalculating fields, closing stale records, or syncing other related info across objects. All done with configuration, not code.

    Example 2: Weekly Email Automation (Scheduled Flow for Weekly Reminders)

    Now let’s tackle a weekly email automation scenario. Imagine you want to send a reminder email every week to account owners for any accounts that have an expired contract and haven’t been addressed yet. This is a common business need: regularly nudge owners about renewing contracts or following up on lapsed customers. With a schedule-triggered flow, you can have Salesforce do this every week like clockwork.

    • Use Case: Weekly contract renewal reminders. Every Monday at 9:00 AM, find all Account records where the contract end date is in the past (expired) and a renewal has not been logged yet. For each such account, send an automated email to the Account Owner (or maybe create a task or chatter post – but we’ll do email here) reminding them to reach out for renewal.

    • Flow Setup: Create a scheduled flow on the Account object:

      • Schedule: Weekly on Monday at 9:00 AM. (When configuring the schedule, after choosing Weekly, make sure to select Monday at 9:00 AM as the start date/time for the first run.)
      • Object & Criteria: Object = Account. Filter: for example, Contract_End_Date__c LESS THAN TODAY AND Renewal_Status__c EQUALS 'Not Renewed'. (Adjust field API names as needed.) This criteria ensures we target accounts with expired contracts that haven’t been renewed.
      • Flow Logic: For each Account record that meets the criteria, we’ll send an email:
        • Option 1 (simple): Use the Send Email core action in Flow. You can create a Text Template for the email body (e.g., “Hi, the contract for Account {!Account.Name} expired on {!Account.Contract_End_Date__c}. Please reach out to discuss renewal.”) and use the owner’s email as the recipient. This requires the flow to run with an email action – ensure you have an Email Alert or template ready if using the dedicated Send Email action.
        • Option 2: Use an Email Alert (if you prefer using a predefined email template and alert). In Flow, add an Action element to send an Email Alert (you must have an Email Alert that’s set up for the Account object). Map the Account as the record and it will send to whoever is defined in that alert (likely the owner or a specific field).
        • You might also log an activity or update a field (like mark that a reminder was sent). This is optional but helps prevent duplicate emails. For simplicity, we’ll assume one email per week is fine even if it repeats until the account is renewed.
      • Activate: After testing with a sample account (perhaps temporarily change the schedule to run once immediately for a test record), activate the flow.
    • Outcome: Every Monday morning, Salesforce will automatically send out renewal reminder emails to the owners of all accounts with expired contracts. The account team gets an inbox full of helpful nudges to take action, without anyone having to manually pull a report or send emails. This weekly automated flow ensures no lapsed contract falls through the cracks.

    This weekly email example illustrates how scheduled flows can handle scheduled communications and notifications. You could adapt this pattern for things like weekly customer follow-ups, summary reports, or any regular email that should go out based on criteria. And since it’s all automated, it happens whether or not you remembered to do it – Salesforce becomes your personal assistant for these tasks!

    Wrapping Up & Next Steps

    By now, you’ve seen how Salesforce Scheduled Flows empower you to automate routine tasks on your own timetable. No more waiting for a record change event just to kick off your automation, and no need to beg a developer for a batch Apex job. With a few clicks, you scheduled a flow to handle your nightly cleanups and weekly reminders – and Salesforce does the heavy lifting every time, right on schedule.

    Think about what this means for you: those tedious, repetitive tasks that used to eat up your time can be delegated to Salesforce, reliably and accurately. You free yourself (and your team) to focus on more important work, while the system quietly keeps everything in order behind the scenes. Pretty powerful stuff, isn’t it?

    If you found this guide helpful, this is just the tip of the iceberg. Salesforce Flows can do so much more, and mastering them can level-up your Salesforce game in a big way. The best part is, you don’t have to figure it all out alone or resort to trial-and-error.

    Ready to become a true Salesforce Flow ninja? Now’s the time to take the next step. I invite you to join me in an in-depth, hands-on journey that will turn you from flow novice to automation pro. Check out 2025 Salesforce Flows: The Complete Guide – our comprehensive Salesforce Flow course. It’s designed to make you an expert in building flows (including scheduled flows and every other type) through real-world projects and step-by-step lessons.

    Imagine having the confidence to automate any business process that comes your way – to whip up a flow for every scenario, just like that. This course will get you there. We cover the why and how of every Flow feature, best practices, and insider tips you won’t find in documentation. It’s like having a Salesforce mentor by your side, showing you exactly what to do, what to avoid, and how to think like a Flow expert.

    Don’t miss out on the automation revolution happening in the Salesforce world. Every day you spend doing things manually or sticking to outdated tools is wasted potential. Instead, picture yourself leading the charge – solving complex requirements with elegant flow solutions, impressing your boss and clients, and saving hours of work. That’s what mastering Salesforce Flow can do for you.

    Call to Action: Head over to nickfrates.com/2025-salesforce-flows now and enroll in the Salesforce Flow course. Invest in your skills today, and unlock the full power of Salesforce automation. Remember, the difference between those who wish for efficiency and those who achieve it often comes down to taking action. This is your moment to take that action – join the course, and let’s build something amazing together.

    Your future self (the one who isn’t up at midnight doing tedious Salesforce updates 😉) will thank you. Here’s to working smarter, automating boldly, and becoming the Salesforce Flow hero you were meant to be!

  • Salesforce Screen Flow Lookup Fields: Step-by-Step Guide

    Salesforce Screen Flow Lookup Fields: Step-by-Step Guide

    Salesforce Screen Flow Lookup Fields: Step-by-Step Guide

    Using lookup fields in Salesforce Screen Flows doesn’t have to be confusing. In this beginner-friendly guide, you’ll learn exactly how to add and configure the Lookup component in a flow screen so users can search for and select records – just like a standard Salesforce lookup field. We’ll cover what lookup fields in flows are, key things to know (and pitfalls to avoid), and walk through the setup step by step. By the end, you’ll be able to seamlessly incorporate lookup functionality into your flows. Let’s dive in!

    What Is a Lookup Field in a Salesforce Screen Flow?

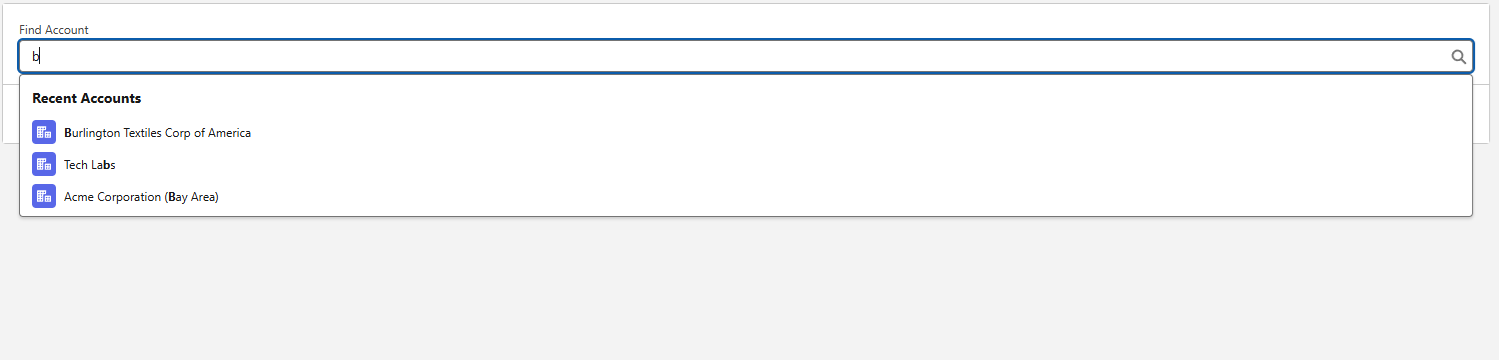
    A lookup field in a Screen Flow is a screen component that lets your users search for an existing Salesforce record and select it, all within a flow. It behaves similar to a lookup field on a Salesforce record page – when the user clicks it, they can type to search, see a list of matching records, and pick one. This is incredibly useful in flows where you need the user to choose an existing record (like an Account, Contact, etc.) as part of a process, instead of typing an ID or name manually. Salesforce introduced this standard Lookup component for flows in Winter ’20​, making it much easier to incorporate record search in your automation screens.

    Why use a lookup in a flow? Imagine a flow that creates a Case and you want the user to associate it with an Account or Contact. With a lookup field on the flow screen, the user can simply search and select the Account or Contact record, ensuring accuracy and saving time. No need to copy-paste record IDs – the flow handles it with a familiar Salesforce search interface.

    Before we get into the steps, keep in mind a few important considerations for using lookup fields in flows:

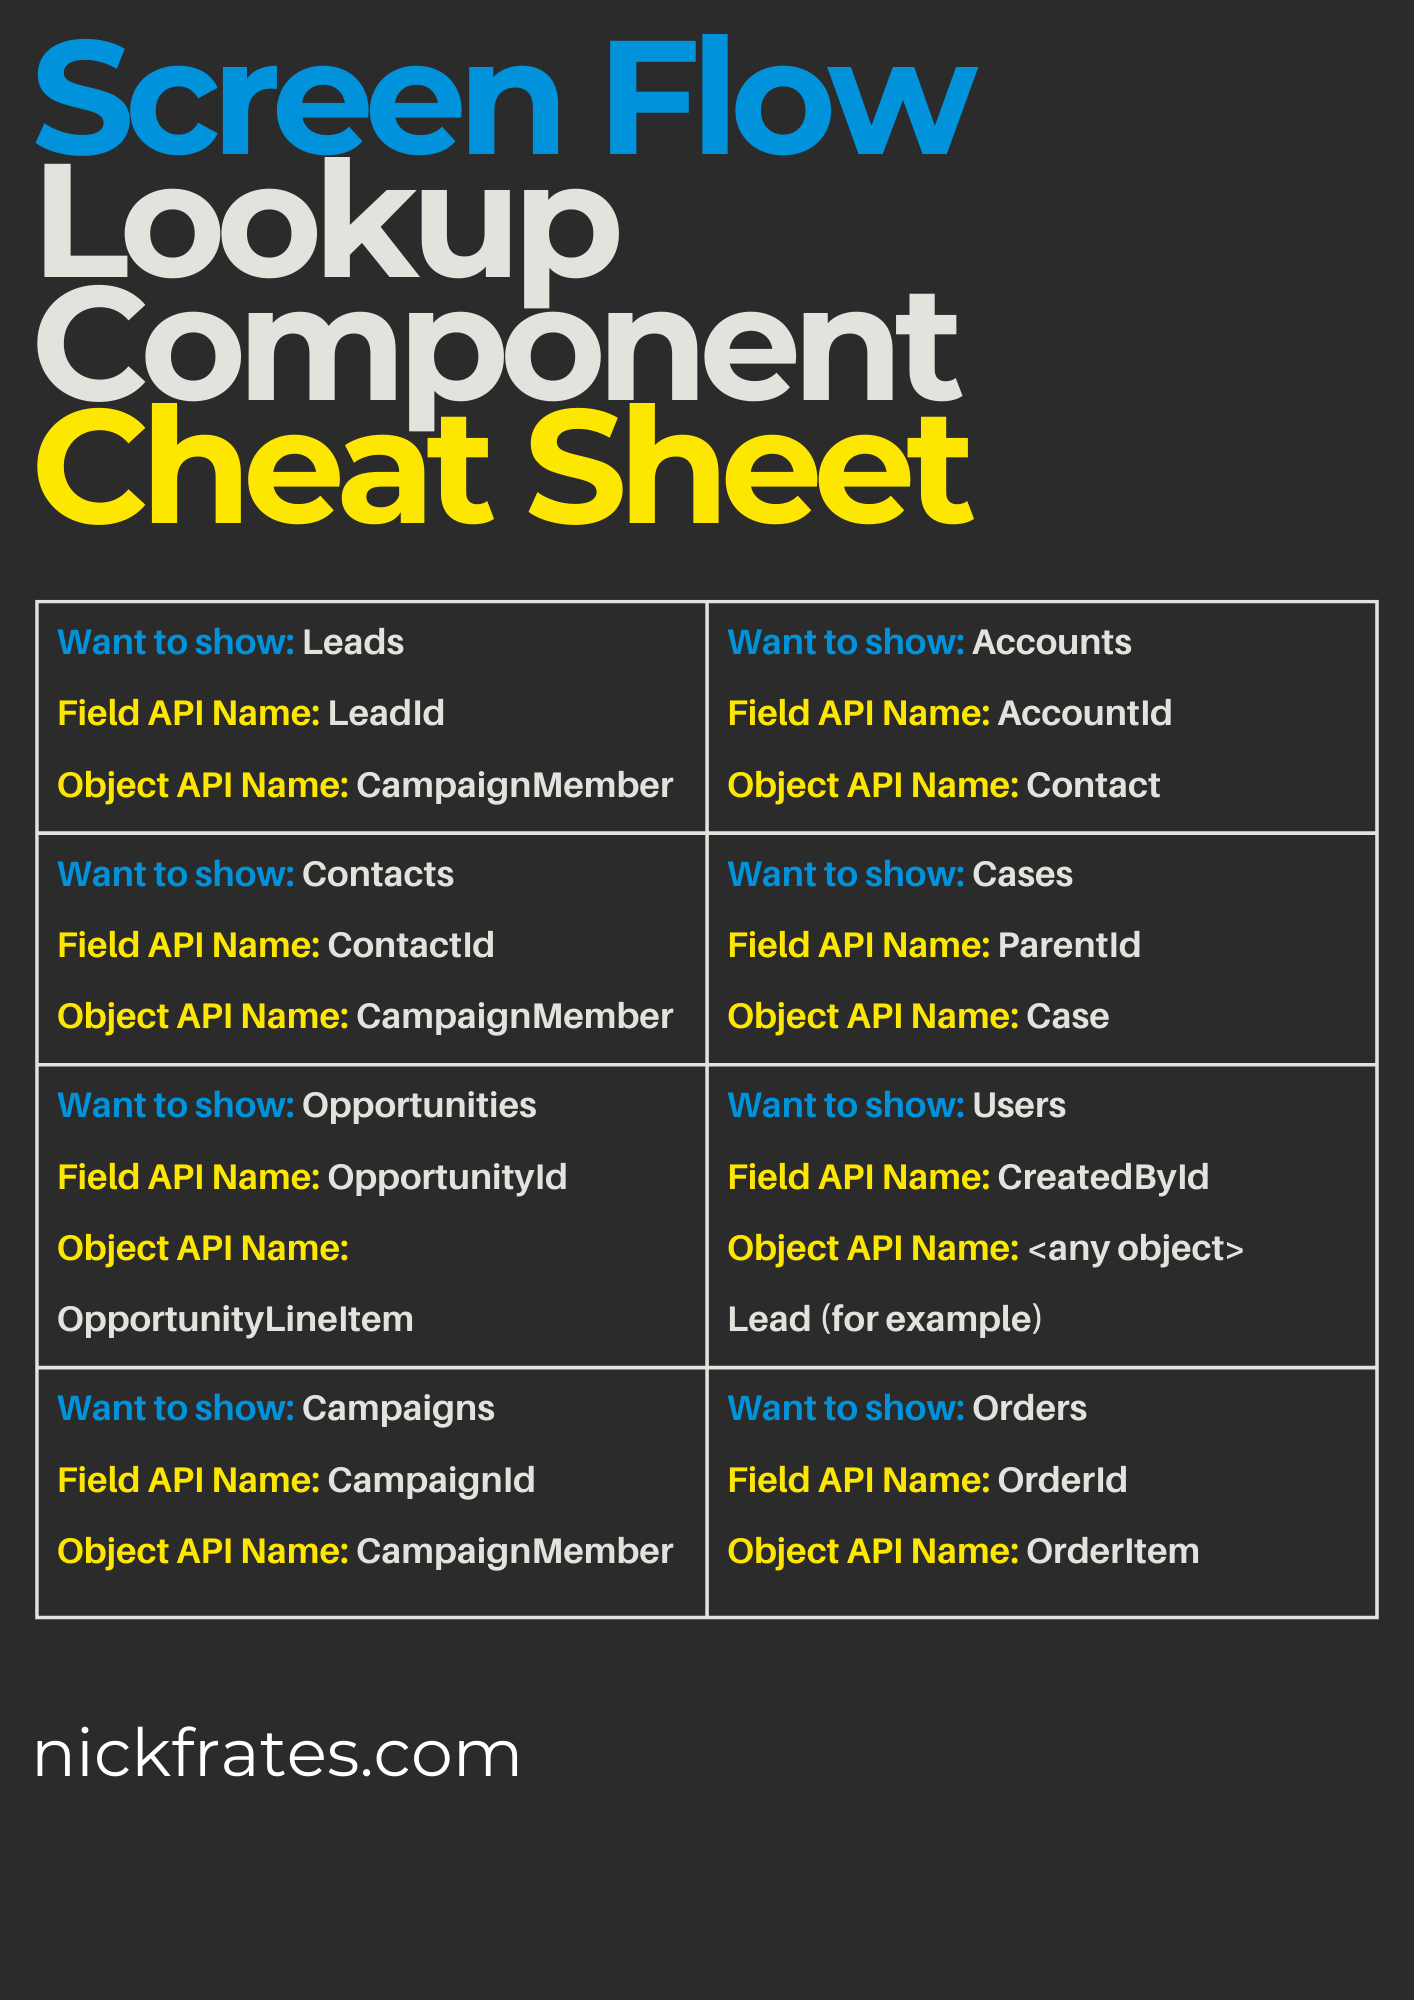
    • Use an existing lookup field: The flow’s Lookup component doesn’t magically create a relationship out of thin air – it must reference an actual lookup field on a Salesforce object. In the component’s properties, you specify a Field API Name and an Object API Name. The field must be a lookup or master-detail on that object. For example: To let users look up an Account, use a lookup field that points to Account (like the AccountId field on Contact or Case) as the Field API Name, and set the Object API Name to the object that field belongs to (e.g. Contact or Case)​. You cannot just put Object API Name as Account and Field as Name – that won’t work, because Name isn’t a lookup field (and the component requires a relationship field). In short, choose an object that has a lookup to your target record.

    • User permissions matter: The running user must have Create permission on the object that the lookup field is on for the Lookup component to function​. Salesforce requires create access on the “source” object in order to search its records via the flow lookup. For example, if your lookup uses the Contact object’s AccountId field (source object Contact), the user needs create access on Contact to use the lookup. Without proper access, the lookup field may appear empty or give an error.

    • Lookup filters aren’t enforced: Any lookup filters defined on the field in object setup are ignored in the flow Lookup component​. The component will show all records the user can access, not just those that meet your filter criteria. For instance, if a Contact lookup on a form would normally filter to only contacts for a chosen Account, the flow lookup won’t honor that automatically. Tip: If you need to restrict results (e.g. only show Contacts related to a specific Account the user selected earlier), you’d have to use a different approach (such as a picklist driven by a Record Choice Set or a custom component) – the standard lookup component won’t apply that filter out-of-the-box.

    • Some fields aren’t supported: Not every lookup field can be used. For example, OwnerId (the standard owner field on many objects) cannot be used in the flow lookup component​ – if you try, you’ll get an error that it’s not a valid lookup field. Salesforce documentation notes to use an alternative like CreatedById if you need a user lookup​. Also, Person Account lookups have special caveats (the Contact’s AccountId trick won’t return Person Accounts​). Keep these in mind when choosing your Field API Name.

    • You can allow multiple selections: By default, the lookup component lets the user select one record. But as of Winter ’23, Salesforce enhanced it to support multi-select. You can enable this in the component properties by setting a “Maximum Selection” greater than 1. This allows the user to pick more than one record from the search results​. For example, you could let a user select up to 3 related records in one lookup. If you use this, the component will output a collection of record IDs instead of a single ID. (We’ll touch on using multiple selections later.)

    With the basics covered, let’s get into the actual steps to set up a lookup field in your flow.

    Step-by-Step: How to Add a Lookup Field to a Salesforce Screen Flow

    Follow these steps to add a Lookup field component to your Screen Flow and configure it properly in Flow Builder:

    1. Open or create a Screen Flow in Flow Builder: In Salesforce Setup, go to Quick Find -> Flows (in Lightning Experience) and click New Flow. Select Screen Flow as the flow type (since we want a flow with screens for user input). If you already have a Screen Flow where you want to add a lookup, edit that flow in Flow Builder. You should see the flow canvas where you can add elements.

    2. Add a Screen element: In a new Screen Flow, click add element and select the Screen element. Give the screen a label (e.g. “Select Account”) so you know its purpose. This screen is where we’ll place the lookup field.

    3. Drag the Lookup component onto the screen: With your Screen element open for editing, you’ll see the Screen Components palette (usually on the left side in Flow Builder). Scroll through the standard components and find Lookup. Click and drag the Lookup component onto your screen canvas (typically into the middle panel where it says “Add a Field”). This adds a lookup field to your flow screen.

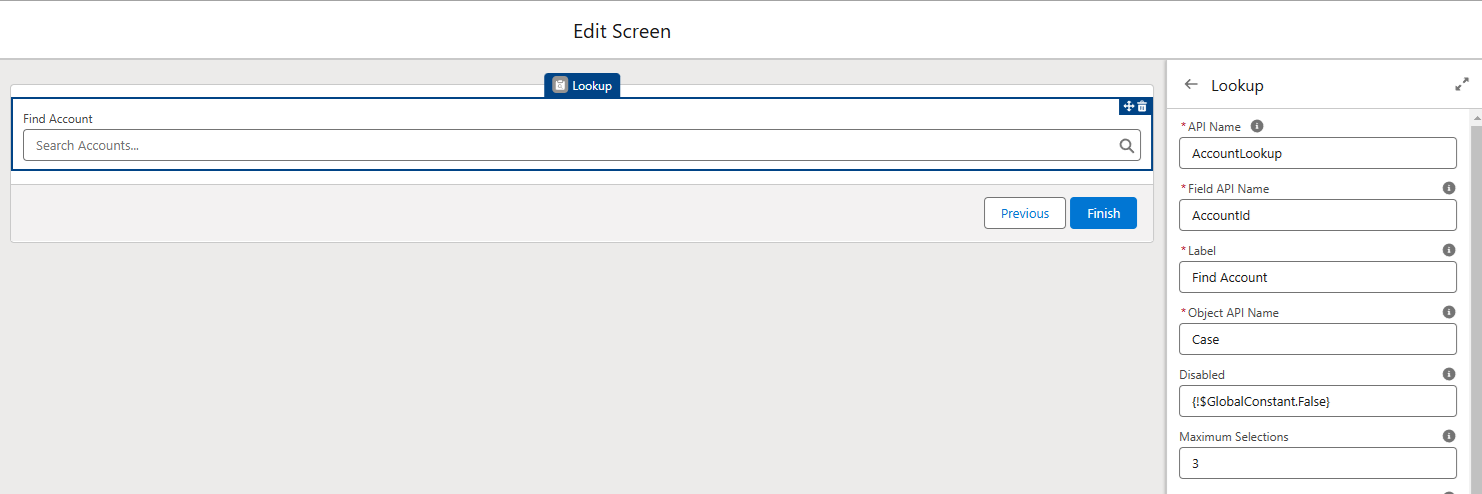
    4. Configure the Lookup field properties: Now, on the right-side panel, you’ll see the properties for this Lookup component. Fill them out as follows:

      • API Name: This is a unique name for this component in the flow (no spaces or special characters). It’s for internal reference in the flow. Give it a clear name, like Account_Lookup or ContactLookup, depending on what you’re looking up. (For our example, if the screen is to select an Account, we might use AccountLookup as the API name.)

      • Field API Name: This is critical! Here, you specify the API name of the lookup field you want to use. This must be a lookup or master-detail field on some object. For example, to let the user lookup an Account, you could use AccountId (which is the API name of the Account lookup field on objects like Contact, Case, Opportunity, etc.). In our example, let’s say we want to select an Account for a new Case we’re creating in the flow – we’ll use the Case’s AccountId field. So we put AccountId as the Field API Name​. (If you’re using a custom lookup field, remember to include the “__c” at the end of the API name.)

      • Object API Name: Here you put the API name of the object that the above field belongs to. In our example, AccountId is a field on the Case object (Case has a lookup to Account), so we set Case as the Object API Name​. This combination tells the flow: “We’re using the AccountId lookup field on the Case object,” which effectively means the user will be searching among Account records (because AccountId on Case points to Account records). If instead we wanted a Contact lookup, we might set Field API Name to ContactId and Object API Name to Case (for Case’s contact lookup) or another object that has a Contact lookup. The general rule is: put the object that has the lookup field, and the API name of that lookup field.

      • Label: This is the user-facing label on the screen. Enter something friendly that tells the user what to do, e.g. *"Account" or "Find Account". In our case, we might write “Account (lookup)” or “Account to associate with Case”. The label appears above or next to the lookup box on the screen.

      • Required: If the user must select something before proceeding, check the Required box. For instance, if it’s critical they pick an Account, mark it required so the flow won’t let them continue without an Account. If it’s optional, leave this unchecked.

      • Max Selection: If you want to allow multiple record selections, set this to a number >1. By default it’s 1 (single select). For example, if this lookup should let the user pick up to 3 records, set Maximum Selection = 3. (If you do this, also adjust the label to indicate they can select multiple, and be prepared to handle a collection of IDs in the flow logic.) If you only need one record, you can ignore this or keep it at 1.

      Double-check that your Field API Name and Object API Name are valid and correspond to a real lookup field. If something is wrong here, the flow will throw an error at runtime. Common mistake: picking an object/field combo that don’t match. For example, if you set Object API Name to Account and Field API Name to ContactId, that will not work because ContactId isn’t a field on the Account object (Account doesn’t have a Contact lookup – it’s the other way around). Make sure the field exists on the object you specify. If you do accidentally configure an invalid pair or a disallowed field (like OwnerId), you’ll likely see an error when running the flow (e.g. “XYZ is not a valid lookup field” or it might fail to render). If that happens, revisit this step and correct the names (or choose a different lookup field)​.

    5. Add any other screen fields or text (optional): You can add other fields or instructions on the same screen as needed. For instance, you might include a Display Text component with instructions like “Search for the account name and select the correct Account from the results.” This could be helpful for users who are new to the interface. You could also add a second lookup on the screen if you need, say, one for Account and another for Contact – just make sure to give each lookup component a unique API Name and configure their Field/Object API Names appropriately (you can reuse the same lookup field on multiple components as long as the API names of the components differ​). Arrange the screen layout as desired.

    6. Save and Finish the screen setup: Once you’ve configured the Lookup component (and any other screen components), click Done to save the Screen element. Back on the flow canvas, connect the Screen to whatever comes next in your flow. For example, if this flow is meant to create a Case after the user selects an Account, you’d connect the Screen to a Create Records element (which creates a Case record using the selected Account Id). Ensure your flow elements are connected properly (Screen → [next element] → … → End).

    7. Use the selected lookup value in your flow: The whole point of adding a lookup field is to do something with the chosen record. The Lookup component’s output will be the record ID (or IDs, if multi-select) of the record the user selects. You can reference this in subsequent flow elements. For instance, if your lookup component’s API Name is AccountLookup (and it was tied to Case’s AccountId field), then after the screen you can refer to {!AccountLookup} as the ID of the Account the user picked. In a Create Records element for a new Case, you’d set the Case’s AccountId field to that {!AccountLookup} value. If you need additional information about the selected record (say you need the Account’s Industry or a Contact’s Email that weren’t directly provided by the lookup), you can use a Get Records element after the screen to query that record by its ID and retrieve more fields. The lookup gives you the record’s Id; from there you have the power to do anything you need with that (update a record, pass it into a subflow, use it in a formula, etc.).

      • Handling multiple selections: If you allowed multiple records to be selected (Max Selection > 1), the lookup component will output a Collection of record IDs (essentially a list). You might see the variable as {!AccountLookup} but it represents multiple values. In that case, if you want to, say, update all selected records or loop through them, you can use a Loop element to iterate over the collection of IDs and handle each one (see our looping guide linked below for details). If you just need to pass the collection as-is (for example, maybe to another flow or an Apex action), you can do that too. Just be mindful that the data type differs when multiple are selected.
    8. Test the flow: It’s always a good idea to debug or run the flow to ensure your lookup field works as expected. In Flow Builder, click Debug on the top-right. Run the flow in debug mode (you can run it as yourself to test the lookup). When the screen appears, try searching in the lookup field for a record you know exists (e.g. start typing “Acme” for Account, and see if matching Acme Corp shows up). Select a record and proceed. If the flow returns results and lets you select, then the lookup is configured correctly. Complete the flow to make sure the downstream logic (using that selected value) works.

      • Troubleshooting: If you cannot find any records when you search, or the lookup field is not functioning, double-check the permissions (are you running as a user who has access and create perms on that object?​). If you get an error like “XYZ is not a valid lookup”, verify that the Field API Name and Object API Name are correct and that field indeed exists on that object (for example, remember OwnerId won’t work as mentioned). Also ensure the component’s API Name is unique in the flow. By debugging, you’ll catch misconfiguration issues early. Once it’s working in debug, Activate the flow (if it’s a new flow or a new version) so that your users can run it in the intended context (e.g. from a Lightning page or quick action).

    By following the above steps, you should have a Screen Flow with a fully functional lookup field. Users will be able to effortlessly search for a record and select it, and your flow can then use that selection just like any other input. This not only improves the user experience of your flows (no one likes having to find and type Record IDs!) but also reduces errors by leveraging Salesforce’s search capabilities.

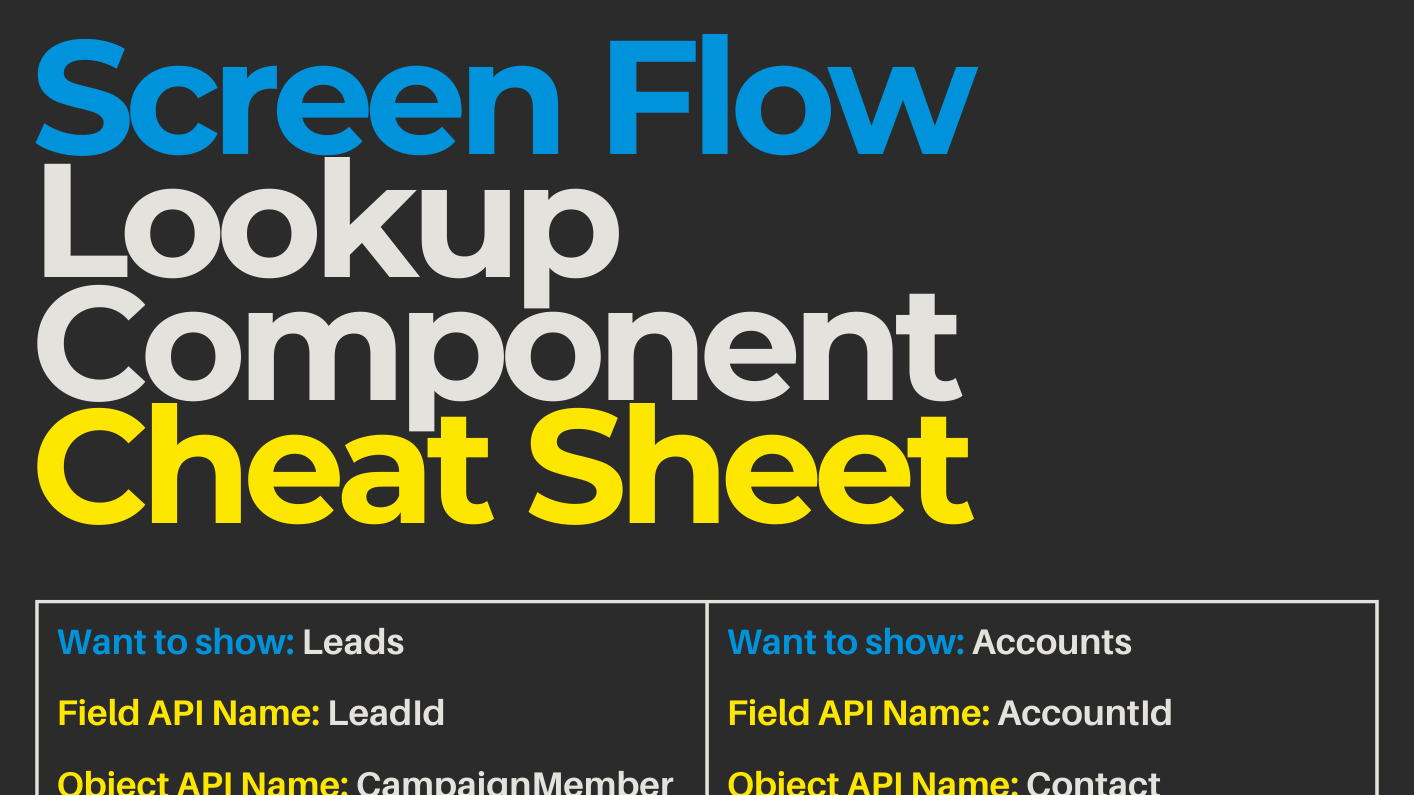
    As a special bonus, here are some common setup scenarios in a handy cheat sheet:

    Internal Links

    If you found this tutorial helpful, you might also enjoy other Salesforce Flow guides on our blog. For example, check out our article on Get Records in Salesforce Flow: Step-by-Step Guide – it shows how to retrieve additional details for a record in a flow, which is perfect if you need to fetch more info after a user selects a record via your lookup. And don’t miss our Salesforce Flow Best Practices for Efficient and Scalable Automation guide, which covers tips to design flows (including screen flows) that run smoothly and are easy to maintain. Following best practices will help you avoid common pitfalls as you add components like lookups to your flows.

    Now that you know how to use the Lookup component, you’re one step closer to Salesforce Flow mastery. Happy Flow-building!

    Ready to become a Salesforce Flow expert? Don’t stop at just one component – take your skills to the next level with our comprehensive course. Enroll in the 2025 Salesforce Flows Complete Guide – an online, self-paced course that covers everything from beginner basics to advanced techniques. It’s taught by a 17x Certified Salesforce Architect with 8+ years of experience​, and has been refined with feedback from over 15,000 students to ensure you get the best learning experience​. You’ll learn pro tips and hands-on strategies to build powerful automations (far beyond just screen flow lookups) and become the go-to Flow guru on your team. Don’t miss out on the opportunity to future-proof your career and skyrocket your Salesforce expertise – enroll now and supercharge your Flow skills today!

  • Get Records in Salesforce Flow: Step-by-Step Guide

    Get Records in Salesforce Flow: Step-by-Step Guide

    Get Records in Salesforce Flow: Step-by-Step Guide

    Retrieving Salesforce records within a flow is essential for building dynamic automations. Luckily, Salesforce Flow Builder provides the Get Records element to do this with clicks, not code. By using Get Records, you can query Salesforce for records that meet certain criteria and use those records later in your flow – all without writing a single SOQL query or Apex. In this help article, we’ll show you exactly how the Get Records element works in Salesforce Flow and how to configure it step by step. By the end, you’ll be able to quickly pull in Salesforce data (like looking up related records or grabbing a specific record by criteria) and use it to power your flow logic. Let’s dive in!

    What Is the Get Records Element in Salesforce Flow?

    Get Records is a Data element in Flow that lets your flow find Salesforce records that meet specified filter conditions and store the results for use later in the flow. In other words, it’s how you query data within a flow. According to Salesforce’s documentation, the Get Records element “finds all Salesforce records that meet the filter and sort conditions and stores values from the retrieved records in variables”​. You can think of it as the Flow equivalent of a database query: you tell it which object to look at (e.g. Accounts, Contacts, Cases), what conditions to match (e.g. “Contact’s AccountId equals X” or “Account Name equals 'Acme'”), and it will return the record(s) that match.

    When would you use Get Records? Anytime your flow needs information that it doesn’t already have. For example, in a Record-Triggered Flow, you might use Get Records to fetch related records (like finding all Contacts related to an Account that was just updated). In a Screen Flow, you might use Get Records after a user provides input (like an ID or name) to fetch the corresponding record details. Essentially, whenever you need additional Salesforce data (beyond the initial context or inputs) to accomplish your automation, Get Records is your go-to element.

    Some key features of Get Records to understand upfront:

    • You can choose to retrieve a single record or multiple records depending on your needs.
    • You can sort the results (useful if you only want the first record out of many matches, for example the most recent record).
    • The element allows you to store the retrieved fields either automatically or in specified variables. Once stored, those values can be referenced by other flow elements (like Decision, Assignment, or Update Records).
    • If no records are found, the output will be empty (null for a single record, or an empty collection for multiple records). It’s good practice to handle that case in your flow (more on that in tips below).

    Now that we know what Get Records does, let’s walk through how to use it in Flow Builder.

    Step-by-Step: How to Use Get Records in Salesforce Flow Builder

    Follow these steps to configure a Get Records element in your Salesforce Flow. For this walkthrough, we’ll use an example of retrieving all Contact records related to a given Account, but the steps are similar no matter what records you need to get:

    1. Add a Get Records element to your flow: In Flow Builder, create the Get Records element on the canvas at the point where you need to retrieve data. Give it a descriptive name. For example, if you are pulling contacts for an account, name it something like “Get Contacts for Account” (naming your flow elements descriptively makes the flow easier to understand later).

    2. Select the Object you want to query: In the Get Records configuration pane on the right, the first setting is Object. Click to select the Salesforce object that you want to retrieve records from. In our example, choose Contact (since we want to get Contact records). If you wanted to get an Account or Case, you’d select Account, Case, etc. Choosing the correct object is important because your filters in the next step will be based on fields of this object.

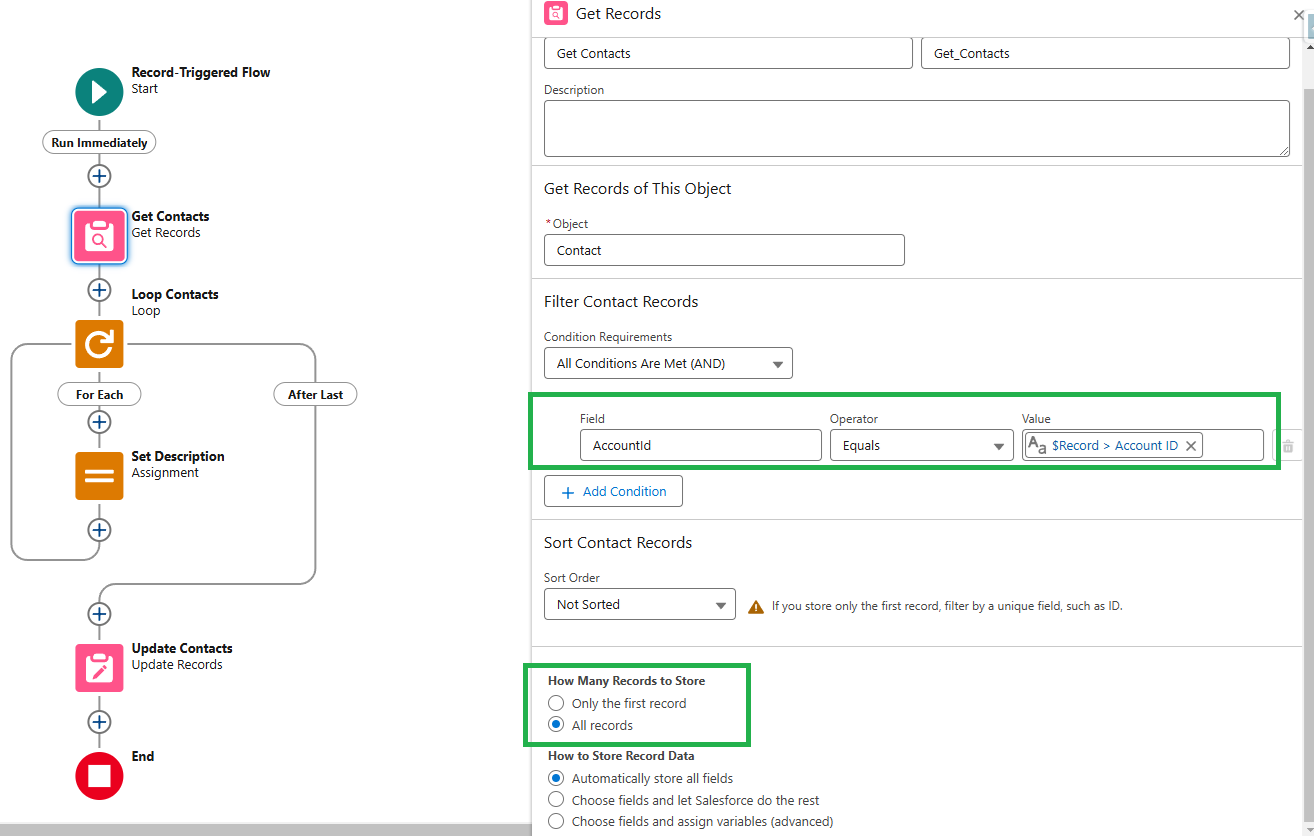
    3. Define Filter Conditions: Under Filter conditions, specify the criteria that the records must meet. This works just like setting up list view filters or a WHERE clause in SOQL. You can add one or multiple filter criteria. In our example, we want Contacts related to a specific Account record. Assuming this flow was triggered by an Account, we could set Contact field AccountId equals {$Record.Id} (where $Record.Id is the Account record that triggered the flow). This tells the Get Records to find all Contact records whose AccountId matches the current Account’s Id​.

      If you’re in a Screen Flow and have an input variable for AccountId, you would use that. You can add additional filters as needed (for instance, you might only want Contacts where Active__c = true, etc.). Make sure your filter logic is specific enough to get the records you actually need and not more. Tip: If you expect a single result (e.g., querying a unique field), you can set the criteria for that one record. If you expect multiple results, just know that all matching records will be retrieved (we’ll handle the difference in the next steps).

      • Optional: Sort the results if needed. You’ll see an option for Sort Order (ascending, descending, or none) and which field to sort by. Sorting is only really necessary if you plan to use “Only the first record” (see next step) or if the order of records matters for your use case. For example, if you only want the most recent record, you might sort by CreatedDate in descending order, then take the first record. If order doesn’t matter, you can leave this as Not Sorted for slightly better performance​.
    4. Choose how many records to store: Next, decide whether you want the flow to retrieve only the first matching record or all records that match. This setting is presented as “How Many Records to Store”. You have two choices:

      • Only the first record – The Get Records will return just one record (the first match found, or the top result if you set sorting). Use this when you know or only need a single record. For example, if you’re querying a unique record (like an Account by a unique ID, or a setting record), or you only care about one record even if several meet the criteria.
      • All records – The Get Records will retrieve every record that meets your filter conditions. Use this when you need to process multiple records. In our Contact example, we would select All records because an Account could have many Contacts and we want them all. Salesforce will store them in a collection variable (essentially a list of records).

      If you choose “Only the first record” and more than one record happens to match your criteria, Salesforce will just take the first one (based on sort order or internal order). If you choose “All records”, you’ll get a collection of all matches. Important: If you want to work with multiple records, make sure to choose All records; if you only get the first record, the rest will be ignored. Conversely, if you only need one, it can simplify your flow to just get one. As a best practice, retrieve all records only when necessary. Salesforce Flow’s documentation notes that if you need more than one record, you should store all and then handle them (e.g., via a Loop or Decision element)​.

    5. Choose how to store the record data: This part can sound a bit technical, but it’s basically deciding what to do with the fields of the records you retrieve. You’ll see options under How to Store Record Data:

      • Automatically store all fields – This is the simplest choice. Salesforce will automatically create a variable (behind the scenes) that holds the record(s) and all their fields. We recommend this option for most cases, especially when you’re building a flow for quick implementation. It means you don’t have to manually specify each field; you can later reference any field of the retrieved records. (If you selected “All records” above, this will be a record collection variable; if you selected “First record”, it will be a single record variable.)
      • Choose fields and let Salesforce do the rest – This allows you to pick specific fields to retrieve, instead of all fields. Salesforce will still create the variable for you, but it will only include the fields you specified. The advantage of this approach is performance: the fewer fields you retrieve, the less work the flow has to do, so your flow can run faster​. If you have a very large object or you only need a couple of fields, this can make your flow more efficient. However, be careful: if you later try to use a field that you didn’t select here, your flow will throw an error (because that field’s value wasn’t fetched)​. Only use this option if you are confident which specific fields you’ll need.
      • Choose fields and assign to variables – These options (there are two variations: one for when you’re storing only one record, and one for storing a collection) are more advanced. They let you manually assign the retrieved field values to existing variables that you’ve created in the flow. This gives you more control (like naming the variables or reusing variables), but it’s rarely needed for straightforward flows. It’s generally used in more complex scenarios or when you have specific reasons to use pre-defined variables. If you’re just getting started, you can skip this and stick with the automatic options above.

      For most “quick solution” purposes, Automatically store all fields is a safe bet – it makes implementation faster and less error-prone. We’ll assume that choice in our example.

    6. Save and finish the element: Once you’ve set the object, filters, how many records, and how to store them, click Done (or Save). You should now see your Get Records element on the flow canvas, with its label. It will show some info like the object name and filter criteria for easy reference. (If you have the option, consider adding a screenshot of the configured Get Records settings here for clarity – showing the Object, Filter, etc.) Connect the Get Records element in your flow (e.g., connect it to the prior element or the Start element if this is the first action in the flow). Now the flow will actually perform the query when it runs.

    7. Use the retrieved records in your flow: Now that your flow has queried Salesforce and stored the results, you can use that data in subsequent steps. What you do next depends on your flow’s goal:

      • If you retrieved a single record (Only the first record), you can directly reference that record’s fields in later elements. For example, if your Get Records (perhaps named “Get Account”) found an Account, you could use {!Get_Account.Name} or {!Get_Account.Industry} in a Screen component or in an Update Records element to update that Account. No need for loops – you have one record, just use its fields as needed.
      • If you retrieved multiple records (All records), the output is a collection of records. You cannot directly reference a field on a collection without iterating, so typically you’ll use a Loop element next to process each record in that collection. For instance, after getting all Contacts for an Account, you might loop through each Contact to update a field or perform some action for each one. (See our guide on looping in flows for an example of iterating over a collection of records​.) Inside the Loop, each record is treated individually (often referred to as the “current item”), so you can reference its fields and take actions (like update fields, send emails, etc.). Alternatively, if you simply need to, say, update all those records to a certain value without doing something custom per record, you could skip the loop and use an Update Records element that updates Records in a collection (Flow can bulk update a whole collection at once after you set a new value on them). The key point is: with multiple records, plan how to handle that list. Most often, you’ll loop through or at least check if the collection is empty before proceeding.
      • Regardless of single or multiple, it’s wise to add a Decision element after Get Records to check if any records were actually found. For example, you might have an outcome for “Records found” vs “No records found”. In the “No records” path, you could notify the user (in a screen flow) that nothing was found, or skip certain actions in a background flow. This prevents errors down the line (like trying to use a field on a null record). It’s an optional step, but a good habit to avoid issues when, say, no record meets your filter criteria.

    That’s it! At this point, your flow has successfully used Get Records to query Salesforce data. We’ve configured the element and discussed how to use its output. Next, we’ll cover a few extra tips and best practices to keep in mind when using Get Records.

    Tips and Best Practices for Get Records in Flow

    Using Get Records is fairly straightforward, but these tips will help you get the most out of it and avoid common pitfalls:

    • Be Specific with Your Filters: Always filter on criteria that will narrow down to the records you need. This not only ensures your flow logic is correct, but also helps performance. Querying a huge number of records unnecessarily can slow down your flow and even hit governor limits if you process them. For example, querying “Contacts where AccountId = X” is much better than querying all contacts and then filtering in the flow. The Get Records element will do the heavy lifting in the database – use that power to your advantage by being specific.

    • Use “All records” vs “First record” appropriately: If you only need one record, use Only the first record – it simplifies your flow. If you need multiple, use All records and be prepared to handle a collection. Don’t accidentally choose “First” when you meant to process many, or you’ll miss data. Conversely, if you only need one, there’s no need to retrieve an entire set. Salesforce Flow will let you handle either case, just make sure to pick the option that matches your scenario. (Remember, if you do get multiple records, you’ll likely need a Loop or another mechanism to handle them individually​.)

    • Select Only Needed Fields for Performance (when necessary): By default, Get Records grabbing all fields is convenient. But if you are dealing with a very large object or you’re performance tuning, consider using the option to choose specific fields. The fewer fields you retrieve, the faster the Get Records element can run because it’s less data to bring back​. This is a classic trade-off between simplicity and efficiency. For most simple flows, automatically storing all fields is fine (and avoids the risk of missing a field). If you do opt to select fields, double-check that you’ve included all the fields you plan to use in the flow; if you reference a field that wasn’t retrieved, the flow will throw a runtime error​.

    • Check for No Records Found: It’s good practice to handle the scenario where your Get Records doesn’t find anything. As mentioned, you can use a Decision element after Get Records to check if the record variable Is Null (for a single record) or if the collection Is Empty (for multiple). This way, you can avoid null-pointer errors. For instance, if no record was found but your next step tries to use a field from that record, the flow would error out. Instead, route the “no records” outcome to perhaps create a new record, notify someone, or simply end the flow gracefully. This makes your automation more robust and user-friendly. (If a query absolutely must return something for the flow to continue, you might also consider using a Fault path on the Get Records element to handle the error – see our Salesforce Flow Error Handling guide for more on fault paths.)

    • Avoid Putting Get Records Inside Loops: This is a common rookie mistake that can lead to hitting governor limits. If you put a Get Records element inside a Loop, you will perform a query on each iteration of the loop – which is very inefficient and can easily exceed Salesforce’s SOQL limits if the loop runs many times. Instead, do one Get Records before the loop to get all the data you need, or accumulate criteria and query after the loop. In our best practices article, we note: “The same goes for Get Records inside loops (use one initial query or accumulate IDs and query outside the loop if needed).” In short, get all your data in one go, then loop through it, rather than querying repeatedly in a loop. This approach keeps your flow scalable and efficient.

    • Don’t Hard-Code IDs – Use Get Records for Dynamic Data: Hard-coding record Ids (like a specific Record Type Id, Queue Id, or User Id) in your flow is not recommended, because those Ids change between sandbox orgs and production. Instead, use Get Records to fetch the record by a stable attribute (like Name or some unique field). For example, if you need a certain Record Type, query the RecordType object where DeveloperName or Name matches the one you want, rather than pasting an Id. Salesforce experts recommend using a Get Records element to dynamically query for the record you need (for instance, get the Record Type by name rather than by Id)​. This way your flow will work in any environment as long as that record exists, without needing manual Id updates. (Our post on How to Query for a Record Type in Salesforce Flow demonstrates this approach in action – using Get Records to find a Record Type Id by its name, which is a great practical example.)

    • Name and Document Your Get Records Elements: This is more of a maintainability tip. When you have multiple Get Records in one flow, make sure each one has a clear name and (if necessary) a description. For example, names like “Get VIP Account by Name” or “Get Contacts for Opportunity” are clear. This will help you and others understand the flow later. It’s easy to forget which Get element does what if they’re just called “Get Records 1, 2, 3...”. A little clarity goes a long way in complex flows.

    By following these tips, you’ll avoid most common issues and make your flows more efficient and easier to maintain. Salesforce Flow is powerful, and using data elements like Get Records wisely will ensure your automations run smoothly.

    Internal Links: If you found this tutorial helpful, you might also enjoy other Salesforce Flow guides on our blog. For example, check out our article on Looping in Salesforce Flow: How to Iterate Over Multiple Records for a deeper look at processing collections of records retrieved by Get Records​. And don’t miss our Salesforce Flow Best Practices guide, which covers more strategies (like avoiding hard-coded Ids and using subflows) to build scalable flows​.

    Now that you know how to use Get Records, you’re one step closer to Salesforce Flow mastery!

    Ready to become a Flow automation pro? Take your skills to the next level with our comprehensive course. Enroll in the 2025 Salesforce Flows Complete Guide – an online, self-paced course that covers everything from beginner basics to advanced techniques. You’ll learn best practices (like efficient use of Get Records and other elements), work on real-world projects, and get expert tips to become a Flow expert. Enroll in the Salesforce Flow course here and supercharge your Salesforce automation skills today!

  • Salesforce Flow Error Handling 101: Fault Paths Explained

    Salesforce Flow Error Handling 101: Fault Paths Explained

    Ever run a Salesforce Flow and see the dreaded “An unhandled fault has occurred in this flow” error? 😱 This vague message strikes fear into admins and confusion into users. It basically means something went wrong in the Flow, but Salesforce isn’t telling you what​. The Flow stops dead, the user is left baffled, and as the admin you likely get an error email with cryptic details.

    Good news: you can prevent these ugly surprises by implementing Flow Fault Paths (Fault Connectors) for error handling. In this guide, we’ll demystify fault paths and show how to catch Flow errors gracefully using fault connectors and the $Flow.FaultMessage variable. You’ll learn to display user-friendly error messages and notify your team, ensuring failed flows are handled smoothly instead of crashing and burning. Let’s dive in!

    What Are Fault Paths in Salesforce Flow?

    Fault Paths (also called fault connectors) are special paths in a Flow that run when an error occurs. Think of a fault path as an “error-handling branch” for your Flow. Certain elements in Flow (like record creates, updates, deletes, or Apex actions) can fail – for example, a “Create Records” might violate a validation rule or a user might lack a field permission. Normally, such failures throw an unhandled fault (the Flow’s equivalent of a runtime error). But if you connect a fault path from that element, the Flow will go down that alternate path instead of just blowing up.

    In Flow Builder, fault connectors appear as dashed red lines from Data or Action elements. You connect a fault path to other elements just like a normal connector. Any elements you connect a fault path to will execute only if the previous element fails. (Tip: You usually need at least one normal outgoing path first before you can drag a second connector for the fault.) Essentially, you’re telling Salesforce: “Try to do X, but if there’s an error doing X, then do Y instead.”

    Why use fault paths? A few big reasons:

    • No more generic errors for users: Instead of Salesforce’s generic error popup, you can show a helpful message. This massively improves user experience by providing context or instructions, rather than a scary “contact your admin” note​.
    • Custom error notifications: With fault paths, you decide how to alert the team. Maybe send yourself (and other admins) an email or Slack message with details. You could even create a record log of the error. You’re not limited to Salesforce’s default error email routing​.
    • Graceful recovery: In some cases, you can guide the user to fix the issue and continue. For example, if a required field was blank and caused an error, a fault path could display “Oops, we couldn’t create the record because a required field was missing. Please fill in all fields and try again.”​ This is much better than the Flow just failing with no direction.
    • Maintain flow integrity: By handling exceptions, you prevent the entire Flow (or transaction) from crashing unexpectedly. Your Flow can cleanly roll back changes or take alternate actions, which leads to more robust automation​.

    In short, fault paths are your Flow’s safety net. Next, let’s walk through how to set them up step by step.

    How to Set Up Fault Paths for Flow Error Handling

    Setting up fault handling in a Flow is straightforward. Here’s a step-by-step example of using fault connectors to catch errors:

    1. Identify error-prone elements: First, pinpoint where your Flow might fail. Common culprits are Data elements like Create Records, Update Records, Delete Records, or external actions (like Apex invocations or subflows). These elements get a fault connector option because they can throw exceptions. For instance, a “Create Records” for Contacts could fail if a required field (say, Phone) is blank or a validation rule kicks in. Jot down which elements in your Flow need error handling.

    2. Add a Fault Connector: Open your Flow in Flow Builder. After you’ve connected the normal path from your element, add the fault path. Click the data element and select Add Fault Path. This will create a new path in the flow, and this is your Fault Path. 

    3. Decide what the Fault Path should do: Now choose how you want to handle the error. You have a few options for the element that the fault path leads to:

    • 👉 Display a user-friendly error (Screen Flow): If this is a Screen Flow (one that interacts with a user), you can route the fault to a Screen element. On that screen, add a Display Text component that shows a nice message instead of a confusing error code. For example: “Oops, something went wrong. Please correct any invalid values and try again.”

      You can even include the actual error details for reference, e.g. “Error Details: {!$Flow.FaultMessage}”. Using $Flow.FaultMessage will output the system error message that Salesforce generated when the element failed​. Often, that message might read like “FIELD_CUSTOM_VALIDATION_EXCEPTION: Phone: Phone number is required” (if a validation rule caused the failure). That’s not super pretty to show a user verbatim. A better approach might be to rephrase it or just inform them of the high-level issue. In our example, you could display “Phone number is required – please enter a value.” and maybe log the technical fault message elsewhere. The key is you’re catching the error and showing your own message on screen, so the user isn’t stuck or scared.

    • 👉 Send an alert or do a rollback (Autolaunched Flow): If your Flow runs in the background (e.g. a Record-Triggered Flow or Scheduled Flow), the user won’t see a screen. In these cases, use the fault path to notify admins or perform cleanup. A popular method is to use an Email Alert or Send Email action. For example, add an Action element on the fault path that sends an email to your support/admin team. In that email’s body, include useful info: which Flow hit an error, what the error was, which record/user triggered it, etc. You can merge in the $Flow.FaultMessage variable to give the exact error details​. This way, when a Flow fails at 2 AM, you get an email like: “Subject: Flow Error in Update Account Flow. Body: Error occurred on 2025-02-12 14:25:03 by user John Doe. Error: FIELD_CUSTOM_VALIDATION_EXCEPTION: Phone: Phone number is required.” – and you’ll know exactly what happened.

      You aren’t limited to emails either; you could post to a Chatter group, send a Slack notification (via webhook), or even create a custom “Error Log” record in Salesforce to track all flow errors. The idea is to catch the error and alert the right people behind the scenes. (Advanced tip: By handling errors with fault paths, you can even notify multiple recipients or log extra data, which the standard Flow error emails can’t do easily​.)

    • 👉 Alternative recovery logic (conditional): In some scenarios, you might use the fault path to take a corrective action automatically. This is less common, but imagine an external API call fails – you could use the fault path to call an alternate service, or if a record create fails, maybe attempt a different create with default values. This really depends on your use case. Most of the time, you’ll either inform the user or notify admins, as described above.

    4. Leverage $Flow.FaultMessage (but wisely): The $Flow.FaultMessage variable is your friend for debugging. It captures the raw error message thrown by the failed element​. You can reference this in any fault path element (like in the Display Text on a screen, or in an email’s text template). This is super helpful to include in notifications because it tells you exactly what went wrong (e.g. “DUPLICATE_VALUE: a record with this ID already exists” or “FIELD_INTEGRITY_EXCEPTION: Amount must be a positive number”).

    However, for end-users, this message might be too technical. Feel free to show it for an internal user audience, but for general users you might want to sanitize or simplify it. Some admins choose to parse the fault message with a formula to extract just the meaningful part (for example, stripping out “FIELD_CUSTOM_VALIDATION_EXCEPTION:” and just showing the validation rule text)​. Simpler yet, you can have a generic user message and only log the full $Flow.FaultMessage privately. The bottom line: include $Flow.FaultMessage in some way so you or the support team can see the real error, even if you hide it from the end user.

    5. Test the fault path: After setting up, run your Flow in a scenario that will trigger the error to make sure your fault handling works. Intentionally cause the failure – e.g. leave the phone blank to trip the validation rule in our Contact example. When you run it, verify that your fault path executes: the user should see your custom error screen (and no scary Salesforce error), or you should receive the notification email you configured. If nothing happens or you still see the generic error, double-check that the fault connector is correctly in place on the element that failed. (Also ensure the Flow is activated if it’s an autolaunched flow running in the background.)

    6. Refine the user experience: Take a moment to refine your error message text. Is it understandable? Does it guide the user on what to do next (if anything)? Often a friendly apology and next steps (like “please contact support with this info” or “try again after correcting the highlighted fields”) can turn a frustrating error into a manageable task for the user. Also confirm that any notification you send has enough detail: include the Flow name, relevant record info (like record Id or name), and the error message, so that whoever responds can quickly jump in. Consistency is key – if every Flow error email you send has a similar format, your team will know immediately “this is a Flow error alert” and how to proceed.

    Pro Tips for Smooth Flow Error Handling

    • Add fault paths to every Data element: As a best practice, anytime you use a Create/Update/Delete or callout in a Flow, attach a fault connector to it. Even if you think it “won’t fail,” plan for the unexpected. This proactive approach makes your automations more robust​ and prevents those random flow error emails from showing up in your inbox. It’s much easier to build the error handling while designing the Flow than to troubleshoot a broken Flow in production later.

    • Keep user messages simple: Users don’t need to see a 5-line error code. They just need to know if the action worked or not, and what to do if not. Phrases like “We hit a snag”, “Oops, something went wrong”, or “Please fix the highlighted errors and try again” can be paired with a specific pointer (like “Email is required” or “Unable to save record”) to give clarity. Save the nerdy stuff for the admin notifications or logs.

    • Notify the right people (maybe even yourself): If a Flow fails silently at night, you want to know ASAP. Set up fault path emails to go to a support queue or your inbox. You can even route them conditionally – e.g., if it’s a low-priority process, maybe just log it; if it’s mission-critical, page someone or send a Slack alert. Since you can customize recipients, consider sending to a group email or Chatter group so multiple team members see it, rather than just the default “Flow owner” or last editor. This way no error gets ignored.

    • Link to internal resources: If you have a knowledge article or internal wiki for certain errors, consider adding that info. For example, if a common error is a validation rule, your fault path screen could say “Error: Phone number is required. (See Phone Input Guidelines on the Intranet for valid formats.)”. This might be overkill, but it’s an option for a polished experience. In many cases, just telling them to contact the admin with the error details is enough.

    • Re-use and standardize: If you find yourself adding the same fault-handling steps in many flows, you can streamline this. For instance, you might create a Subflow that sends an error email (accepting the $Flow.FaultMessage and context as input). Then every Flow’s fault connector could invoke that subflow. This avoids duplicating email logic everywhere. Likewise, if you log errors to a custom object, have a subflow or Apex action to create that log. Standardizing your approach means faster building and a consistent format for all Flow errors in your org.

    (For more on making your Flows scalable and robust, check out our article on Salesforce Flow Best Practices, where we discuss fault paths and other pro tips in depth​.)

    Wrapping Up and Next Steps

    No more cringe-worthy “unhandled fault” messages – you’ve now got the tools to handle Flow errors like a champ! By using fault paths and the $Flow.FaultMessage variable, you ensure your Salesforce Flows fail gracefully when things go wrong. Users get clear, helpful feedback instead of cryptic errors, and you get timely notifications with all the details to fix the issue. This not only saves you troubleshooting time, but also builds trust with your users (they’ll see that errors are anticipated and managed, not random and scary).

    Now, take your Flow skills to the next level. Error handling is just one piece of mastering Salesforce Flow. If you found this helpful, imagine what else you could do with a complete understanding of Flows from start to finish. 🌟 Ready to become your team’s go-to Flow expert? Enroll in our in-depth Salesforce Flow Course – 2025 Salesforce Flows: The Complete Guide. You’ll learn best practices, advanced techniques, and real-world examples to build powerful automations with confidence. Don’t let Flow errors (or any Flow challenges) hold you back. Join the course today and get on the fast track to Flow mastery!

    Happy Flow-ing, and may your fault paths never be lonely! 🚀

  • Before-Save vs After-Save Salesforce Flows: A Clear Guide for Beginners

    Before-Save vs After-Save Salesforce Flows: A Clear Guide for Beginners

    Before-Save vs After-Save Salesforce Flows: A Clear Guide for Beginners

    If you’ve ever built a record-triggered flow in Salesforce and paused at the choice between “before-save” and “after-save,” you’re not alone. Many budding Salesforce admins and developers scratch their heads over which flow type to use. The good news? It’s simpler than it seems. This beginner-friendly guide will clear up the confusion between before-save and after-save flows and help you quickly decide which one is right for your needs. We’ll break down the key differences, show you when to use each type, and provide step-by-step tips so you can confidently choose the correct flow type every time.

    Understanding Before-Save vs. After-Save Record-Triggered Flows

    Record-Triggered Flows run automatically when a record is created, updated, or deleted (in certain cases) – much like Apex triggers, but with clicks not code. Salesforce gives you two options for timing your record-triggered automation: before-save flows and after-save flows. These are sometimes labeled in Flow Builder as “Fast Field Updates” (before-save) and “Actions and Related Records” (after-save). The names hint at their strengths: before-save flows are ideal for quick in-place field updates on the record that triggered the flow, while after-save flows let you perform additional actions like creating records, sending emails, or updating related records.

    At a high level, the difference comes down to when the flow executes and what it can do:

    • Before-Save Flows run before the record is saved to the database. Think of this like a pre-processing step. Because they run pre-save, they execute blazingly fast – Salesforce experts often note they can be around 10x faster than after-save flows. They’re optimized for efficiency, but in exchange, they have a limited scope: they can only update fields on the triggering record (the record that initiated the flow). This is perfect for things like auto-populating fields or cleaning up data as soon as the user hits “Save.” However, before-save flows cannot create new records, send emails, or update related records – those actions require the record to exist in the database, which hasn’t happened yet in a before-save context.

    • After-Save Flows run after the record is saved. This means the record and its ID exist in the database when the flow executes. After-save flows are slightly “heavier” in terms of performance because Salesforce must commit the record first and then run the flow’s actions (and any changes the flow makes will perform additional database operations). The big benefit is flexibility: after-save flows can do almost anything – create or update other records (including related records), send email alerts or notifications, call subflows, post to Chatter, and more. If you need to perform actions beyond just updating the triggering record, an after-save flow is your go-to. In fact, most use cases that were traditionally handled by Process Builder (like triggering an email or a task after a record changes) are handled by after-save flows in Flow Builder today.

    Key Differences at a Glance

    To summarize the core differences between before-save and after-save record-triggered flows, here’s a quick rundown of their characteristics:

    • Execution Timing:

      • Before-Save Flow: Runs before the record is saved to the database (similar to a “before trigger” in Apex).
      • After-Save Flow: Runs after the record has been saved to the database (similar to an “after trigger”).
    • Performance:

      • Before-Save: Ultra-fast and efficient. Since it runs pre-save, it avoids an extra database update. This means no additional save cycle – Salesforce doesn’t have to re-save the record, which skips extra processing like assignment rules or workflow rule re-evaluation. In practical terms, a before-save flow can execute very quickly (often cited around 10x faster than an after-save flow) and does not count against DML limits when updating the triggering record.
      • After-Save: Slightly slower because any updates or actions it performs happen after the initial save, often requiring additional database transactions. Updates made in an after-save flow do consume DML operations. You won’t notice a small after-save flow being slow, but in bulk operations (or very complex flows), the difference in efficiency becomes important.
    • Allowed Actions:

      • Before-Save: Can update fields on the triggering record only. In Flow Builder, before-save flows support a limited set of elements: Assignment, Decision, Loop, and Get Records (plus formula resources). You cannot use elements that perform separate actions like Create Records, Delete Records, or Send Email in a true before-save context. (In the Flow Builder’s Start configuration, choosing “Fast Field Updates” enforces these limits.)
      • After-Save: Can perform all actions available in Flow Builder. This includes Create Records, Update Records (on any record), Delete Records, Send Email, Post to Chat, Launch Subflows, and even Scheduled Paths (time-delayed actions). In the Start configuration, selecting “Actions and Related Records” opens up the full toolbox of elements.
    • Use Case Examples:

      • Before-Save: Auto-populating or correcting field values on the same record as it’s being saved. For example, setting a default value, formatting a text field, or checking a checkbox if certain criteria are met – all without needing additional records or user actions. It’s ideal for simple, quick data adjustments (like automatically capitalizing a name, or copying a value into a secondary field upon save).
      • After-Save: Anything that needs to happen after the record exists. Common examples: creating a follow-up Task after a new Opportunity is closed, sending an email notification when a case is updated, updating all child records when a parent record changes, or logging a record change to a history object. If your flow needs to reference the record’s ID (for example, to pass it into a subflow or include it in an email), you’re in after-save territory because the ID is only available post-save. After-save flows are basically the declarative way to handle what you might otherwise do with Apex after triggers or the (now legacy) Process Builder.

    When to Use Before-Save Flows (Fast Field Updates)

    Choosing a before-save flow makes sense when your automation only needs to affect the record that triggered the flow, and no further actions are required. Here are some clear-cut scenarios where a before-save flow is the perfect choice:

    • Updating Fields on the Triggering Record: If all you need is to set or modify some field values on the record as it’s being saved, use a before-save flow. For example, when a Lead is created, maybe you want to automatically set a “Source Category” field based on the Lead Source, or when an Opportunity’s Stage changes to Closed Won, you want to stamp a “Closed Date” field with today’s date (if it isn’t already populated). These kinds of in-place field updates are exactly what before-save flows excel at. They happen in-memory before the save, so Salesforce saves the record once with your changes already applied – no extra update needed.

    • Performance is Critical (High Volume): Because before-save flows are so efficient, they are ideal for high-volume changes. If your org often processes lots of records at once (data loads, bulk updates, etc.), doing simple field updates in a before-save flow helps avoid hitting governor limits. You skip the additional DML operation that an after-save flow would require for the same field change. In fact, field updates in before-save flows do not count against the DML limits at all, since they don’t perform a separate update operation – it’s just part of the initial save. This means you can update thousands of records’ fields with a before-save flow without consuming one of your allowed 150 DML statements in that transaction.

    • No Need for IDs or Related Records: If your logic doesn’t require knowing the record’s Salesforce Id (for example, you’re not creating related records or logging anything using that Id), then a before-save flow is sufficient. Also, if you don’t need to touch any other object or send any notifications, keep it simple and stick with before-save.

    Example Use Case (Before-Save): Suppose whenever an Account is created, you want to set a custom field “Account Score” based on some criteria (say, increase the score if certain fields are filled out). You don’t need to create any other records or send emails – just update a field on that new Account. A before-save flow would be ideal here: it can calculate the score and assign it to the Account before it gets saved, so the saved record already has the correct score. This will be faster and more governor-limit-friendly than doing it after save.

    How to Configure a Before-Save Flow:
    Even if you’re a beginner, setting up a before-save flow is straightforward. Here’s a quick step-by-step to configure one:

    1. Create a New Flow: Go to Setup -> Flows, click New Flow, and select Record-Triggered Flow.
    2. Choose Object and Trigger: Select the object that will trigger the flow (e.g., Account, Contact, Case, etc.), and specify when it should run (on create, or update, or both). You can also set entry conditions if the flow should only run for certain record criteria.
    3. Optimize for Fast Field Updates: In the Trigger setup, you’ll see an option for “When to Run the Flow.” Choose “Fast Field Updates”, which is Salesforce’s way of saying “run this flow before the save.” This setting ensures the flow runs as a before-save flow.
    4. Build Your Logic with Assignment (or Decision) Elements: In the flow canvas, use an Assignment element to set new values for fields on the $Record (the record that triggered the flow). For example, assign $Record.Account_Score__c = 5 (or whatever logic you need). You can use a Decision element if you only want to update the field under certain conditions. Note: You won’t even see options like “Create Records” or “Send Email” – those are intentionally unavailable in a before-save flow.
    5. Save & Activate: Save the flow, test it, and activate it. Now whenever a record meeting your criteria is saved, your flow will run before the database write, seamlessly updating the field.

    When to Use After-Save Flows (Actions and Related Records)

    An after-save flow is the right choice when your automation needs to do more than just edit the triggering record. Essentially, if your flow’s job description goes beyond “update some fields on this record,” you’ll likely be in after-save territory. Consider using an after-save flow in scenarios like these:

    • Creating or Updating Related Records: This is one of the most common needs for after-save flows. For instance, when a new Opportunity is closed, you might want to automatically create a related Task to follow up with the customer, or update all related Contacts when an Account’s status changes. You can’t do that in a before-save flow (which can’t create records), but an after-save flow is built for it. Example: When an Account is marked “Inactive,” an after-save flow could loop through all related Contacts and mark them “Inactive” as well. (We’ve written a detailed tutorial on how to update child records with an after-save flow – check it out for a real-world example of after-save in action.)

    • Sending Emails or Notifications: If your process involves sending an email alert, a Slack message, or a push notification, you’ll need an after-save flow. For example, you might want to send a welcome email to a new lead immediately after their record is created, or trigger an email to a support agent when a high-priority case is updated. After-save flows can use the Send Email action or even invoke email alert configurations. Before-save flows can’t send emails because, again, they’re limited to just field updates.

    • Accessing the Record’s ID or System-Generated Values: Sometimes your automation needs the record’s unique ID (perhaps to pass to another process or use in a link) or other fields that Salesforce populates only after saving (like Last Modified Date, Created Date, or formula fields that calculate upon save). In a before-save flow, those values aren’t available yet. But in an after-save flow, they are. For example, if you want to log an entry in a custom “Change Log” object with the record’s ID and timestamp whenever a record changes, you must use after-save.

    • Using Scheduled Paths (Delays): Salesforce Flow allows after-save flows to have Scheduled Paths, meaning you can perform actions a certain time after the trigger event. For example, when a case is created, you might want to send a follow-up email after 3 days if the case is still open. This delay feature only works in after-save flows, since the flow needs to wait after the initial save event. Before-save flows execute immediately and cannot have time-based actions.

    • Delete Triggers: Worth noting – Salesforce record-triggered flows currently do not support “after-delete” events. You can create a flow that triggers on record deletion, but it will actually run as a before-delete flow (since once the record is deleted, you can’t act on it after the fact). In deletion scenarios, if you need to perform actions when a record is deleted (like cleaning up related records), Salesforce will treat that as a before-save (before delete) flow under the hood, giving you the full range of actions. So for deletes, just remember: you’ll configure it as a record-triggered flow on delete, and you will have create/update/delete elements available (it’s an exception where before-delete behaves like after-save in terms of available elements).

    Example Use Case (After-Save): Imagine whenever a Deal (Opportunity) is closed, you want to automatically create a set of follow-up tasks: one task for Finance to send an invoice, another task for an Account Manager to check in after 30 days, and maybe post a congratulatory message to a Chatter group. This requires multiple actions across different related records (Tasks, Chatter posts) and even a scheduled action (the 30-day follow-up). A single after-save flow can handle all of this: it can create the Task records, post to Chatter, and use a Scheduled Path to create the 30-day follow-up task later. Trying to do any part of this in a before-save flow would be impossible – you need the after-save capabilities here.

    How to Configure an After-Save Flow:
    Setting up an after-save flow is quite similar to before-save, with a couple of differences in the options you select:

    1. Create a New Flow: Go to Setup -> Flows, New Flow, and choose Record-Triggered Flow (just like before).
    2. Choose Object and Trigger Conditions: Pick your object (e.g., Opportunity) and when it should trigger (on create, edit, etc.). Add any entry conditions if needed (e.g., Stage = Closed Won).
    3. Optimize for Actions and Related Records: In the start configuration, choose the option for “Actions and Related Records”. This ensures the flow will run after the record is saved and allows you to use all action elements. (If you’re in a newer Salesforce version, this is the default for most record-triggered flows; in older versions it was explicitly labeled as after-save.)
    4. Build with Action Elements: Now you can drag and drop Create Records, Update Records, Send Email, Launch Subflow, Delete Records, etc., as needed. Design your flow according to what you want to accomplish. For example, use a Get Records to find related records to update, then an Update Records element to change them. Or use a Create Records element to make a new Task. You can also still use Assignment and Decision elements to handle logic, just like any flow. The key is: you’re not limited, so make sure to use those powers responsibly (only include necessary actions to avoid performance issues).
    5. Test & Activate: Because after-save flows can do a lot, always test your flow with sample data (Flow Builder has a debug mode) to ensure it behaves as expected. Then activate it. The flow will run after Salesforce saves the record, carrying out your actions.

    How to Choose the Right Flow Type (Step-by-Step Decision Guide)

    Still not sure whether your scenario calls for a before-save or after-save flow? Use this simple decision guide to choose the correct flow type:

    1. Identify What Your Flow Needs to Do: Start by clearly listing what you want the automation to accomplish. What’s the end goal? For example: “When a Contact is created, I want to populate a custom field and create a follow-up Task.” Understanding the requirements is key. (Pro tip: Writing this out will often hint at whether you need additional actions or just a field update.)

    2. Ask: “Am I Only Updating Fields on the Triggering Record?” If the answer is yes – the flow’s job is only to update some fields on the record that triggered it (and nothing else) – then lean towards a before-save flow. This will handle your use case and do it with maximum efficiency. If the answer is no – you need more than just updating the triggering record – proceed to the next question.

    3. Do I Need to Create/Update Other Records, Send Notifications, or Perform Complex Logic? If yes, you need an after-save flow. Any requirement like creating related records (e.g., Tasks, child records), updating other records in the system, sending out an email or notification, or calling a subflow means you’re squarely in after-save territory. Use after-save so you have the full toolbox of actions at your disposal. (If no, and you truly only update the same record, then a before-save is likely sufficient as determined above.)

    4. Do I Need the Record’s ID or Other Post-Save Values? Some flows might not explicitly create other records but still need info that’s only available after a save. For example, if you need to use the record’s Id (maybe to pass to an external system or include in an email link), or you need to check a formula field’s value that calculates on save, those are clues that you should use an after-save flow. Before-save flows happen too early to get those values.

    5. Consider Performance and Best Practices: If both a before-save and after-save flow could achieve the result (for instance, you could update the same record’s field using either type: before-save with an Assignment, or after-save with an Update Records element), default to before-save for the better performance. It’s generally a best practice in Salesforce Flow to do the minimum work necessary in the earliest possible phase. Why put extra load on the system with an after-save update if a no-impact before-save update will do? This helps keep your automations lean and less error-prone. (For more tips on building efficient flows, check out our Salesforce Flow Best Practices.)

    6. Use Both Types if Needed (Advanced Tip): Sometimes the best solution is combining both: a before-save flow to handle field updates on the record, and an after-save flow to handle additional actions. Salesforce will execute the before-save flow first, make the field changes, then save the record, then execute the after-save flow. By splitting logic this way, you get the speed benefits and ensure you’re using each flow type for what it does best. For example, on an Opportunity update, you might use a before-save flow to immediately calculate and stamp a “Last Stage Change Date” field (fast update), and an after-save flow to send an alert to the team if the Opportunity was marked as Closed Won (needs email action). Designing your flows this way (one before, one after per object) is a common pattern for keeping automations organized and efficient.

    By following the steps above, you should be able to determine the right approach for any given scenario. When in doubt, remember this rule of thumb: Use a before-save flow for speed and simplicity, and an after-save flow for power and capability. If you stick to that guideline, you’ll rarely go wrong.

    Conclusion & Next Steps

    Understanding the difference between before-save and after-save flows is a game-changer for anyone working with Salesforce automation. By using the right type of flow, you ensure your solution is not only correct but also efficient. No more trial-and-error or confusion – you now have a clear framework for deciding which flow type to use for any record-triggered automation need.

    With this knowledge, you’re well on your way to building smarter, faster flows. But this is just the beginning of what you can do with Salesforce Flow!

    Ready to Become a Salesforce Flow Pro? If you’re excited to take your Flow skills to the next level, there’s no better way than hands-on learning with expert guidance. Imagine being able to build any automation you need – and doing it the right way the first time. To get there faster, consider joining our Salesforce Flow course designed for professionals just like you.

    Next Step: Master Salesforce Flows & Level Up Your Career
    Finally – a simple, proven way to become confident with Salesforce Flows even if you’re starting from scratch. The 2025 Salesforce Flows: Complete Course is a step-by-step program created by Nick Frates. In this course, you’ll learn to build flows from the ground up, tackle real-world scenarios, and apply best practices used by top Salesforce professionals. No fluff, no endless documentation – just clear, structured lessons that turn you into a Flow superstar. By the end, you’ll be automating complex business processes with ease, impressing your team and even future-proofing your career in the Salesforce ecosystem. Opportunities in Salesforce are booming – don’t get left behind. Enroll now in the Salesforce Flows course and unlock the skills that will make you the go-to Salesforce Flow expert at your organization. Your future self (and your current or next boss!) will thank you.
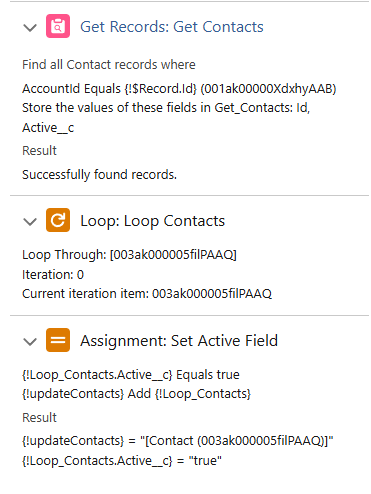
  • How to Debug Salesforce Flows: Step-by-Step Troubleshooting Guide

    How to Debug Salesforce Flows: Step-by-Step Troubleshooting Guide

    Introduction

    Debugging Salesforce Flows is a critical skill – especially as your flows grow more complex. Even a simple mistake in logic or a missing field can cause a Flow to fail silently or throw errors, so being able to pinpoint issues quickly is vital. Proper debugging ensures your automations run smoothly and helps maintain user trust. However, many admins and developers struggle with troubleshooting flows due to a lack of insight into what the Flow is doing behind the scenes. Common challenges include not knowing which element caused a failure, difficulty tracking variable values as the Flow runs, or confusion over cryptic error messages (like “unexpected null value”). In this article, we’ll break down exactly how to debug Salesforce Flows step by step, so you can immediately diagnose and fix Flow issues with confidence.

    Step-by-Step Salesforce Flow Debugging Guide

    Using the Built-in Debug Tool in Flow Builder

    Salesforce provides a powerful built-in debugging tool right in Flow Builder. This Debug Mode lets you run the flow in a test context and watch each step execute in real-time. It’s the fastest way to see what’s happening inside your Flow without affecting real data. To use it:

    1. Open your flow in Flow Builder and click the “Debug” button: In Flow Builder, you’ll find a Debug button at the top of the canvas for most flow types. (Platform Event-triggered flows are an exception – they can’t be run in Debug Mode​)
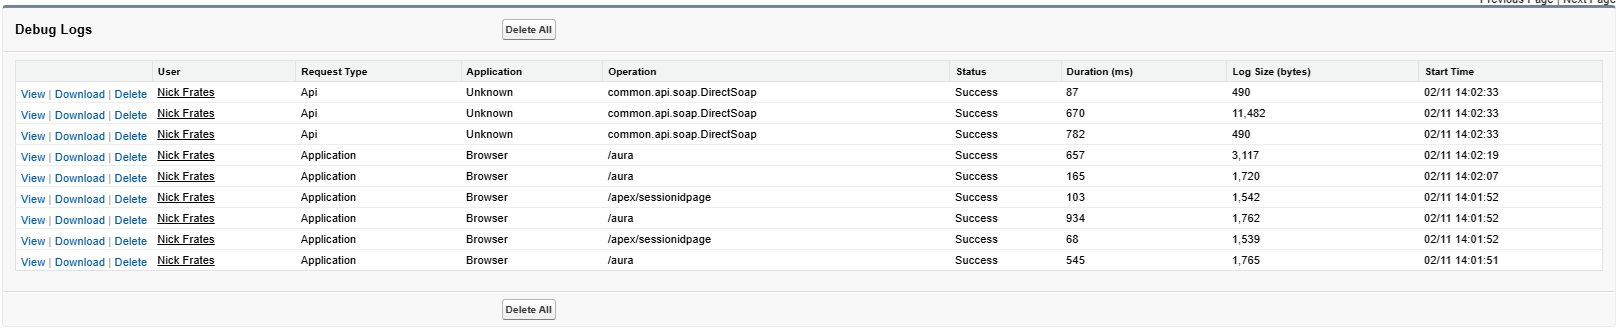
    2. Set debug options and inputs: You can specify things like which record to run the flow on or input variable values. For example, for a record-triggered flow, you might enter a Record ID or set a checkbox to simulate the trigger conditions​. For screen flows, you can simply start without needing an ID. You also have advanced options (depending on flow type), such as running as another user, skipping start conditions, or running in rollback mode (so no changes are actually saved)​. Choosing “Run in rollback mode” is a best practice while debugging to avoid making real changes to your data.
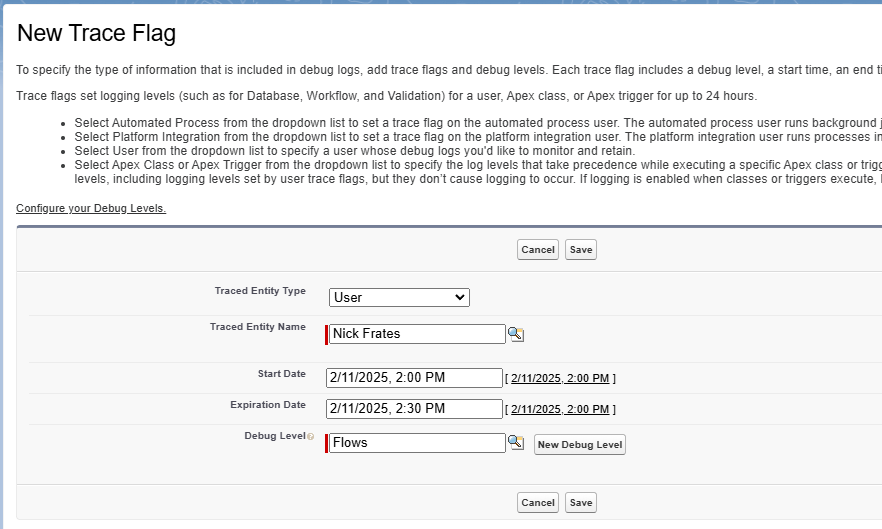
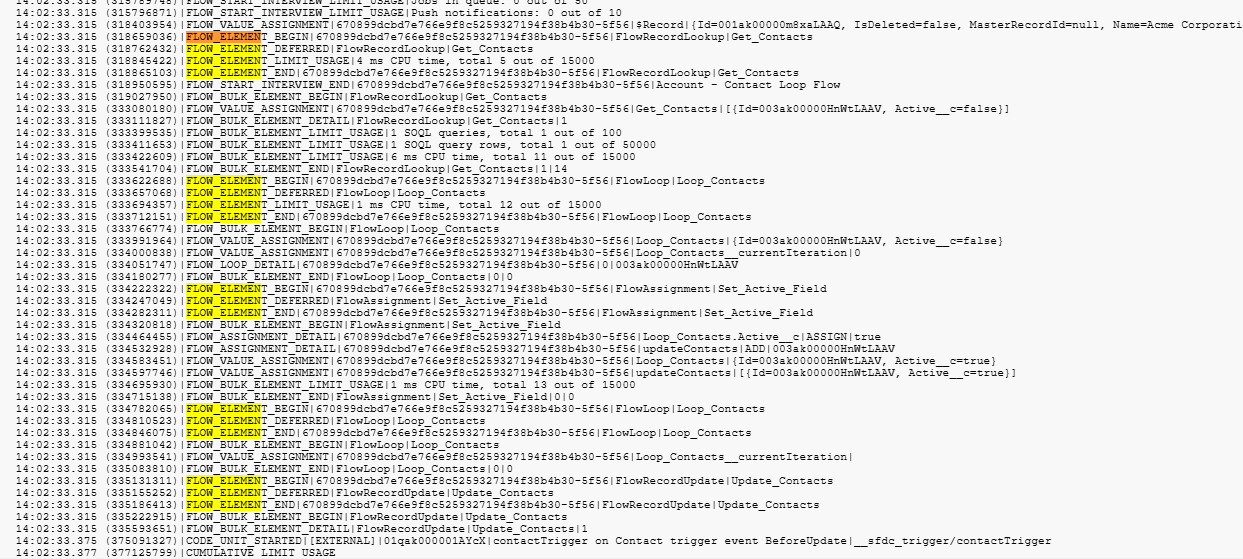
    3. Run the debug session: Once your options are set, click Run (or Run Flow). The flow will execute step by step. In the debug panel, you’ll see a detailed readout of each element execution, outcomes of decisions, and changes to variables. Watch the variable values update as the flow progresses​. For example, when a Get Records element runs, the debug details will show how many records were retrieved; when an Assignment runs, you’ll see the new value assigned to the variable. This real-time insight is like having an x-ray of your flow’s logic.
    4. Review the results: After the flow finishes (or hits an error), examine the debug details. The debug screen clearly highlights which path was taken at each Decision, what data was passed into subflows or Apex actions, and where any errors occurred. If an error happens, you’ll get an error message in the debug log output. Use this info to identify the failing element and the state of your variables at that point. A good practice is to test multiple scenarios in Debug Mode – for instance, if your flow has different decision branches, run the debug for each branch logic if possible. Also, if your flow updates or creates records, use rollback mode or do your debugging in a sandbox to avoid unintended data changes.

    Best practices for Debug Mode: Treat Debug Mode as your first line of defense. Make one change at a time and re-run the debug to see its effect. Pay close attention to the order of execution and ensure the flow’s behavior matches your expectations. If your flow involves user interaction (screen flows), use Debug to step through the screens and confirm they display correctly. Remember that Debug Mode runs in the context of your user by default – if your issue might be permission-related, use the “Run as another user” option to replicate how it runs for others. Overall, the Flow Builder’s debug tool is an excellent way to validate logic in real time, catch obvious errors, and verify that each part of your flow works before deploying it.

    Setting Up Debug Logs for Flows

    While Debug Mode is great for interactive testing, sometimes you need deeper insight or to troubleshoot flows that run in the background (e.g. record-triggered or scheduled flows running outside of Flow Builder). This is where Salesforce Debug Logs come in handy. By configuring debug logs, you can capture a detailed log of everything that happens during a flow execution – including database operations, logic branches, and any errors. Debug logs are especially useful for flows that you can’t easily run with the Debug button (like an auto-launched flow invoked by a trigger), or for reviewing flow behavior after the fact.

    How to enable debug logs for a Flow: Salesforce doesn’t log flow details by default, but you can turn it on in Setup. Here’s how:

    1. Go to Setup and search for “Debug Logs” in the Quick Find, then select Debug Logs​.
    2. Click the “New” button to add a new monitored user for logging​. Select your user (or whichever user will run the flow) as the monitored user. You can set a timeframe for how long logging is active (e.g. 30 minutes or an hour while you test).
    3. Set the log level to capture flows: Assign a Debug Level that has Workflow set to Fine (or finer) and Apex Code set to at least Debug​. The “Workflow” category in debug logs includes Flow actions, so setting it to a finer level ensures the log will include each Flow element execution and variable assignment. (If you use the standard “Workflow” debug level that is Info or lower, you might miss detailed flow info. Setting Workflow to FINER will show assignment actions and values in the log​.)
    4. Click Save. Now, perform the actions that run your flow (for example, create or update a record to trigger it, or run it from Debug if it’s autolaunched). Ensure you do this while the debug log is active for your user.

    After running the flow, return to Setup’s Debug Logs section and refresh the log list. You should see one or more log entries. Locate the log entry corresponding to your flow run – the Operation will indicate a flow (e.g. it might show operations like /aura):

    Interpreting Flow debug logs: The log will be a text output of every step that happened. Look for sections labeled FLOW_START, FLOW_ELEMENT_BEGIN, FLOW_ELEMENT_END, etc., which denote flow execution steps. Each element the flow executed will be listed, often with the API name of the element. You’ll also find variables and their values at certain points. For example, an Assignment might show a line like |ASSIGNMENT|myVariable = "ABC" in the log. If an error occurred, search for “EXCEPTION” or the error text; the log will usually show the exception and which element caused it. Debug logs can be verbose, so it helps to use your browser’s find feature to search within the log for your flow’s name or element names. By reading through the log, you can trace the exact path the flow took and see where things went awry. This is extremely useful for catching issues like a record not being found by a Get, a null pointer on a field, or a permission issue – the log will often include an error message that wasn’t visible to the end user.

    One pro tip: Debug levels and filtering. To reduce noise, you might create a custom debug level where only Workflow (Flows) is set to a fine level, and others (like Apex, Validation, etc.) are set to error or none, so your logs focus mainly on flow details. Also remember to deactivate or remove debug log entries when you’re done (Salesforce limits the number of active debug logs and the log size). Using logs in combination with Flow’s Debug Mode gives you a 360° view of your flow’s behavior – interactive testing plus a forensic log for deeper analysis.


    Additional Debugging Tips for Flows

    Beyond the basic tools, here are some extra tips to help troubleshoot and harden your flows:

    • Use Fault Paths (Fault Connectors) to capture errors: Every Data element (like Get, Update, Create, Delete) in Flow can have a Fault path (the little red connector). Always connect fault paths to either a Screen (in screen flows) or a Subflow/Assignment that logs the error (for auto processes). This way, if an error occurs (say a record update fails due to validation rules or permissions), the flow won’t just fail silently or email an admin – it will execute the fault path. You can display a friendly error message to the user or record the error details in a custom object or debug log. Using fault connectors not only improves user experience but also makes it easier to troubleshoot problems in your flows​. By handling exceptions, you’ll immediately know when something goes wrong and where, instead of scratching your head over an unanticipated failure.

    • Perform record-based testing in a sandbox: It’s one thing to run a flow in Debug Mode with hypothetical inputs; it’s even better to test it with realistic data in a safe environment. In a sandbox org, create or use sample records that mirror production scenarios, then run your flow against them. This helps catch data-specific issues. Sometimes, a flow might work in Debug Mode but fail with actual data. For instance, if a required field is blank on a real record, the flow could throw an error that you didn’t see in a controlled debug test. By testing with actual record data, you ensure your flow works end-to-end. (Always do this in a sandbox or Developer org – never test new flows on live production records!). Salesforce’s debug tools even allow you to debug as another user, so you can simulate how the flow runs with different field values and permissions. The key is to make your testing as close to reality as possible.

    • Leverage error emails and Flow interview logs: When a flow fails in production, Salesforce will send an automated flow error email to the last person who modified the flow (by default). Don’t ignore these! The email includes the error message and even a link that opens the exact version of the flow that failed, with the failed element highlighted​. This can save you a ton of time – you can literally click the link and start debugging the flow in Flow Builder on the spot. Additionally, Salesforce keeps a log of failed flow interviews. In Setup, you can go to Paused and Failed Flow Interviews to see any flow runs that errored out or paused​. From there you can open the flow in the state it failed. Use this after-the-fact when a user reports “something went wrong” but you weren’t there to debug live. It’s an immediate clue to what happened.

    • Check “Paused And Failed Flow Interviews” for running or stuck flows: Similar to the above, if you suspect a flow is hung up or not completing (perhaps a pause element waiting on something), you can check Paused And Failed Flow Interviews in Setup. This isn’t needed for most simple flows, but for long-running flows or those that pause, the Paused And Failed Flow Interviews can show you if a flow is in progress or suspended at a certain step, which might explain behavior. Clearing out stalled interviews can sometimes resolve issues (after you’ve identified why they got stuck).

    With these additional strategies, you’ll be able to catch errors early and ensure your flows are robust. Debugging isn’t just about fixing what’s broken – it’s about building guardrails (like fault paths and tests) so that your flows handle the unexpected gracefully.

    Common Debugging Mistakes and How to Avoid Them

    Even experienced admins can fall into some traps when debugging flows. Here are some common mistakes and how you can avoid them:

    • Not using Fault Paths for error handling: A frequent mistake is leaving out fault connectors on Flow elements that can fail. Without fault paths, any runtime error (like a DML failure or missing record) will cause the flow to error out and just send an email. That’s a missed opportunity to handle the error gracefully. Solution: Always add fault connectors to critical elements. For screen flows, direct faults to a screen that shows a user-friendly error message. For auto-launched flows, you might route faults to update a log record or send a notification. This way, you catch issues within the flow and can even guide the user or admin on next steps​. It makes debugging far easier because you’ll know which element failed and why, right when it happens, rather than after the fact.

    • Debugging (and building) in Production instead of Sandbox: It can be tempting to build a quick fix directly in production or run debug there “just this once.” This is risky and considered bad practice. You might accidentally modify real data or disrupt users. Moreover, production doesn’t allow you to create test records freely or run thorough experiments. Solution: Do all your flow development and debugging in a Sandbox or Developer org. Salesforce professionals consistently advise never to build directly in prod​. In a sandbox, you can use the debug tools with no risk to live data, and test various scenarios (including negative tests) freely. Only after you’ve fully debugged and tested the flow in sandbox should you deploy it to production​. This ensures you catch issues early and protect your org’s integrity. By adhering to this, you won’t inadvertently turn a small flow bug into a big production incident.

    • Overcomplicating flows without incremental testing: Salesforce Flows are powerful, but if you cram too much logic into one flow without testing along the way, you’re likely to run into trouble. Building a huge flow and then pressing “Activate” without intermediate tests makes it hard to know where something went wrong. Solution: Build your flow in small sections and test each “checkpoint.” A great approach (as outlined in our Flow Building Framework guide) is to break the flow into logical chunks​. For example, build and test that the trigger and first Get Records work (ensure the flow fires and finds records). Then add the next element (say a Decision) and debug again, and so on. By “stacking small wins” you can isolate problems immediately​. If something fails, you know it’s in the last chunk you added, not somewhere in 100 elements. This incremental method saves time and frustration. It also keeps your flows simpler and more modular, which means fewer places for bugs to hide.

    • Relying solely on Debug Mode without real-world testing: Debug Mode is fantastic, but it runs in a controlled environment and might not catch all issues. A common mistake is assuming that if a flow “works in Debug” then it will work in reality – not always true. We’ve seen cases where a flow debugged without errors, but when activated on a real record, it failed. For example, trying to set an Address field in a flow can “successfully” run in Debug Mode, yet throw an error at runtime when used on a record​. This happens because Debug Mode doesn’t always replicate certain platform nuances (like required field checks, or specific field behaviors) exactly as they occur in real operations. Solution: Always follow up your Debug runs with a test on a real record (in sandbox) or use Salesforce’s new Flow Test feature if available. If your flow is record-triggered, activate it in a sandbox and perform the actual record action to trigger it, then check the outcome (and debug logs). This real-world validation will catch issues that a synthetic debug might miss – for instance, picklist value mismatches, permission problems, or in our example, address fields that need to be handled as individual components​. In short, trust Debug Mode to guide you, but verify with actual data before declaring victory.

    By being mindful of these pitfalls, you can avoid hours of headache. Incorporating error handling, using proper environments, and testing methodically will make your Flow debugging process much smoother. As you gain experience, you’ll start anticipating these issues before they happen – but until then, let these common mistakes be lessons learned the easy way (from others!) rather than the hard way.

    Conclusion

    Troubleshooting Salesforce Flows doesn’t have to be a daunting task. By leveraging Salesforce’s built-in tools – Flow Builder Debug Mode, Debug Logs, Fault Connectors, and more – you can systematically break down any flow and find out exactly what’s happening at each step. We’ve shown how using these tools in tandem gives you immediate insight and long-term audit trails to resolve issues quickly. Remember, the key is a methodical approach: start in a safe environment, test incrementally, handle errors gracefully, and never be afraid to dive into debug logs for the full story. Debugging is a skill, and like any skill, it gets easier with practice.

    By mastering these debugging techniques (and following Flow best practices to avoid issues in the first place​), you’ll build more reliable, error-resistant flows that keep your org running smoothly​. No more mysterious errors or frustrated end users – you’ll be the Flow troubleshooting hero of your team!

    If you found this guide helpful and want to deepen your Salesforce Flow expertise, consider enrolling in our comprehensive course: 2025 Salesforce Flows: The Complete Guide. In this 15-hour project-based course, you’ll learn not just debugging, but all aspects of building Flows like a pro – from fundamentals to advanced patterns. Future-proof your skills and become the go-to Flow expert in your organization.

    Additional Resources: For further reading, be sure to check out our other Salesforce Flow articles on NickFrates.com, such as Salesforce Flow Best Practices for Efficient and Scalable Automation​ and the Flow Building Framework for designing flows with easier debugging in mind​. These will complement your debugging know-how with design strategies to minimize errors. Happy Flow building, and happy debugging!

  • Looping in Salesforce Flow: How to Iterate Over Multiple Records

    Looping in Salesforce Flow: How to Iterate Over Multiple Records

    Updating many records at once in a Salesforce Flow can be game-changing for admins and developers looking to automate processes. The good news is that you can loop through a collection of records in Salesforce Flow and update each one – all in one flow run. In this article, we’ll show you exactly how to use a Salesforce Flow Loop to iterate over multiple records and update them efficiently. We’ll use a real example (updating a batch of child records) to walk through the steps. By the end, you’ll know how to handle collection variables, avoid common pitfalls, and bulk update records with ease. Let’s dive in!

    Why Use a Loop in Salesforce Flow?

    Loops in Salesforce Flow let you iterate over a collection of records so you can perform actions on each record. This is incredibly useful when you need to update or process multiple records as part of an automation. For instance, if an Account status changes, you might want to update all related Contacts, or if an Opportunity is closed, maybe loop through and update associated records. Instead of building separate actions for each related record (which is impossible if you don’t know the count upfront), a loop handles it dynamically.

    What is a Loop element? It’s a Flow element that takes a collection variable (a list of records) and lets you handle each record one by one inside the flow. You can think of it like saying “for each record in this list, do X”. With loops, Salesforce professionals can update multiple records in Salesforce Flow without writing code, using just clicks in Flow Builder.

    Example Use Case: Updating Child Records in Bulk

    To make this concrete, let’s use a common scenario: automatically updating all child Contact records when an Account record is updated. Imagine your Account object has a checkbox field “Active__c” and you want every Contact under that Account to have their Active__c field match it. Instead of manually editing each contact or writing Apex code, we’ll use a flow loop to handle it.

    How this will work: When an Account’s Active__c field changes, a record-triggered flow will fetch all related Contacts (that’s a collection of records). We’ll loop through that contact collection, set each Contact’s Active status to match the Account, and then update all the Contacts at once. This approach can be adapted to any scenario where you need to update many records based on some condition – the loop logic remains the same.

    Step-by-Step: How to Loop Through and Update Multiple Records

    Ready to build the flow? Follow these steps in Salesforce Flow Builder to configure a loop that updates multiple records:

    1. Start a Record-Triggered Flow (After Save): In Setup, go to Flow and create a new Record-Triggered Flow on the Account object (since our example is triggered by an Account change). Set it to run after the record is saved so we can perform updates on related records. (If you’re using another context, you could also use an autolaunched flow or schedule-triggered flow – the loop concept will be similar.)


    2. Add a Get Records element (Get Related Records): We need to gather the child records to loop through. Add a Get Records element that queries Contact records where AccountId == $Record.Id (the Account that triggered the flow). Make sure to allow multiple records (it should store the results in a record collection variable). This is our list of contacts to update.

    3. Add a Loop element: Drag a Loop element onto the canvas next. Set the collection to loop over as the collection variable from the Get Records (e.g. Get_Contacts). Choose the loop direction (it can be first to last — the order usually doesn’t matter unless you have a specific reason to reverse). The Loop element will iterate over each Contact in that collection one by one. Salesforce will create a Loop Variable (often named like Current Item from Get_Contacts) representing the single record in the collection for each iteration.

    4. Inside the Loop – Assignment (update each record’s field): Now inside the loop, use an Assignment element to set the field values on the current record. In our example, we take the {!Loop_Contacts.Active__c} and assign it the value of the Account’s Active__c (which triggered the flow). Essentially: Loop_Contacts.Active__c = True. You can do this for any fields you need to update. Important: This doesn’t save the record yet; it just changes the value in memory for that loop record.

    5. Collect the records to update: Still inside the loop, we need to build a collection of all the modified records. We already have a collection from the Get, but it’s a best practice to avoid directly updating a collection you’re looping (it can cause issues). Instead, use a second Assignment element (or the same one) to add the updated record (the loop’s current record) to a “Records To Update” collection. If you don’t have a variable for this yet, create a new Record Collection Variable (e.g., updateContactCollection) of type Contact. Each iteration, add {!Loop_Contacts} to {!updateContactCollection}. This way, we accumulate a list of Contacts with the new values.


    6. After the Loop – Update Records: Now we’ve exited the loop, and our updateContactCollection collection contains all the contacts with updated Active__c values. The final step is to actually save these changes to the database. Use an Update Records element, and set it to update Records in a Collection (and specify updateContactCollection). This will perform one bulk update operation on all records in that collection. Salesforce will take care of updating each Contact record in one go.

    7. Save and Test the Flow: Save/activate your flow. Now test it out: change the Active__c on an Account that has multiple contacts. After saving the Account, all the related Contacts should have their Active__c field updated to match. You can also debug the flow in Flow Builder to ensure the logic runs correctly (the debug will show the loop iterating through each record).

    Visual Summary of the Flow: (In your mind’s eye, or on a whiteboard, the flow looks like: Trigger (Account) → Get Contacts → Loop through Contacts → Assignment (set field on contact, add to update list) → [loop ends] → Update Records (Contacts). This pattern is the go-to solution for looping in Salesforce Flow to update multiple records.)

    Best Practices and Tips for Using Loops

    Loops are powerful, but you need to use them correctly to avoid hitting limits or causing slow flows. Keep these best practices in mind:

    • Avoid DML inside loops: Never place an Update Records (or Create/Delete) inside the loop itself. This would perform a database operation on each iteration, quickly running into Salesforce governor limits (which allow only 150 DML operations per transaction). Instead, always collect records in a variable and do a single update outside the loop (as we did above). This is a crucial Salesforce Flow best practice​ that keeps your automation scalable. (For more tips on designing efficient flows, see our article Salesforce Flow Best Practices for Efficient and Scalable Automation on this site.)

    • Limit the loop size if possible: Loops will go through each record one by one. If you expect thousands of records, consider if a Flow is the right tool or if you need to batch/bulkify further. Usually, Flows can handle a few hundred records in a loop, but large volumes might hit limits. Use entry conditions on the triggering record or the Get Records query to fetch only the records you truly need to update.

    • Use efficient queries: When using Get Records before a loop, make sure to filter precisely (e.g., only get child records that actually need updating). This keeps your collections smaller and your loop running faster.

    • Test with different scenarios: Always test your flow with various conditions – e.g., an Account with no contacts (the loop should simply do nothing), an Account with one contact, and with many contacts – to ensure your logic works in all cases.

    • Understand collection variables: A collection variable in Salesforce Flow is essentially a list (array) of items. In our case, it’s a list of records. You can build collection variables using Get Records (which returns a collection), by adding records in Assignments (as we did), or other means. Mastering collections is key to using loops effectively. (If you’re new to Flow fundamentals, you might want to read our post Salesforce Flow Types Explained for a primer on different flow types and scenarios.)

    By following these tips, you’ll ensure your loop runs smoothly and your flow is bulkified and efficient.

    Internal Resources and Next Steps

    Mastering loops opens up a world of automation possibilities. You can apply the above pattern to countless scenarios: mass updating child records, iterating through related lists to aggregate data, or even complex logic that needs to check each record against criteria. For more advanced examples and use-cases, explore other how-to articles on our blog. For example, if you found this useful, you might also enjoy Salesforce Flow Formulas: 5 Useful Examples (Text, Date, IF), which can help if you need to incorporate formula logic in your flows.

    And if you’re hungry to deepen your Salesforce Flow expertise, we’ve got something special for you.

    Ready to become a Flow automation pro? Take your skills to the next level with our comprehensive course! Enroll in the 2025 Salesforce Flows Complete Guide – an online, self-paced course that covers everything from beginner basics to advanced techniques. You’ll learn best practices (like using loops effectively), real-world projects, and tips to become a Flow expert. Enroll in the Salesforce Flow course here and supercharge your Salesforce automation skills today!