Category: Flows

  • How to Navigate to a Record in Salesforce Flow

    How to Navigate to a Record in Salesforce Flow

    We're officially halfway through 2024.

    Halfway into the year, are you ahead of schedule, on track, or behind where you want to be on your 2024 goals?

    I'm behind... I definitely want to spend a little more time on my most important 2024 goals.

    Now that we've had a moment of reflection, let's jump into this week's tip: how to navigate to a record from a flow.

    In a screen flow it's often useful to redirect a user to a newly created record.

    And, sometimes, it can be useful to refresh the current record page a user is looking at.

    This solution handles both use cases.

    First, you'll want to go to the Salesforce help site here, and take a look at the three pieces of code.

    Don't worry, you don't need to understand it at all. This is a simple copy and paste operation I'm about to walk you through.

    Next, we'll head to Salesforce and open the developer console.
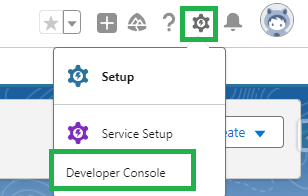
    And we'll click File -> New -> Lightning Component.

    Type NavigateToRecord as the name and press Submit.

    You'll land on a page like this
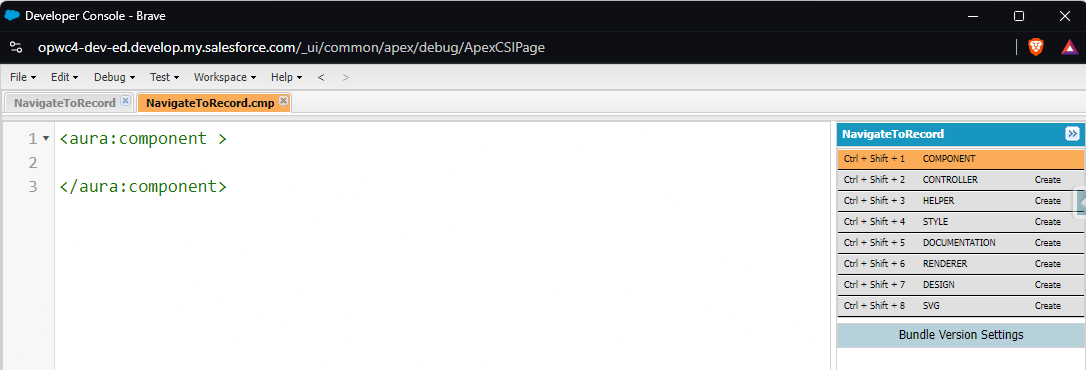
    On this page, paste the code from the help site labeled Component Markup.
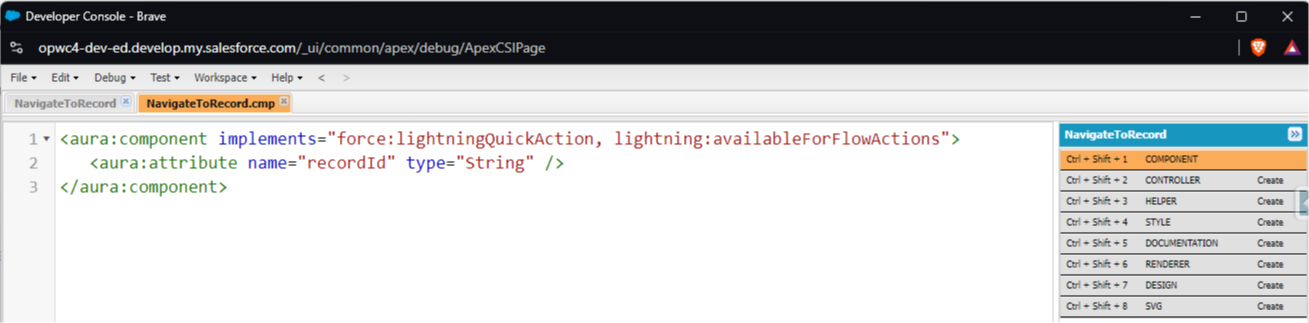
    It will look like the above image when you're done.

    The next step is to, on the right hand side, click both the word Controller and the word Design once.
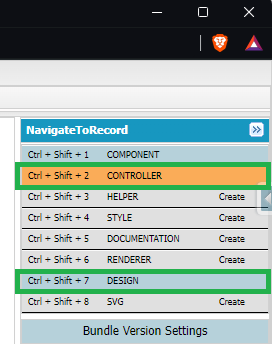
    This will create the space for you to paste the other two pieces of code.

    Now:

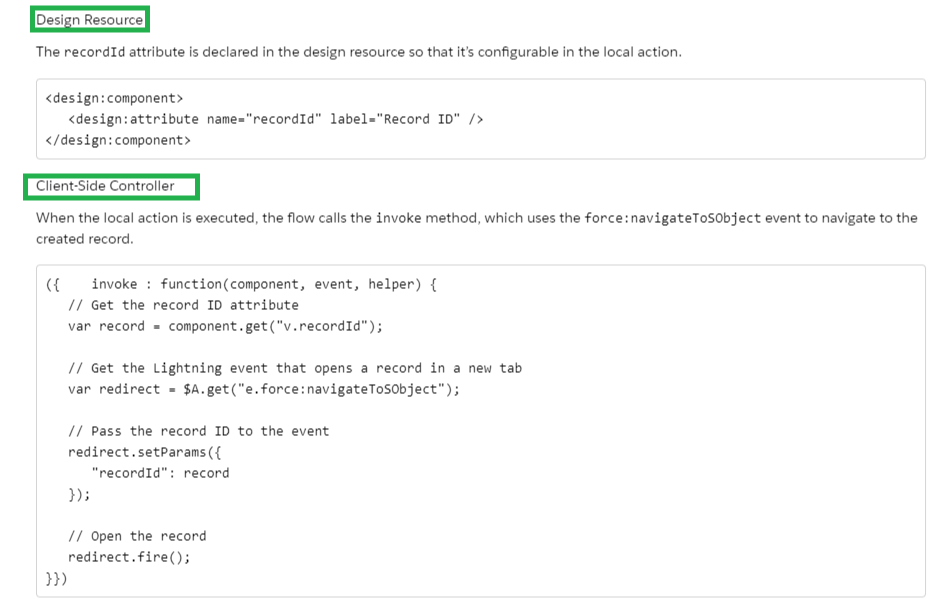
    1. Paste the code from the help site labeled Design Resource into the Design file
    2. Paste the code from the help site labeled Client-Side Controller into the Controller file
    3. Make sure to save each individual tab by pressing Ctrl + S

    The following screenshot shows which code to copy.
    Hard part done! After saving, you can close the developer console.

    Now we can move on to the flow.

    In any screen flow that you'd like to include this action in, click the +Action button on the canvas to add a new action.

    Then search for NavigateToRecord (what we named our component).

    Click the action, name it, and then specify the record Id of the record you want to send the user to.

    This recordId could be for a newly created record, or even the record that started the flow (to refresh the page).

    Here's an example:
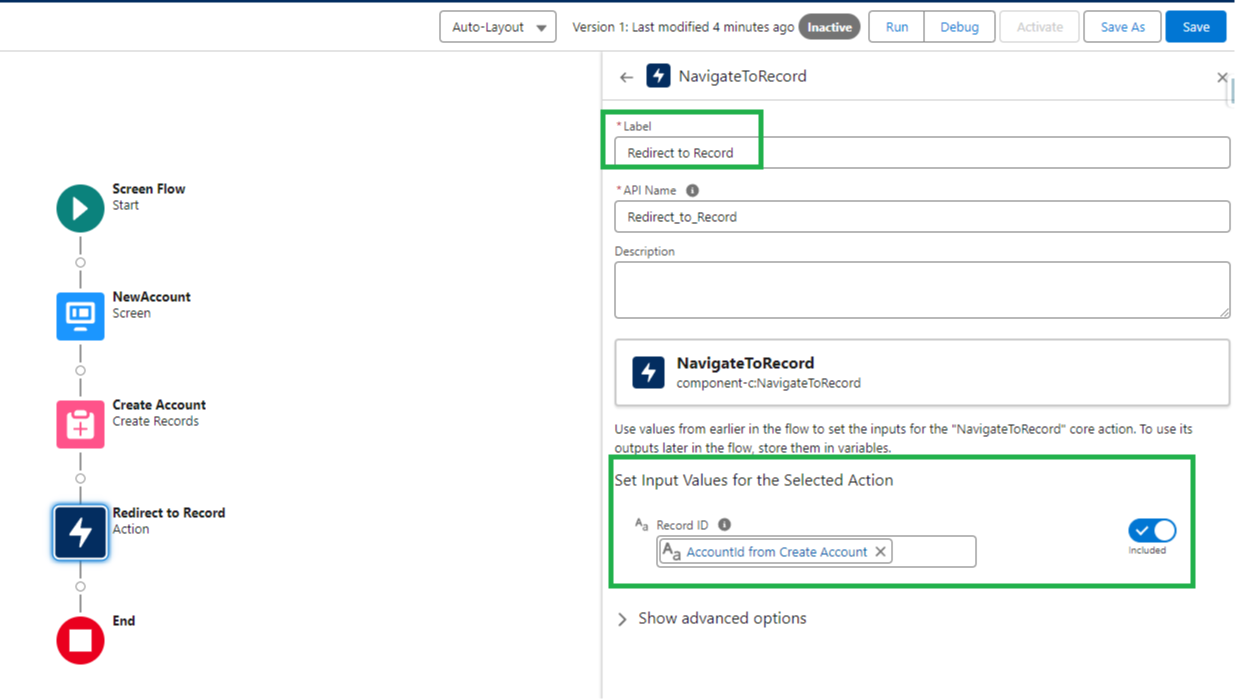
    Once you configure the action, save and activate the flow. And you're done!

    Now any time a user goes through the screen flow, the action will fire, and redirect them to the record you chose.

    Sweet!

    Another good thing about this action is that can be built directly in a production environment. No deployment or developer needed.

    Hope you find this one helpful. I use it all the time.


    Best,

    Nick

  • Custom Flow Error For the Win!

    Custom Flow Error For the Win!

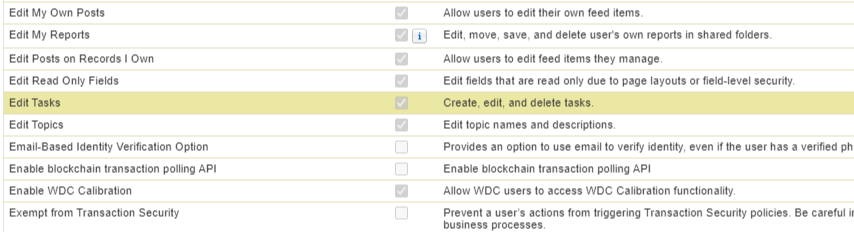
    This week a client of mine had a requirement to prevent their users from deleting tasks.

    You may know that the ability to create, edit, and delete tasks are bundled together in a single permission at the profile level.

    If we want to take away one of those permissions, users lose them all (which in this case they absolutely needed).

    What to do?

    Enter the Salesforce Flow Custom Error component (and new Custom Permission of our own).

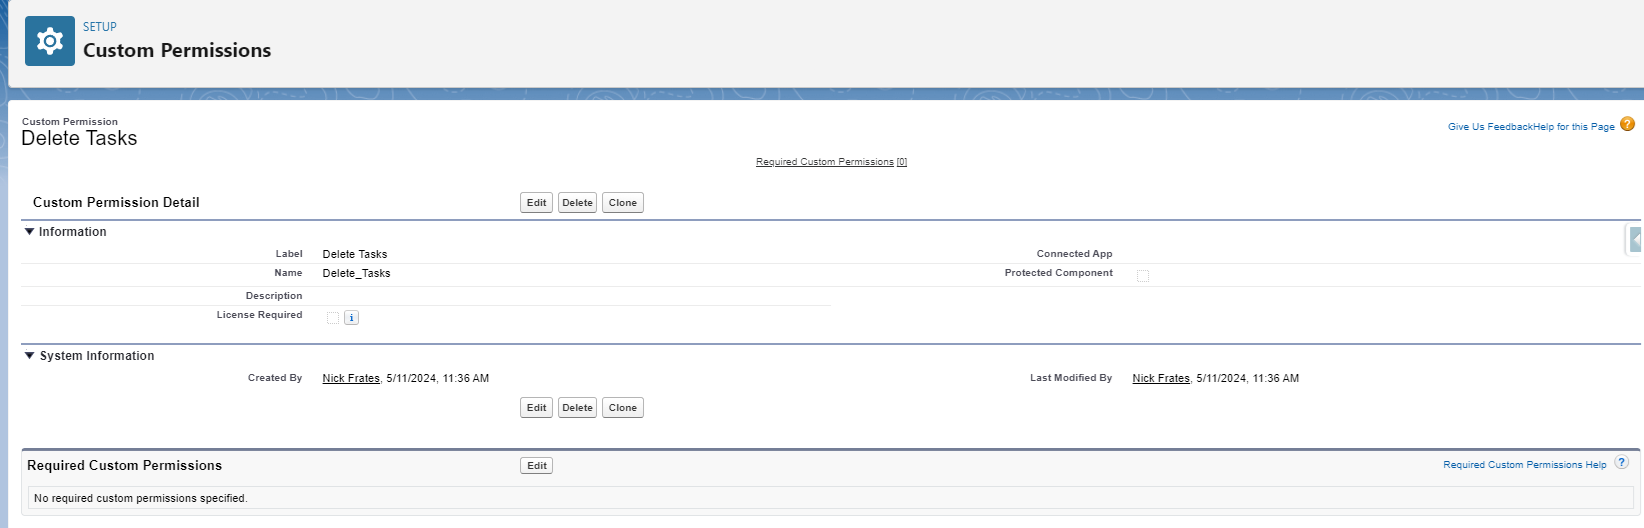
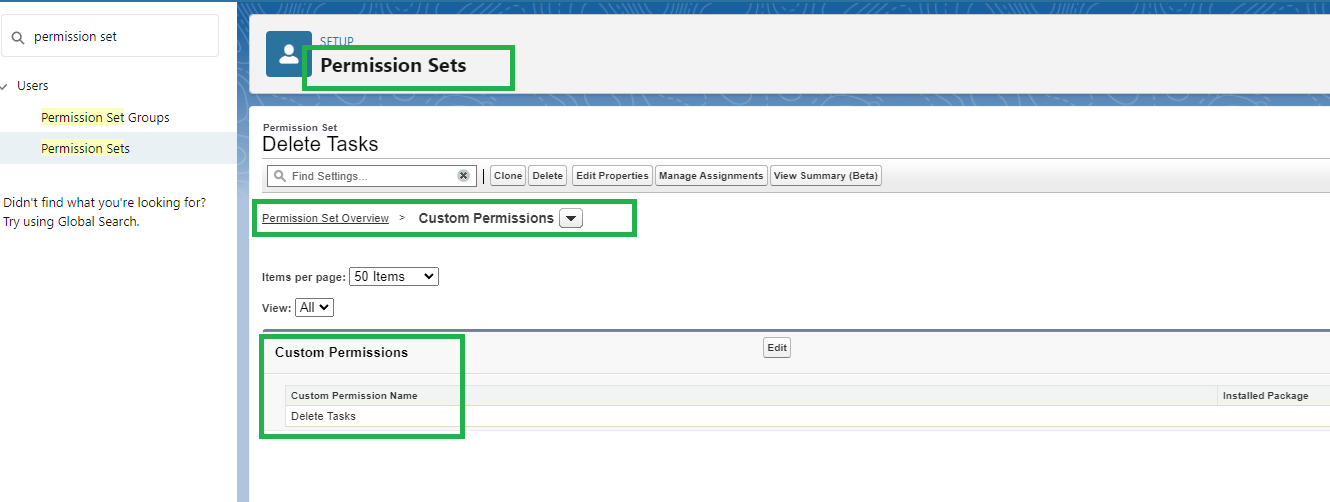
    First, we'll create a custom permission named "Delete Tasks" and assign it to a new permission set we created for this requirement.

    With this done, we now have the ability to assign that new custom  permission (Delete Tasks) to anyone by using the permission set.

    This is key, because it unlocks a cool feature in the Flow Builder, as you'll soon see.

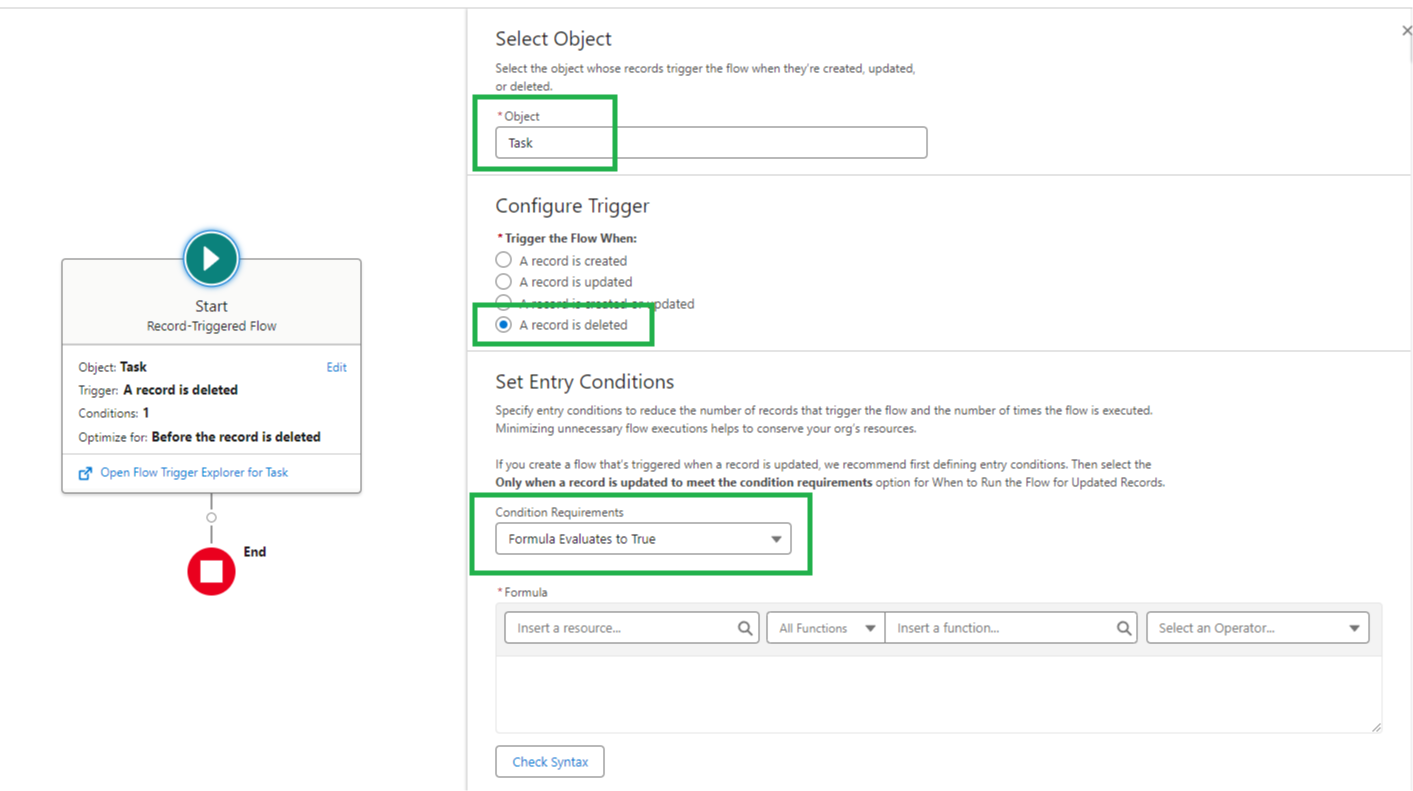
    We'll next create a Record-Triggered Flow designed to fire when a Task record is deleted.

    We'll choose that the Formula Evalutes to True in the condition requirement so the Flow only fires when our condition (which we're about to set) is true.

    And this is where the cool feature I mentioned comes into play. By using Formula Evaluates to True we can check if the current user has our custom Delete Tasks permission.

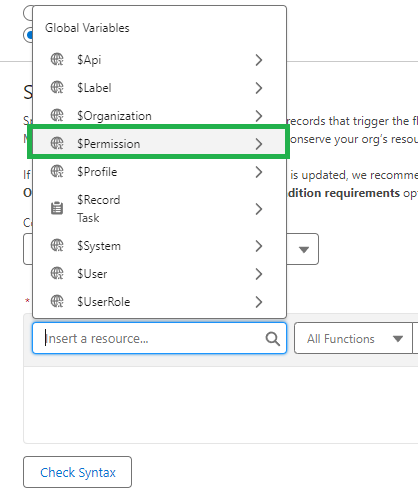
    Just click on Insert a Resource and select the Permission option from the list.

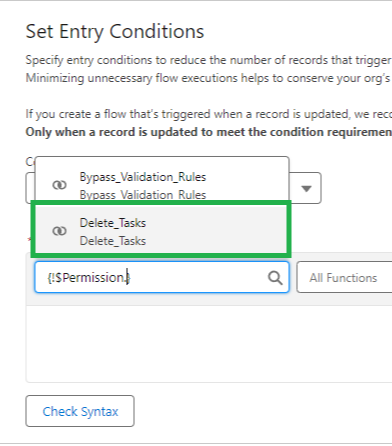
    This will show you all the Custom Permissions in the environment you're in. In this environment there are two, but we'll just select the one we need (Delete Tasks).

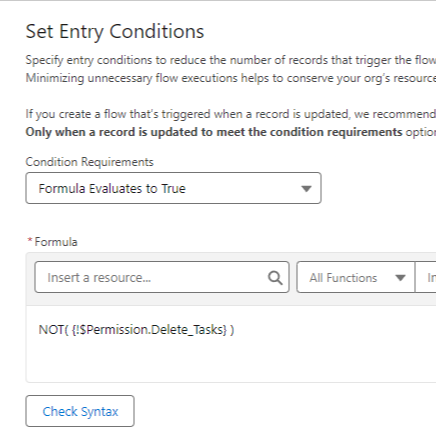
    Click once and that permission will appear in the Formula Editor.

    Wrap the formula in a NOT() statement.

    This tells Salesforce we only want the Flow to run when the current running user does not  have this permission i.e. they aren't allowed to delete tasks.

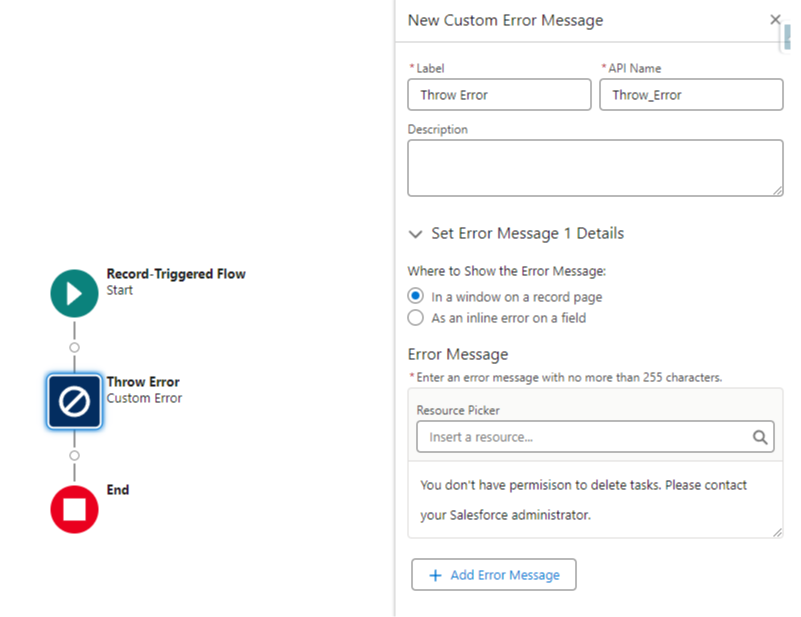
    Final step is to add the Custom Error element to the canvas and set the error message.

    With that done we can save and activate our Flow.

    With the Flow now active, it will run whenever a Task is deleted.

    If the user doesn't have the permission set, it will throw the error, otherwise nothing will happen and they can delete the task.

    And that's how I was able to separate the delete task permission from everything else.

    Hope this helps!

    Best,

    Nick
     

  • Bypass Validation Rules in Salesforce Flow

    Bypass Validation Rules in Salesforce Flow

    Happy Saturday!

    Have you ever wished you could bypass a validation rule in a Flow?

    Just while the flow is running, skip that validation rule!

    Here's a short walk through on how to do it using a custom permission and scheduled Flow paths.

    Let's pretend you and I work at Universal Containers.

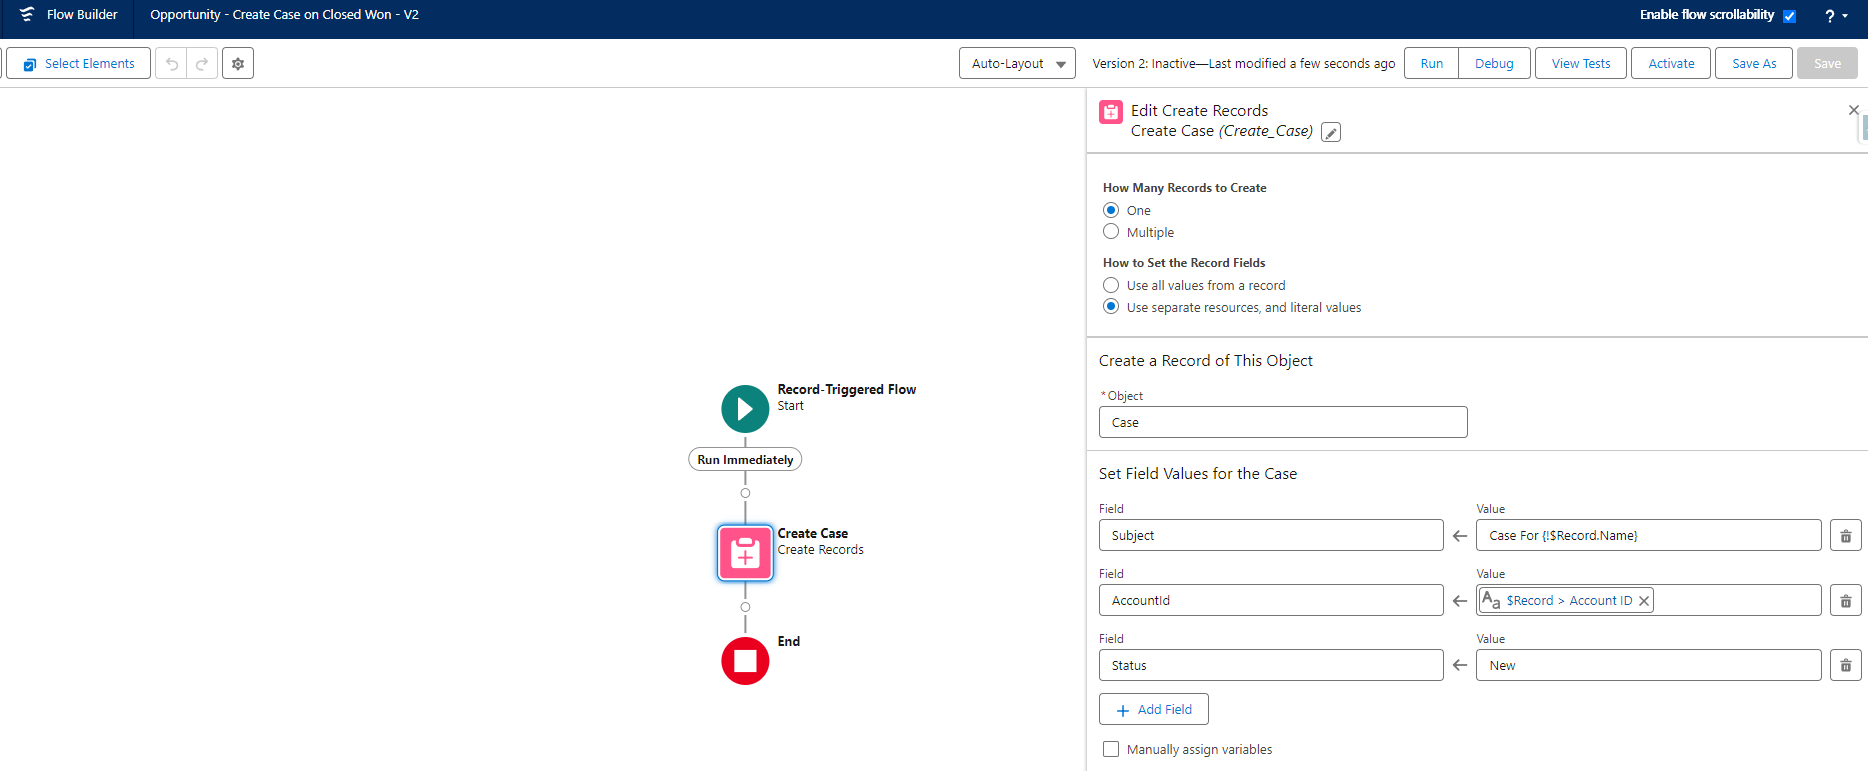
    We have a Flow that creates new cases when an Opportunity is Closed Won.

    And we want to make sure Case Validation rules never block the Flow from running.

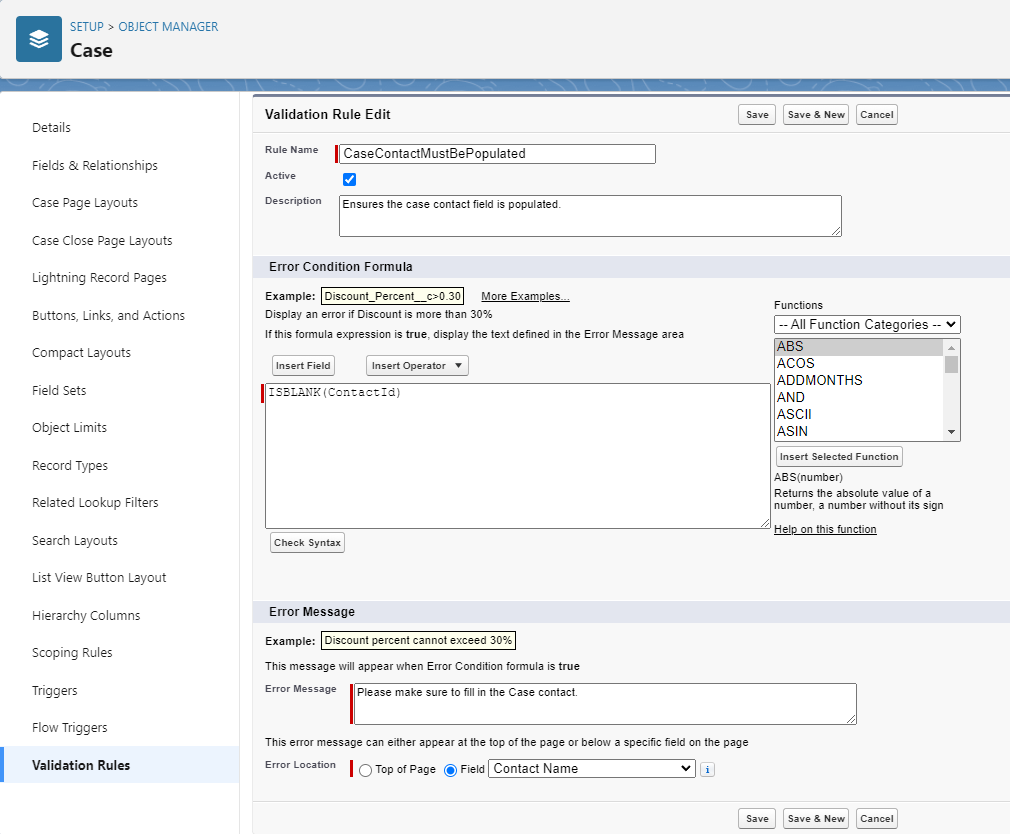
    Further, in our pretend jobs at Universal Containers, there is currently a validation rule which says the Contact field on a Case can't be empty.

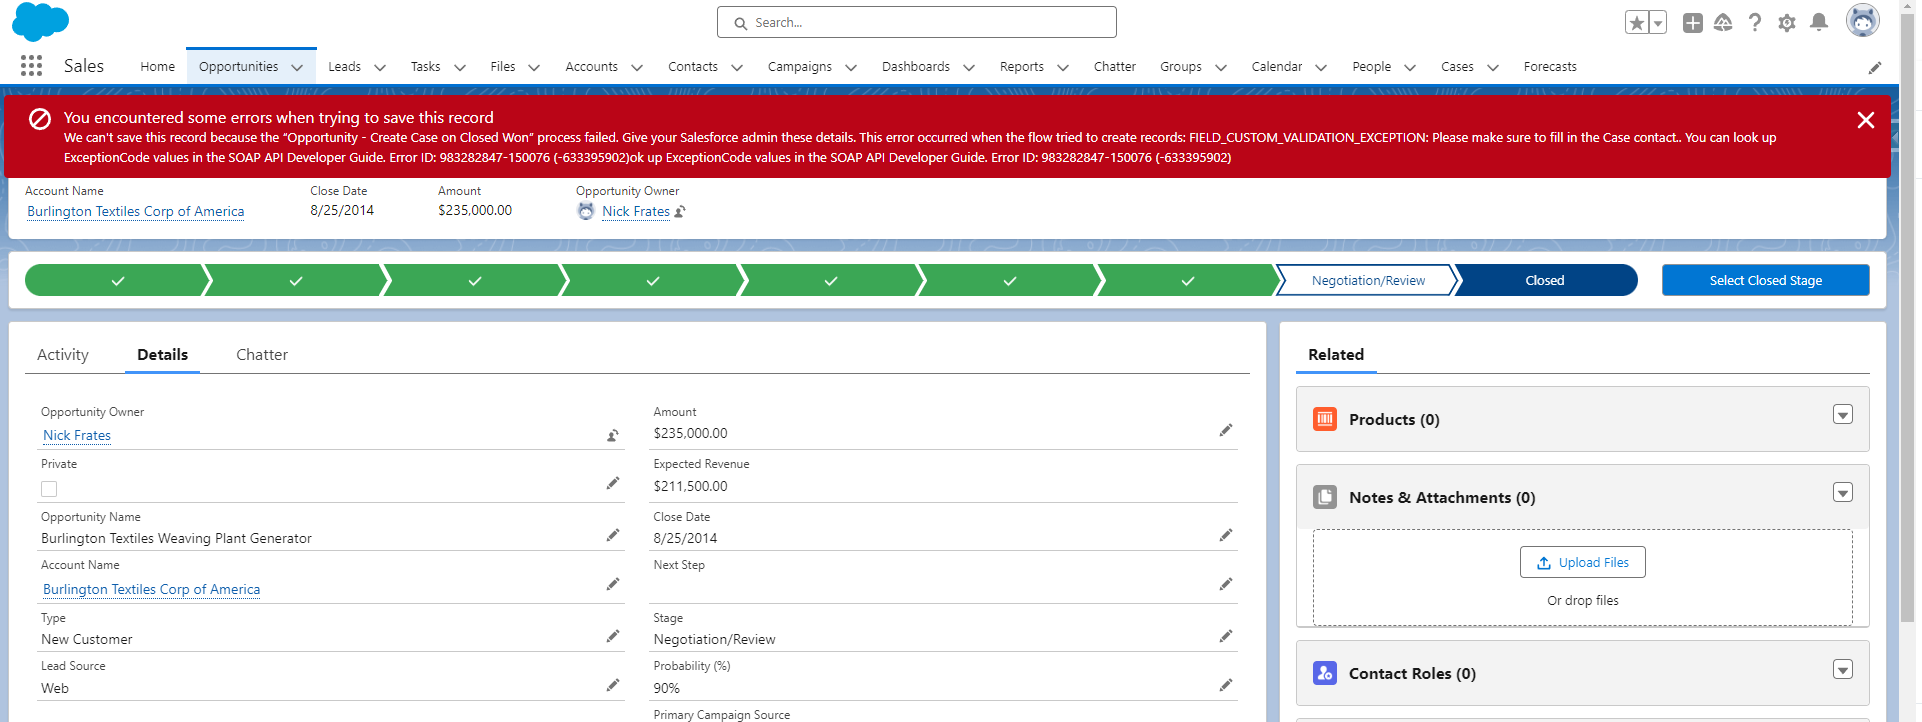
    Triggering our Flow by putting an Opportunity into Closed Won throws a big red error message (because we didn't map the Contact field in the create Case element).

    We could absolutely map the Contact field in our Flow and solve this error that way.

    But this method is for when you need to skip the rule entirely.

    To make our Flow immune to this rule we'll take the following steps.

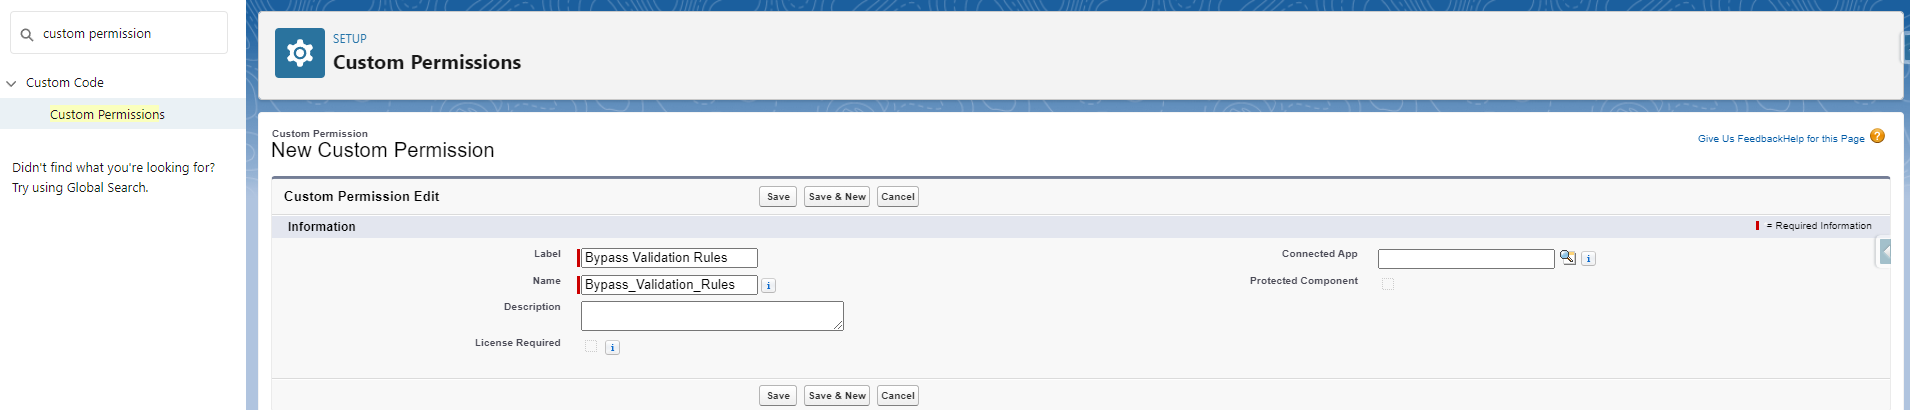
    Step 1: Create a Custom Permission

    Name it: Bypass Validation Rules

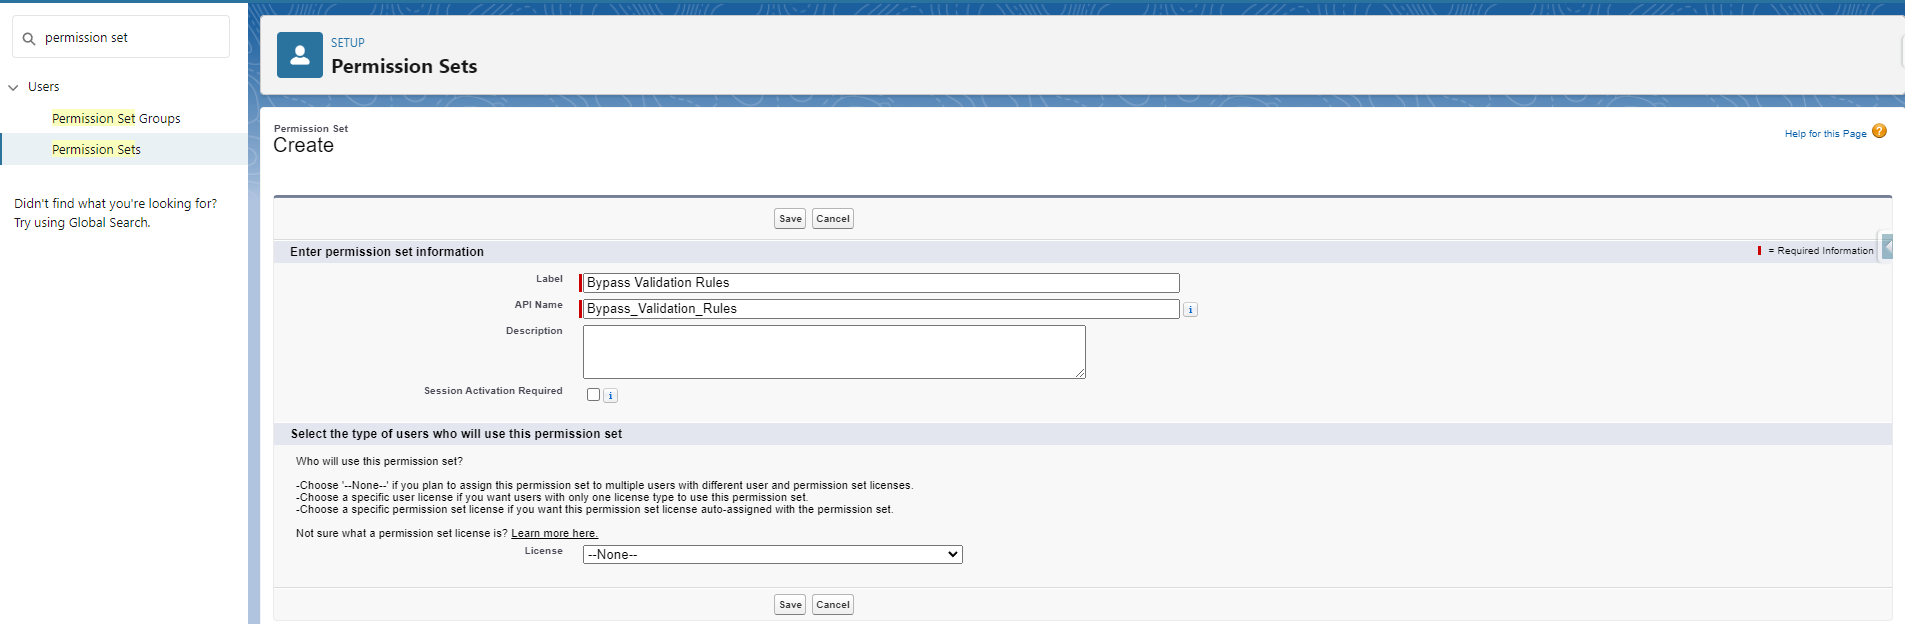
    Step 2: Create a Permission Set

    Name it the same as our Custom Permission: Bypass Validation Rules

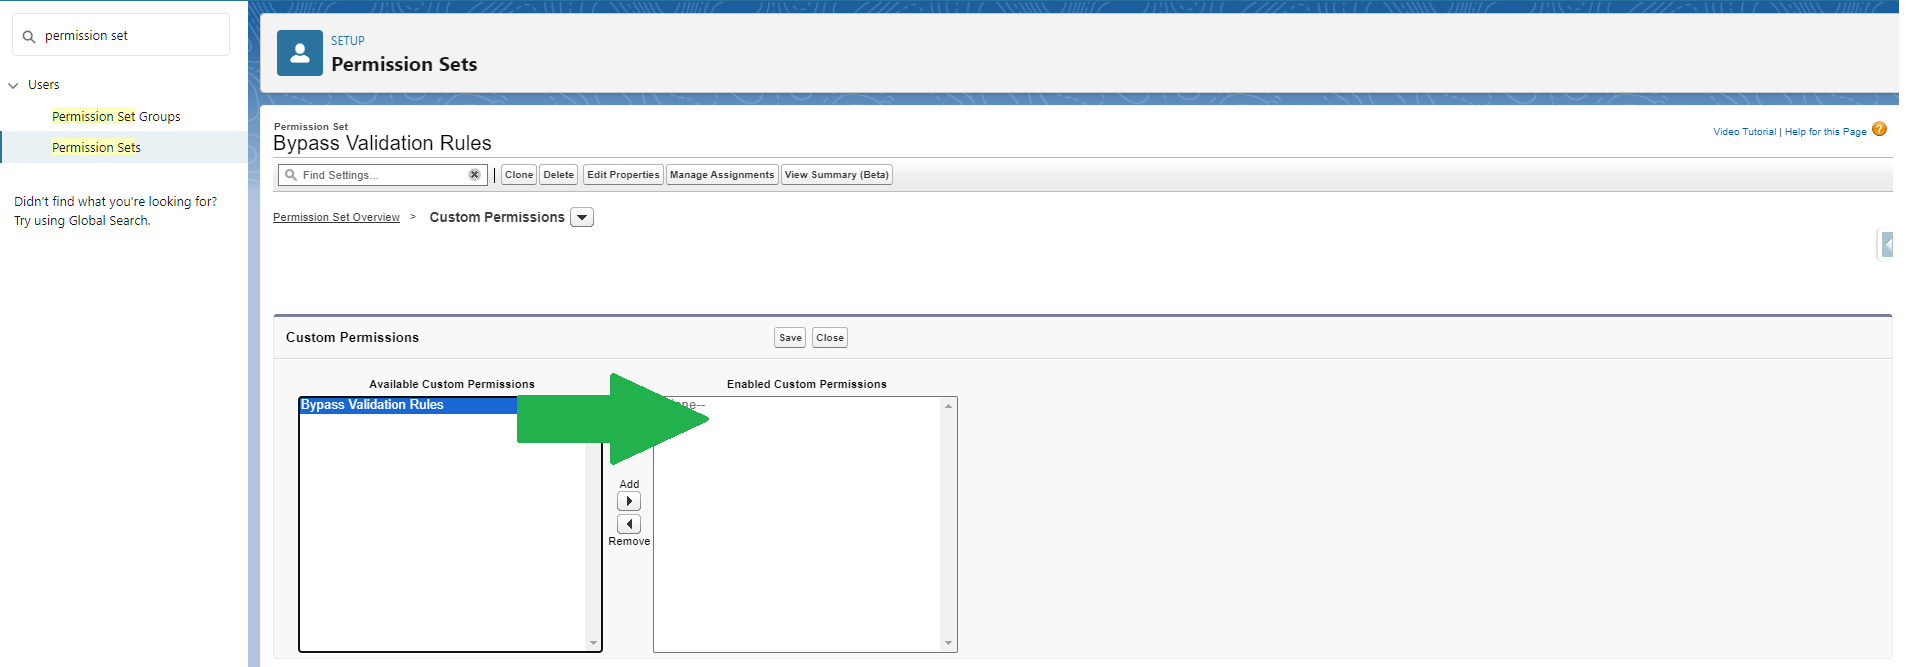
    Step 3: Add the Custom Permission to the Permission Set

    • Go to the Permission Set from the Setup menu
    • Click Custom Permissions
    • Move the Custom Permissions to the Enabled Column
    • And then press Save

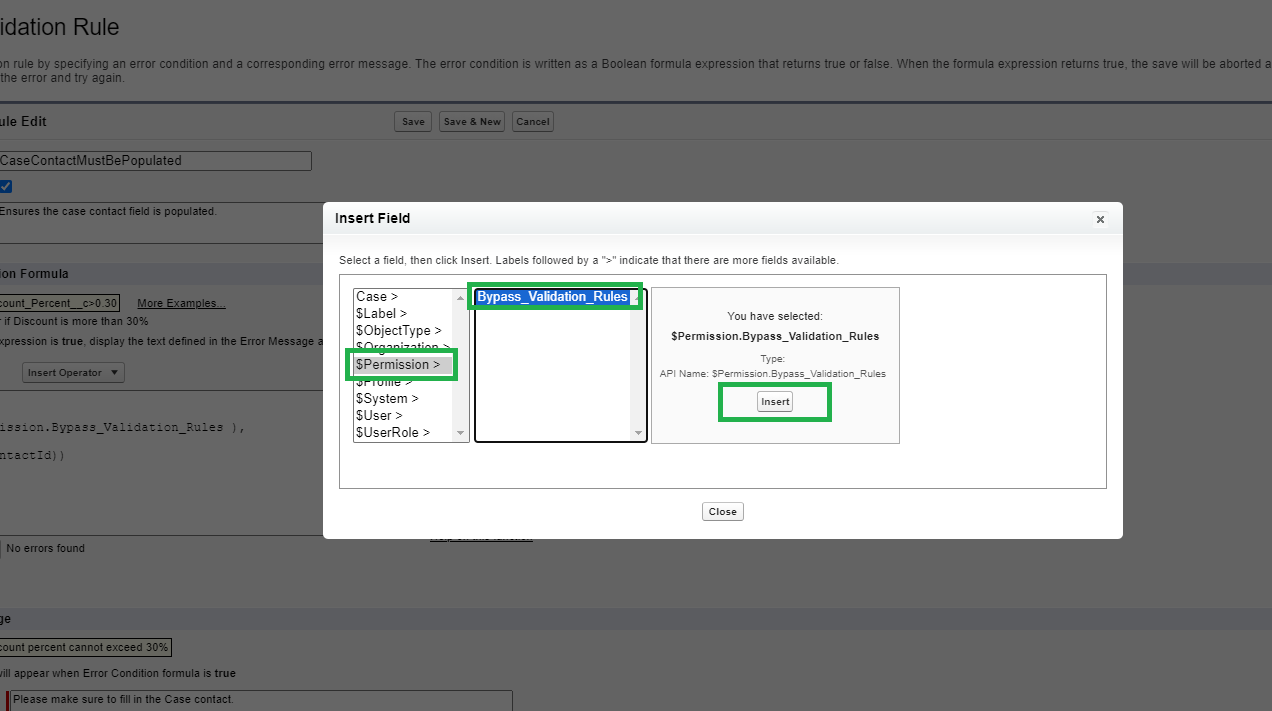
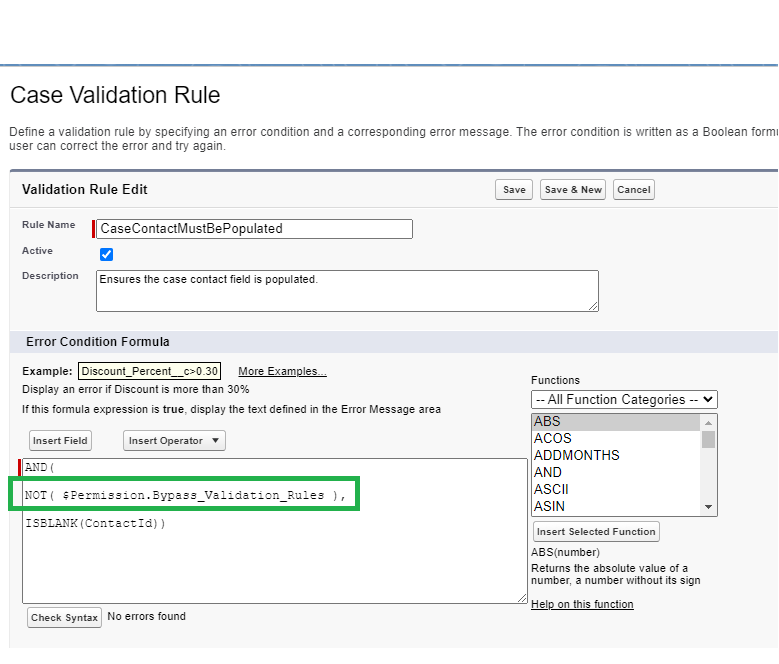
    Step 4: Exempt Users with this Permission Set from the Validation Rule

    Use the Insert Field functionality and the NOT() formula to add the exemption to the rule.

    Step 5: Update our Flow

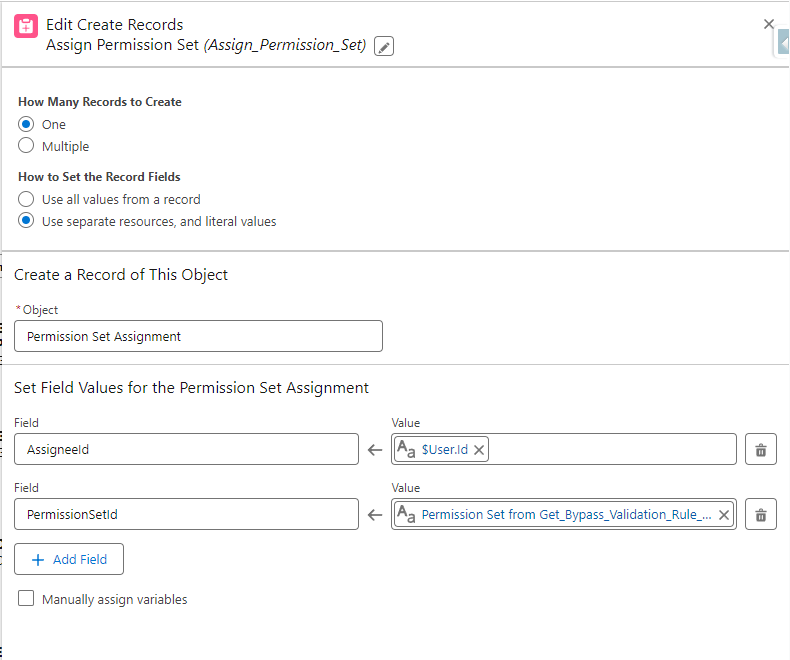
    With our Permission Set created, and our Validation Rule updated, we can use the Flow to assign our Bypass Validation Rule permission set to the current running user.

    By assigning the permission set before the Flow creates the Case, the Flow doesn't trigger the Case validation rule!

    After the Case is created, we'll want to unassign the Bypass Validation Rule from the running user so they have to follow the rule again.

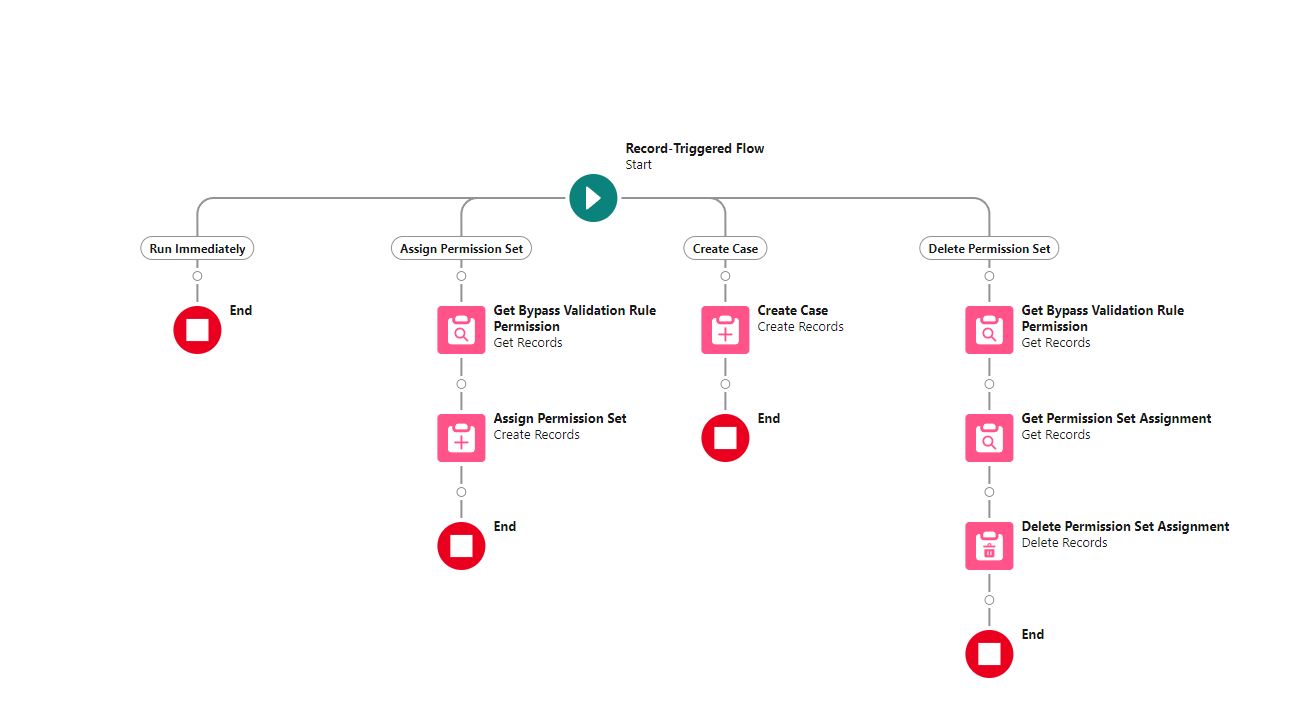
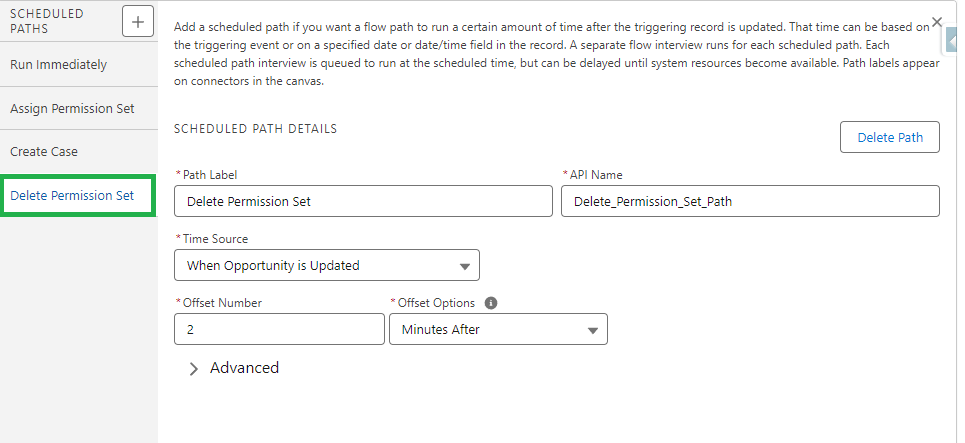
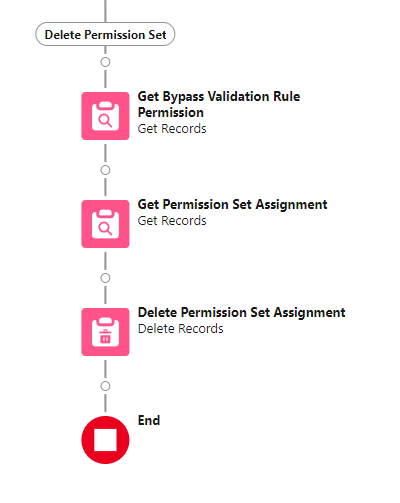
    To make all this work, we use three scheduled Flow paths.

    • The first path runs right away and Assigns the Permission
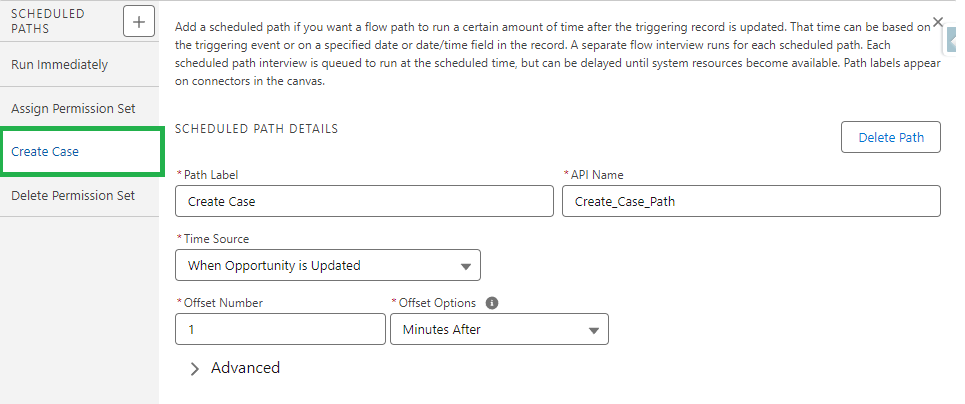
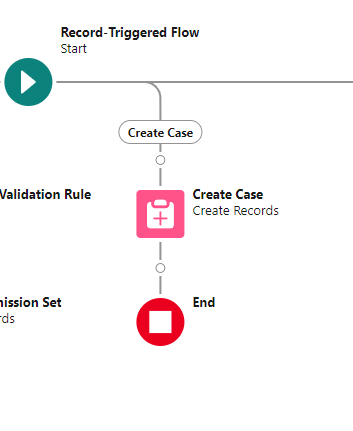
    • The second path runs 1 minute later and creates the Case
    • The third path runs 2 minutes later and Unassigns the Permission

    The reason we need three scheduled Flow paths is to avoid a MIXED_DML_OPERATION error (otherwise it would be much easier to put all these operations in a single path).

    Each scheduled path gets its own transaction, meaning it doesn't trigger the MIXED DML error.

    And there you have it, five steps to Bypass Validation Rule in your Flows :)


    Have a great weekend!


    Best,

    Nick
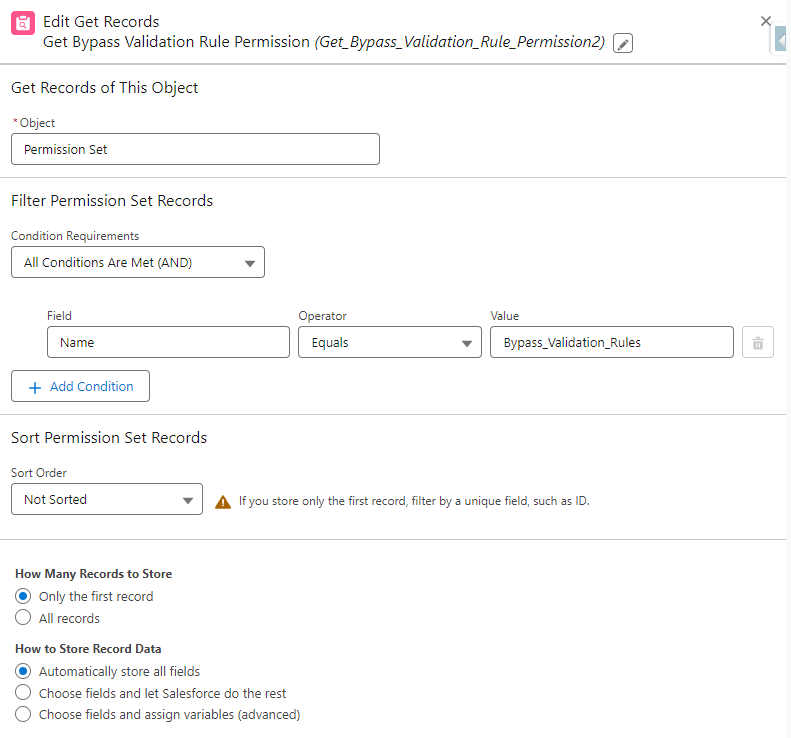
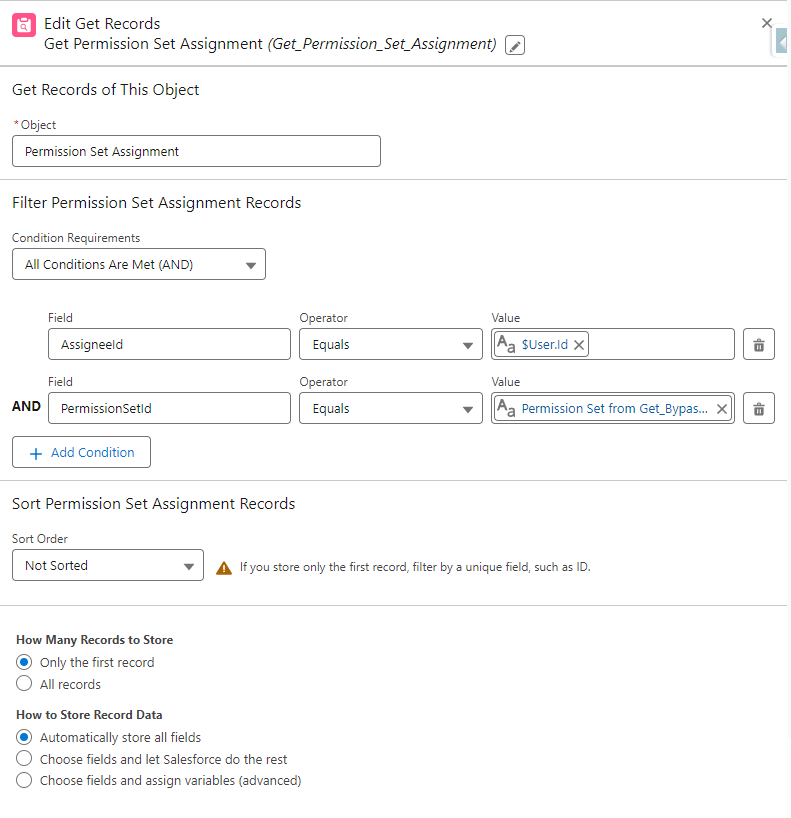
    P.S. If you're interested in the nitty gritty, I've posted screenshots of the Flow scheduled path and element configuration down below.

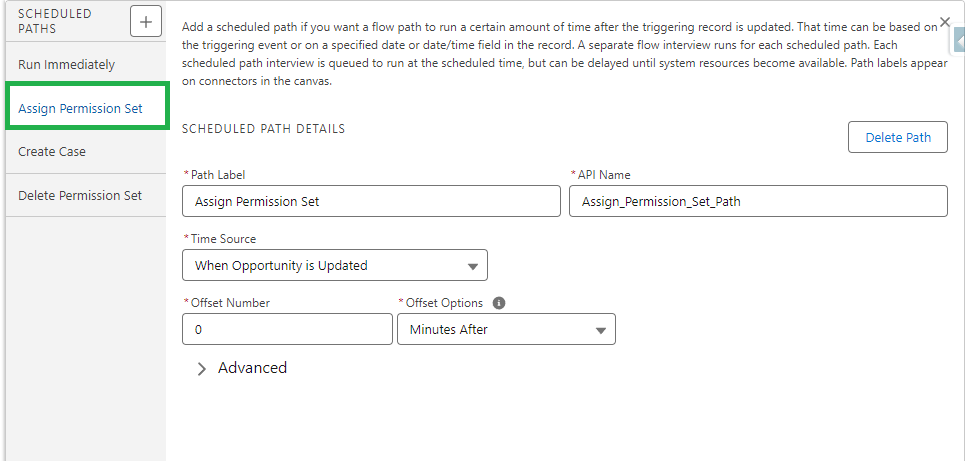
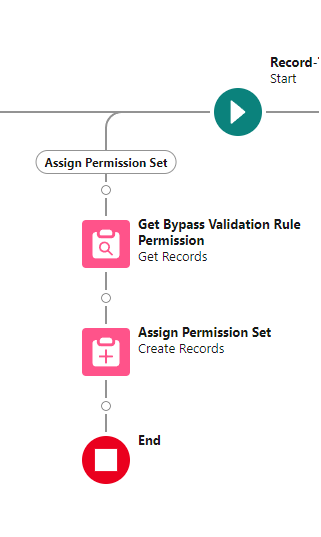
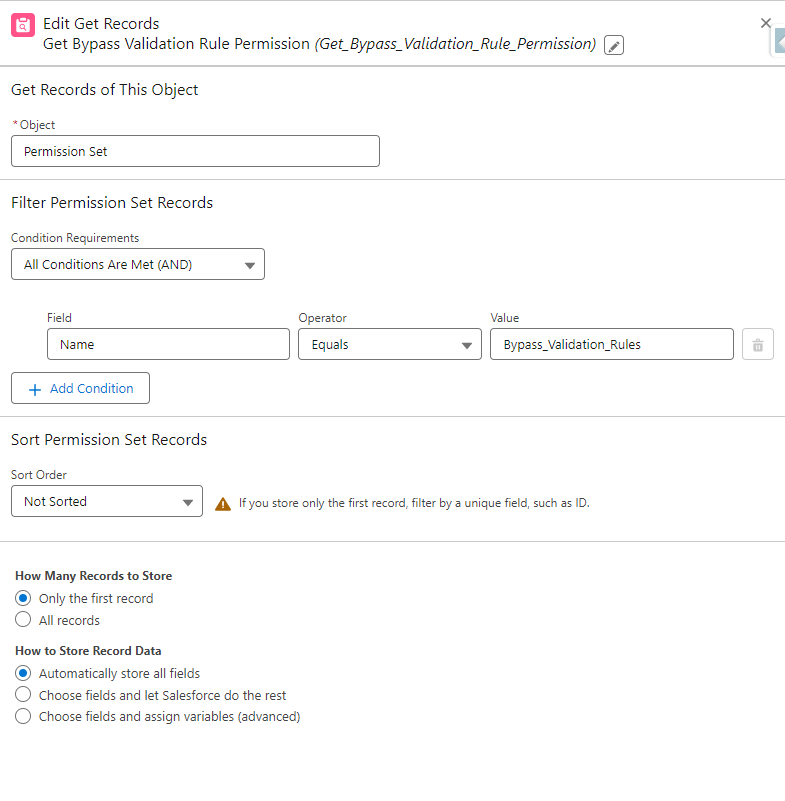
    1. Assign Permission Set Path Configuration

    a. Path Configuration


    b. Path Order on Canvas


    c. Get Bypass Validation Rule Permission Element

    d. Assign Permission Set Element


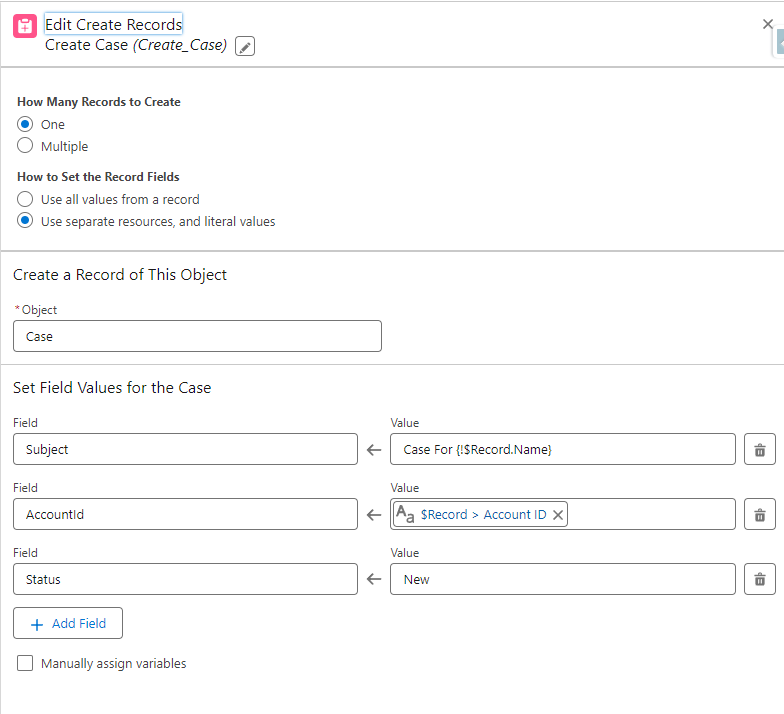
    2. Create Path Configuration

    a. Path Configuration


    b. Path Order on Canvas

    c. Create Case Element


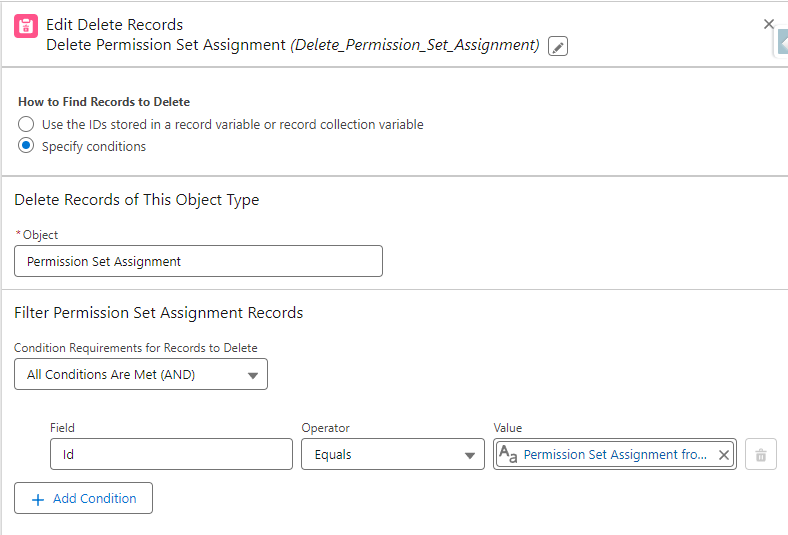
    3. Delete Permission Set Path Configuration

    a. Path Configuration


    b. Path Order on Canvas


    c. Get Bypass Validation Rule Permission Element


    d. Get Permission Set Assignment Element


    e. Delete Permission Set Assignment Element


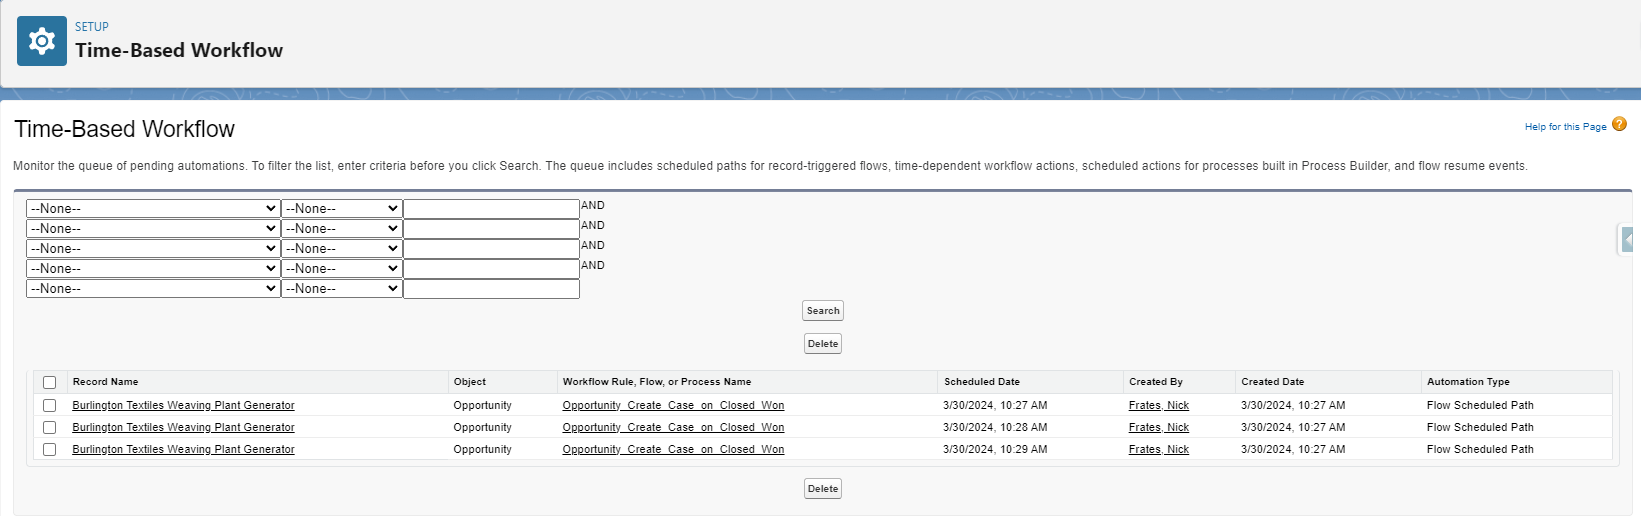
    3. When Triggered All Paths Appear in Time-Based Workflows 


  • How to Run a Flow from a List View in 8 Steps

    How to Run a Flow from a List View in 8 Steps

    This week a client of mine asked me to build a custom button on a list view in order to trigger a Flow.

    Have you ever needed something like that?

    Here are 8 steps that will show you how to trigger a Flow for every record in a list view, all from an easy to click button.

    Step 1: Identify your use case.

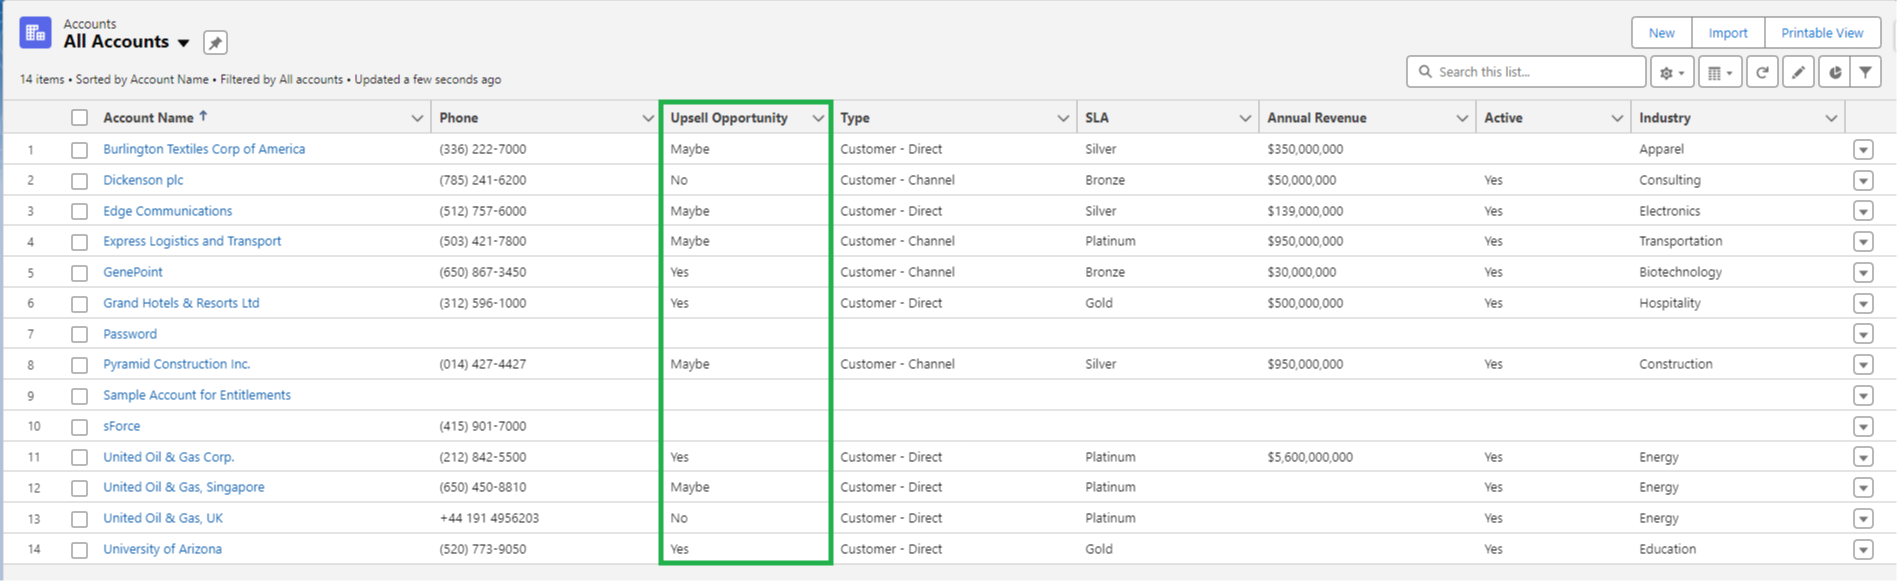
    To keep it simple, we'll pretend we need a Flow to create an Opportunity for any Account where the Upsell Opportunity field is "Maybe" or "Yes".

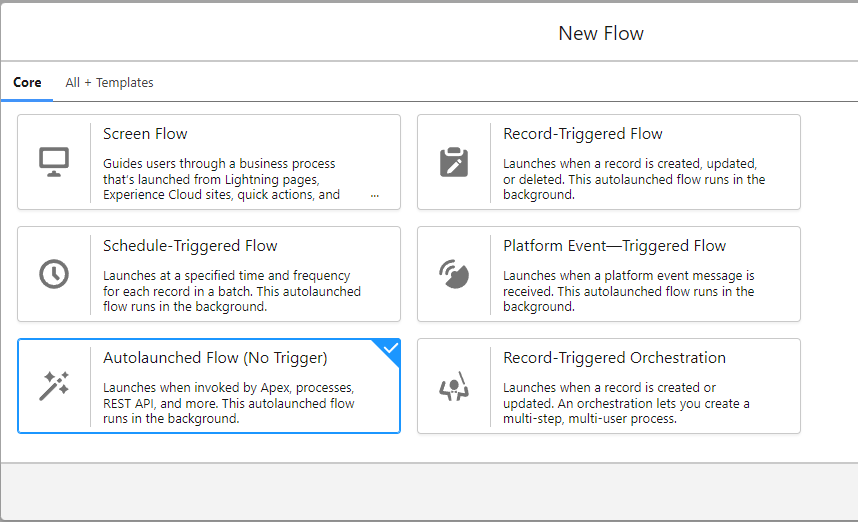
    Step 2: Choose your flow type.

    This process works for Screen Flows and Auto-Launched Flows.

    The main decision is if your use case requires showing a screen to your end users.

    In this case, it does not, so we'll choose Autolaunched Flow.

    Step 3: This is one of the most important steps.

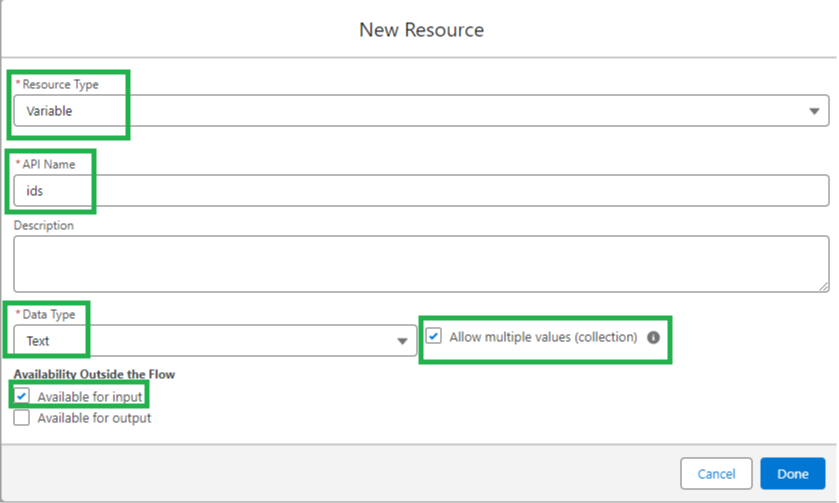
    Immediately in the Flow Builder:

    1. Create a variable
    2. Set the text data type
    3. Mark the variable as a collection
    4. Mark the variable as available for input
    5. Name it exactly "ids"

    Note: it must be exactly "ids"

    The variable name is case sensitive.

    Salesforce "knows" to pass the record Ids of all the records from your list view into this variable when you click the button.

    If you do this step wrong, the button won't work!

    Step 4: Build out your flow. Then save and activate it.

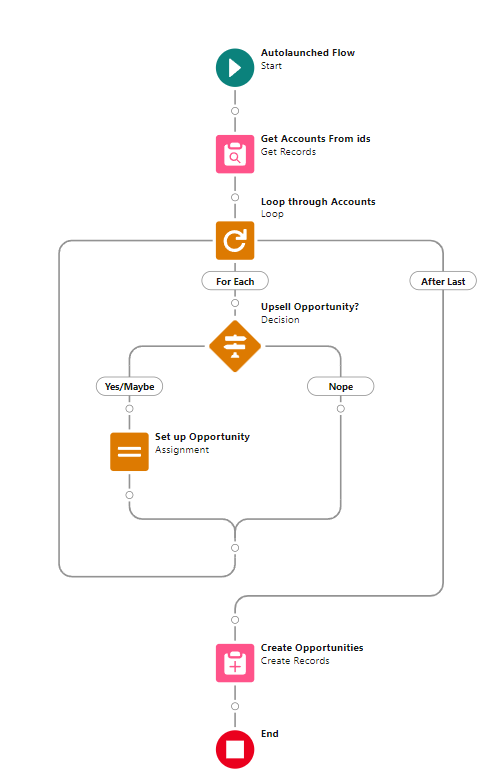
    I'll skip the nitty gritty here but in our example, the Flow is designed to create an Opportunity for each Account we select, based on the Upsell Opportunity field.

    The critical thing to know when building your flow is that is must be bulkified.

    Your flow will run on every record you select in your list view.

    Therefore, it must be able to successfully run for dozens (and maybe hundreds) of records at once.

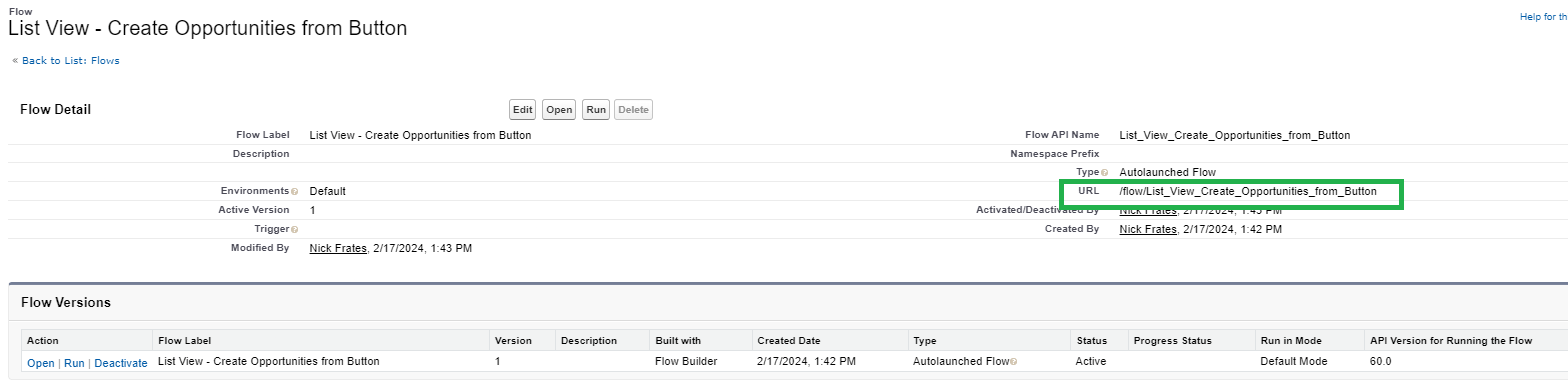
    Step 5: Find the Flow URL.

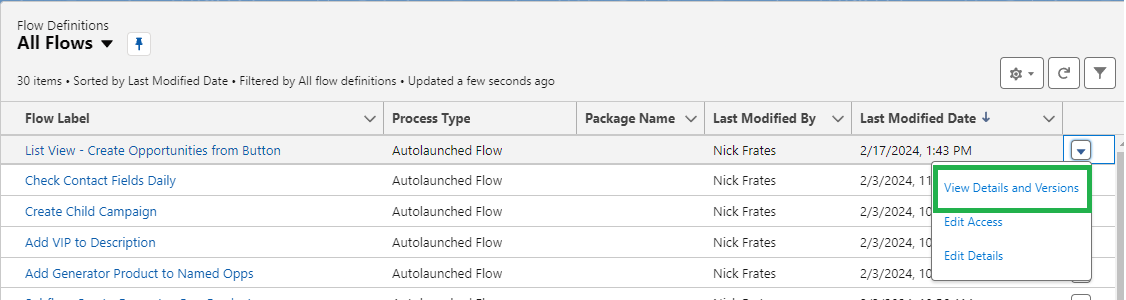
    Exit the Flow you just built and go to the Flow Builder.

    Find the Flow in the list and click the dropdown on the far right. Select "View Details and Versions"

    From the Details page find the URL field.

    Copy the value in that field to your clip board or into a note document.

    You'll need it in Step 6.

    Step 6: Build your button.

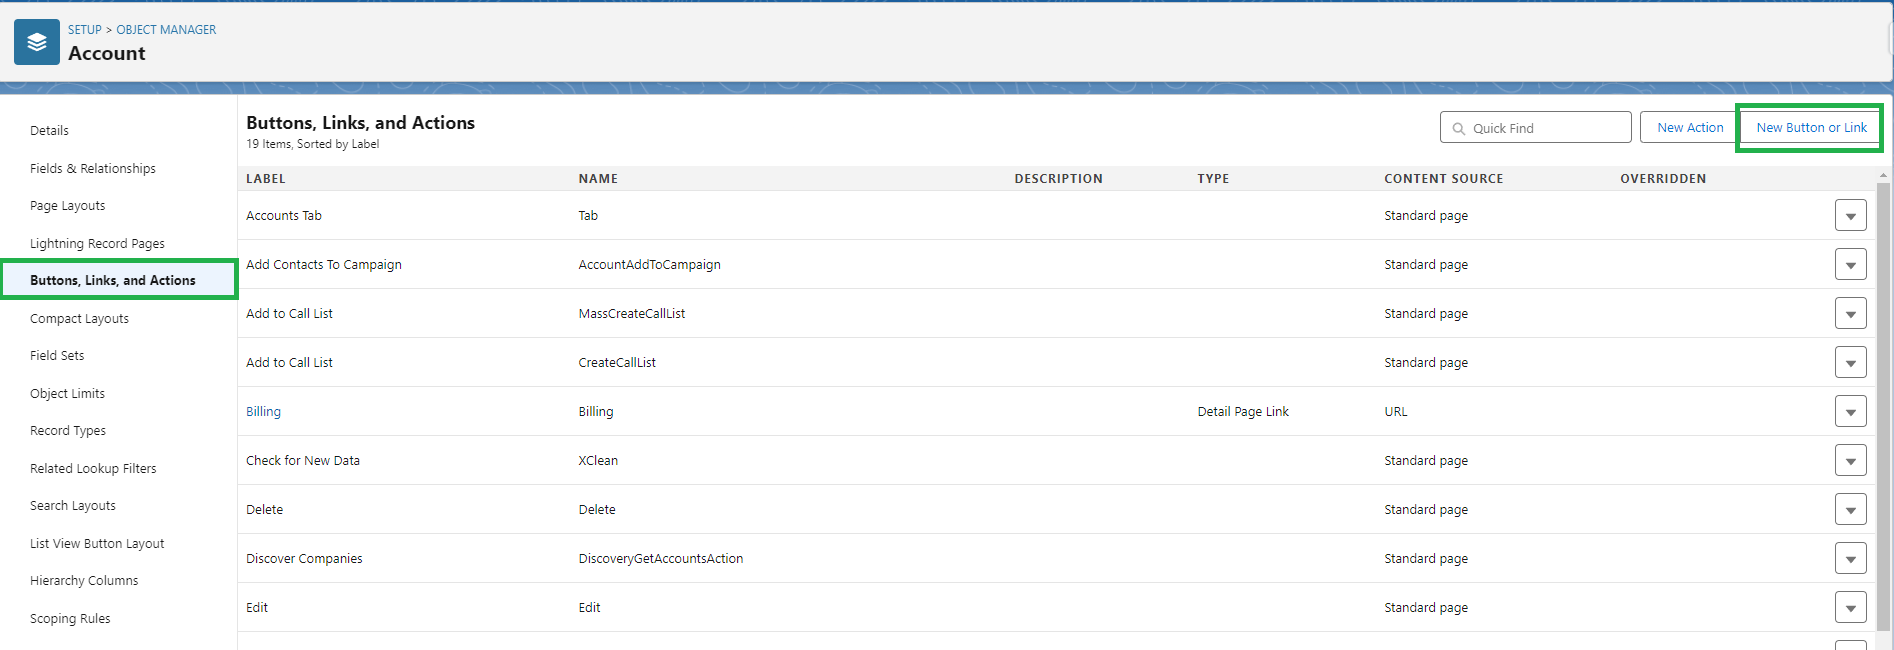
    Navigate to the object in the object manager with the list view you want the button to be on.

    In our example, we want our button to be on the Account list view, so we'll go to Accounts in the object manager.

    Click Buttons, Links, and Actions on the left.

    Then click New Button or Link on the right. 

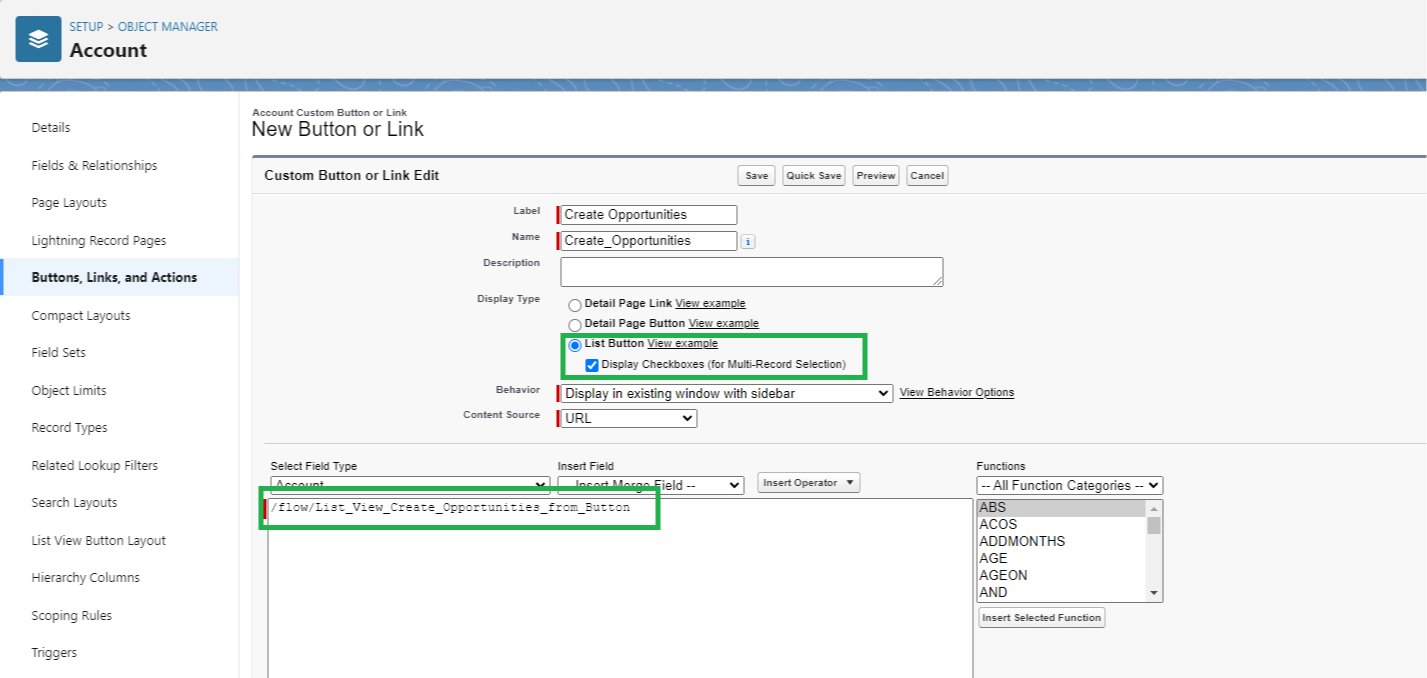
    Name your button.

    Select List Button for the Display Type.

    And then paste the URL you copied from Step 5 into the field below.

    Then press Save.

    Step 7: Add the button to the list view.

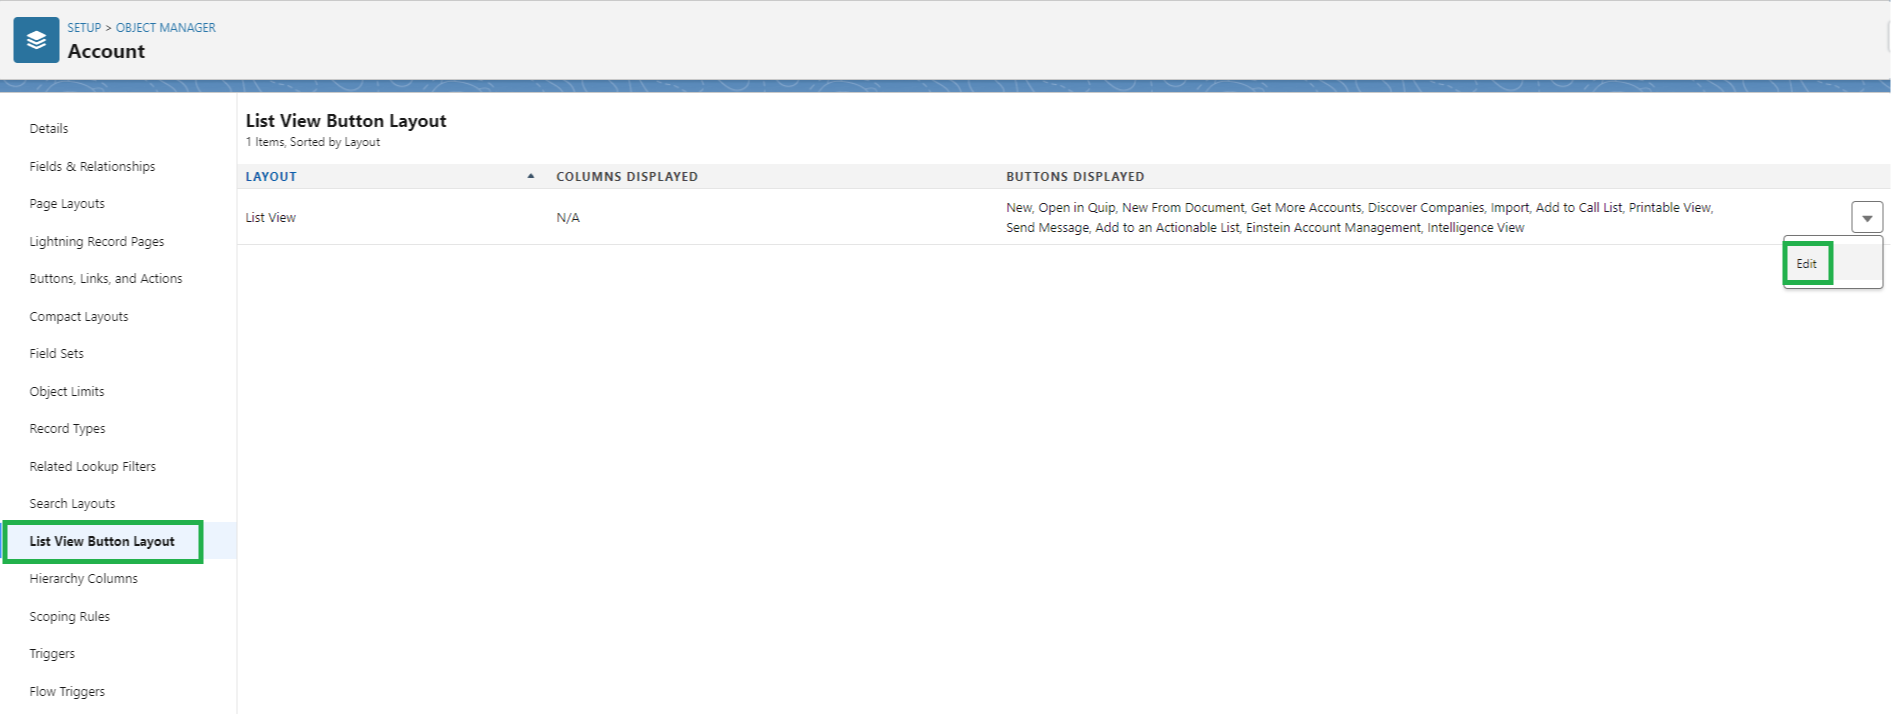
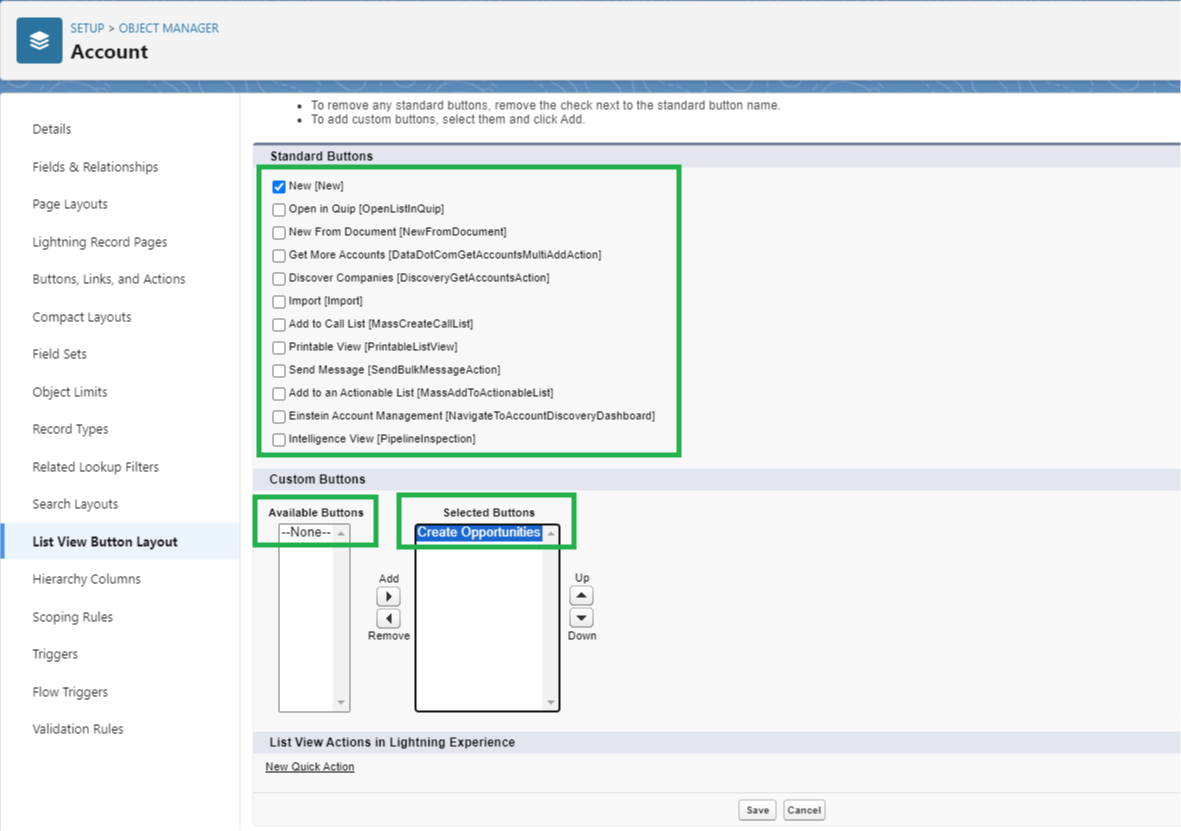
    Click List View Button Layout.

    Click edit.

    From here, uncheck the boxes to remove Standard buttons you don't want.

    Then move the button you created in Step 6 from the Available Buttons column to the Selected Buttons column.

    Press Save.

    Whew! You're done.

    Let's go check it out on the list view.

    Step 8: Test everything out.

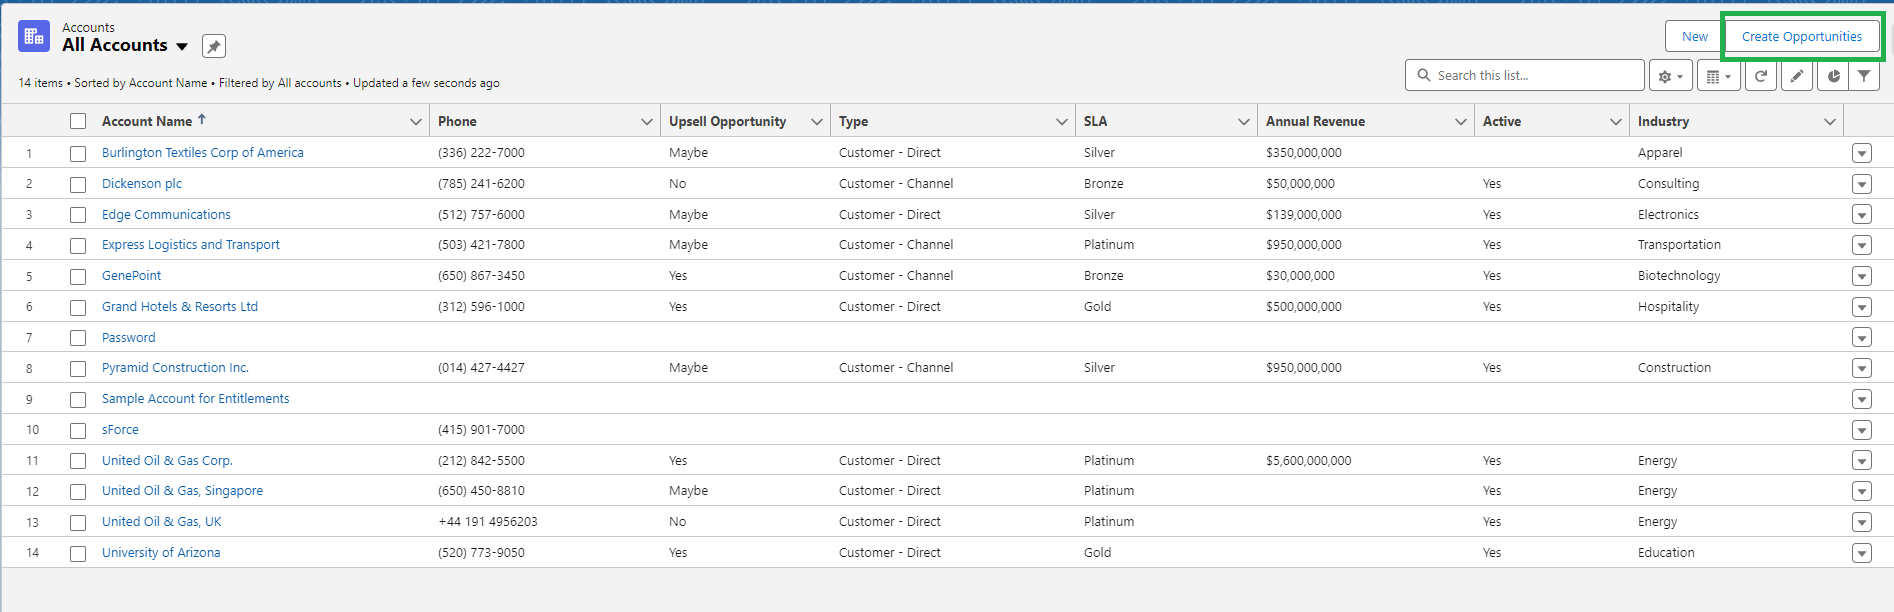
    Refresh your List View page and confirm your button is visible.

    Select a few records from the list you want to run the Flow for.

    Once you check the box next to the records, click your button.

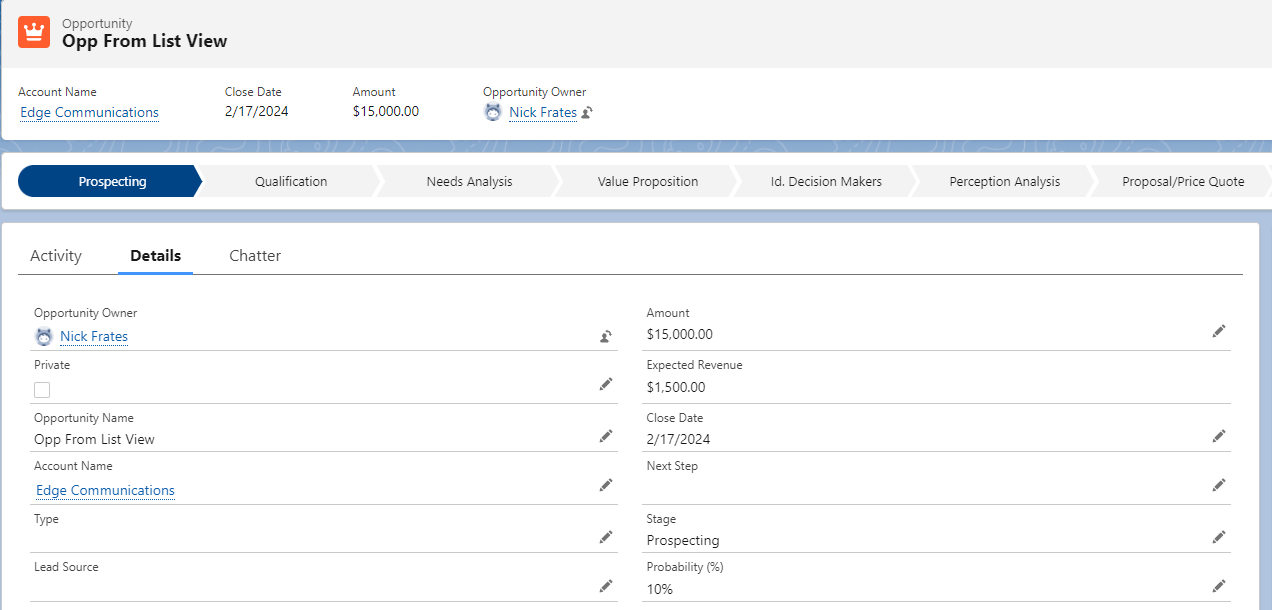
    Confirm the Flow runs as expected by spot checking some records.

    In this case the new Opportunities.

    Looks great! Everything came out as expected!

    I followed these steps for my client this week and was able to get everything working.

    Thought it might be helpful at some point for you too!


    Best,

    Nick


  • How to Assign a Queue as Record Owner in Salesforce Flow

    How to Assign a Queue as Record Owner in Salesforce Flow

    In this Salesforce Flow Tutorial we'll cover how to assign a queue as a record owner in Salesforce Flow. Check out the video below: